Progressive Web App 會是未來趨勢嗎?
距離今年 Google I/O 2016 轉眼間也過了兩個多月,議程中提及的 Progressive Web App (PWA) 似乎討論不多,我當時隨便掃過 Google Developers 上的資料後的念頭是:“怎麼有點像當年 Firefox OS 上跑 web app的長相?”
其實我覺得是蠻雷同的,差別在於 Progressive Web App 是想能夠直接利用目前的 Browser 來支援其運作。實際上 Mozilla 一樣有在推動相關標準的建立。
這也是我初次接觸 Progressive Web App,因此就照著 Google Developers 上的教學走一遍,並紀錄分享在此。
何謂 Progressive Web App (PWA)
先講結論,Progressive Web App 是希望能夠讓 Web application 盡可能的在各種環境(網路環境、手機作業系統等)下都能順暢且不減功能性的運作,並讓你的 Web App 可以:
- 直接被使用者安裝到桌面
- offline 使用
- 擁有推播功能
- 開啟時看不到 URL Bar(類 Native app 的使用經驗)
- 開啟時有 Splash Screen
而要做到這些事情,整個 PWA 的設計要點就會包含以下特性:
Progressive - 漸進增強:在越完善的環境下,能執行更加完整的服務,若環境不許可,能夠優雅降級,運行最基本的功能。
Responsive - 響應式介面:能夠在各種螢幕尺寸下顯示、能夠因應多種輸入方式與設備回饋(震動、音頻等)。
App-like - 類原生程式的操作模式與使用者介面:採用原生平台(Native App)的 Style 與資料更新方式(利用 service worker 存取快取資源)。
Fresh - 持續更新:使用 Service worker API 來自動更新應用程式(無需透過 App store, Google Play 等)。
Safe - 應全面採用 HTTPS 提供最基本的安全防護。
Discoverable - 透過設置 manifest 檔案,一樣能進行 SEO 優化,讓搜尋引擎找得到你的 APP。
Re-engageable - 透過推播,能主動與使用者互動。
Installable - 可安裝:透過 Add To Home 等方式,將 Web App 放在手機桌面,並且能在應用程式中單獨列出與切換,就像一般的 App 一樣,但完全不用透過應用程式商店下載。
Linkable - 透過 URL 可以隨時分享你的 App。
上面是官網所列出的,而紅色是我認為較為重點的特徵,而在這些重點特徵下,最大要點就是 Service worker。有了 Service worker 的幫助,你可以實作出離線可用的 Web App,讓 User 操作起來有更佳的使用體驗。
Service Worker
Service worker 是一個運行在瀏覽器背後的腳本,有其自己的生命週期,並獨立於網頁頁面。
其特性如下:
Javascript worker,無法直接操作頁面 DOM,但可透過
postMessage與頁面溝通,讓該頁面自行操作 DOM。Service worker 可以讓你截取並掌控頁面發出的 network request。(這點很重要!要記住!!)
當 Service worker 不需要被使用時,會進入 Terminated 生命週期,等待下一次的需求進來。因此你在 onfetch 或是 onmessage 的 event handler 中若想要儲存全域變數,必須使用 IndexedDB API 來輔助儲存。
使用 Promise (這對一般開發者來說應該已經不算難事)
待會進行 PWA 實作的時候,我們就會運用到 service worker,透過 intercept 以及 handle network requests 來幫忙處理 Cache 的議題。
今天重點擺在 PWA,Service Worker 的相關介紹可以看這裡:
source: html5rocks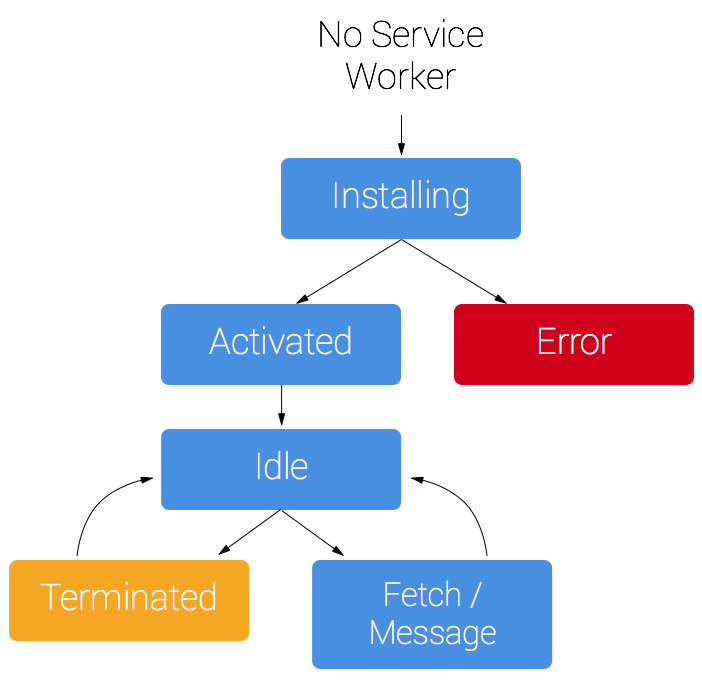
看太多文字會想睡覺,所以開始動手做我們的第一個 Progressive Web App 吧!
Progressive Web App
為求快速,我們跟著 Google developers 上的範例程式走一遍,才能專注在 PWA 的部分,不用去管其他細節。code 可以在此下載 google developers pwa example,後續步驟會需要這份 code 來做對應比較方便理解。
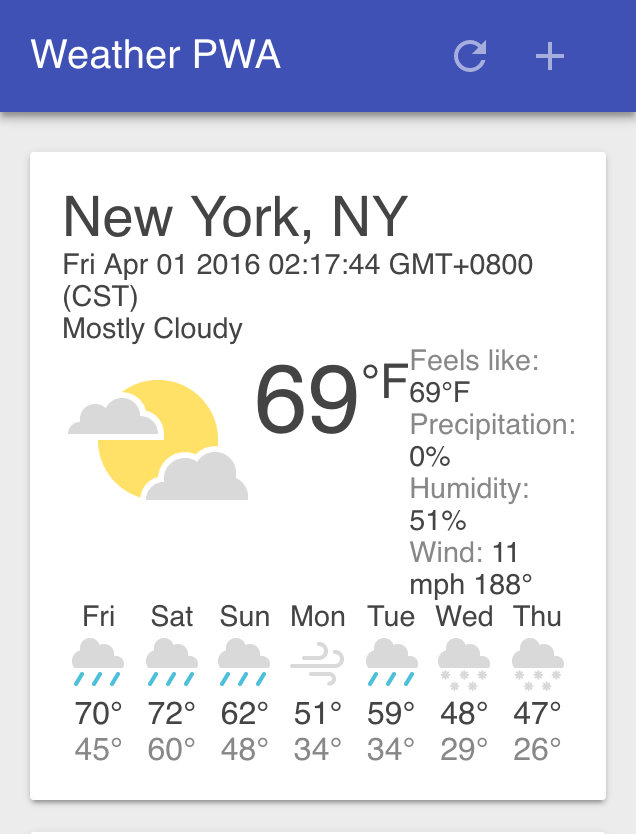
範例是一個天氣卡,可以顯示所選區域的天氣狀況,大致上會長這樣:
App Shell Architecture
當你用瀏覽器打開一個網頁時,通常都需要等該頁面載完需要的 javascript, css 等等檔案後,你才能看到一個完整的頁面,在 SPA 當道的現今更是如此(姑且先不談 server-side render)
但還記得先前提過,Progressive Web App 的目標是想要能夠 讓 Web application 盡可能的在各種環境(網路環境、手機作業系統等)下都能順暢且不減功能性的運作。
因此 PWA 提出了一個 App Shell Architecture
App shell architecture 將應用程式的基礎設施(infrastructure)、UI 與資料做分離,並利用 service worker 將 infra 與 UI 做 Cache,如此一來,當你重複打開 Web App 時,需要遠端載入的就只剩下資料,因為其他部分都已經先快取在本地端了(也可以把部分資料先快取起來)。
由上述說明應該不難看出 app shell 的設計會非常重要,他決定了你的 User 進到你的 App 後的第一印象。所以在設計 App shell architecture 時,有幾個要點必須考量清楚:
當 Web App 開啟時,哪些東西需要立即呈現在螢幕上?
有哪些是重要的 UI components?
此 app shell 是否需要 styles, javascript 等等資源?
以今天的範例來說,我們會預期一開啟 App 時,要能馬上看到最上方的 Header 以及中間至少一張天氣預測卡,因此這兩個元件就會是我們必須設計進 App shell architecture 的 component。
稍稍整理一下,我們的 App shell 將會擁有:
顯示 App 名稱、更新與新增按鈕的 Header Bar
Header 下方放置天氣卡的 Container
天氣卡模板
加入地區天氣時的對話筐
載入狀態的 loader
App shell architecture implementation
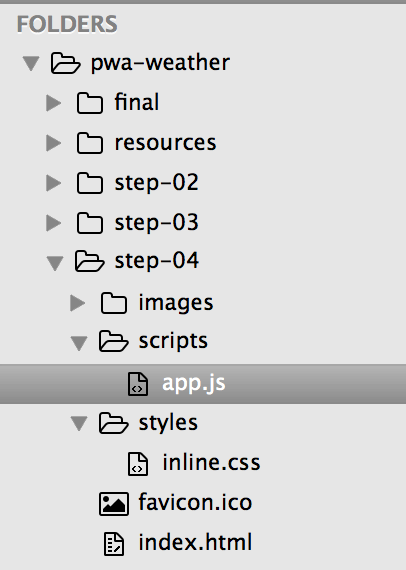
根據上方列出的需求,身為 web developer 一定很快就會把 HTML、CSS 刻好,甚至將可能需要的 JS 都先準備好,但實際上 Progressive web app 的重點其實在於如何將元件與資料做 cache ,以及 app-like 的顯示模式,因此我們跳過這些跟基礎 web 開發相關的步驟,直接到剛剛下載的範例檔案中,打開 step-04 資料夾,裡面就有了最 default 的元件 layout(index.html, inline.cs),以及資料 fetch 相關的 javascript 檔案(app.js):
[!NOTICE] 需要將程式碼內的一些相關路徑修改一下才能正常運作喔!
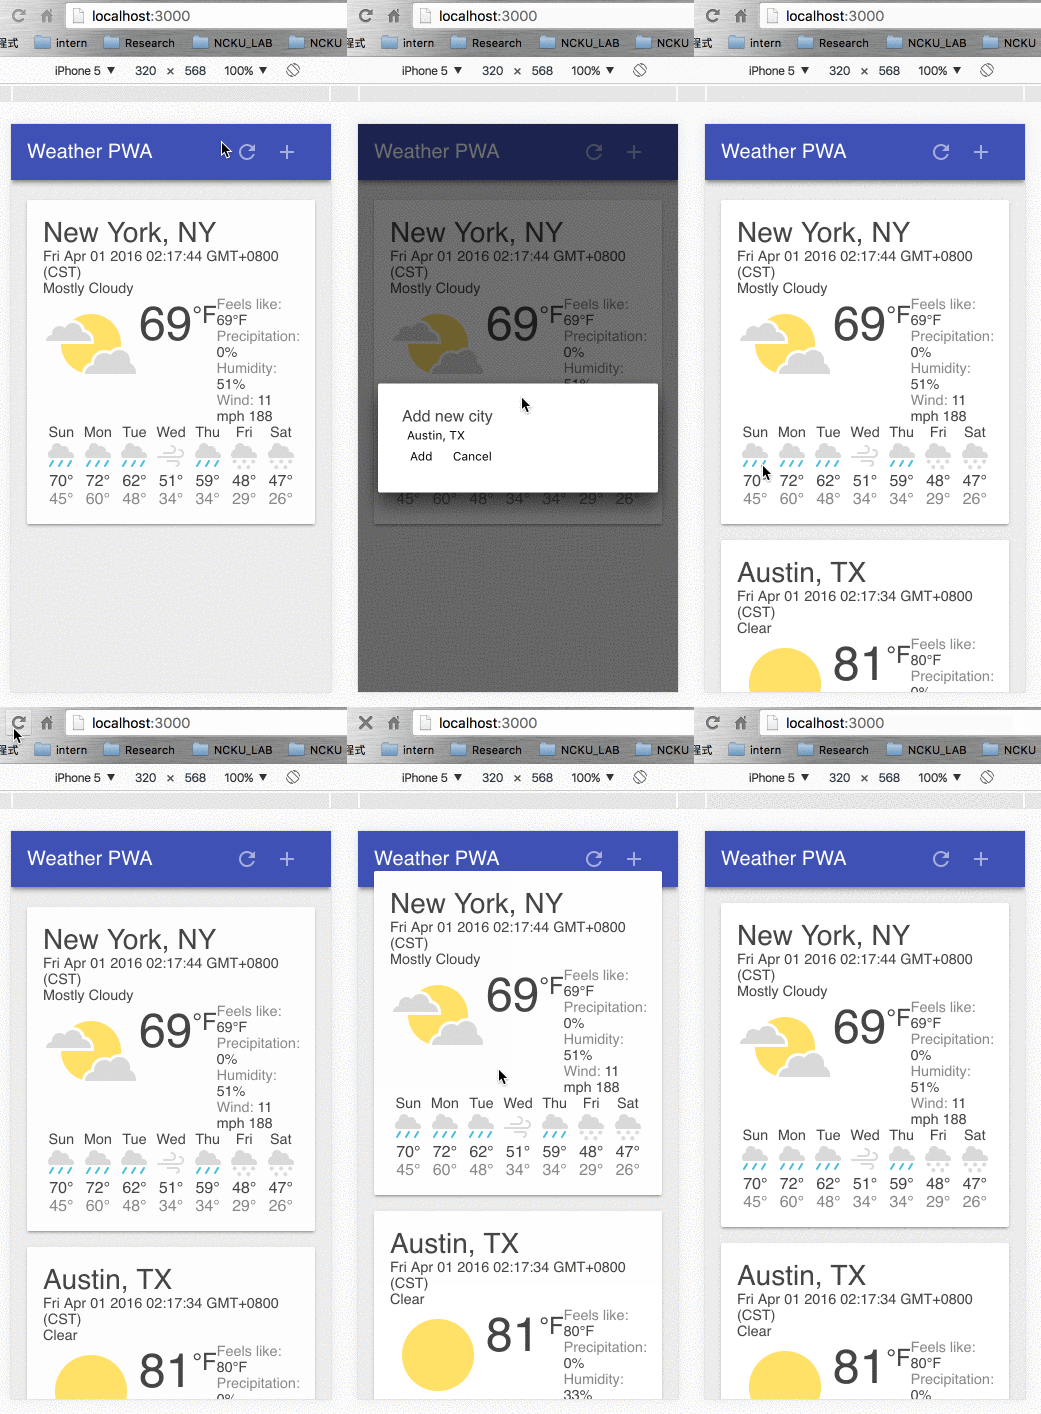
開啟以後正常會看到如下畫面:
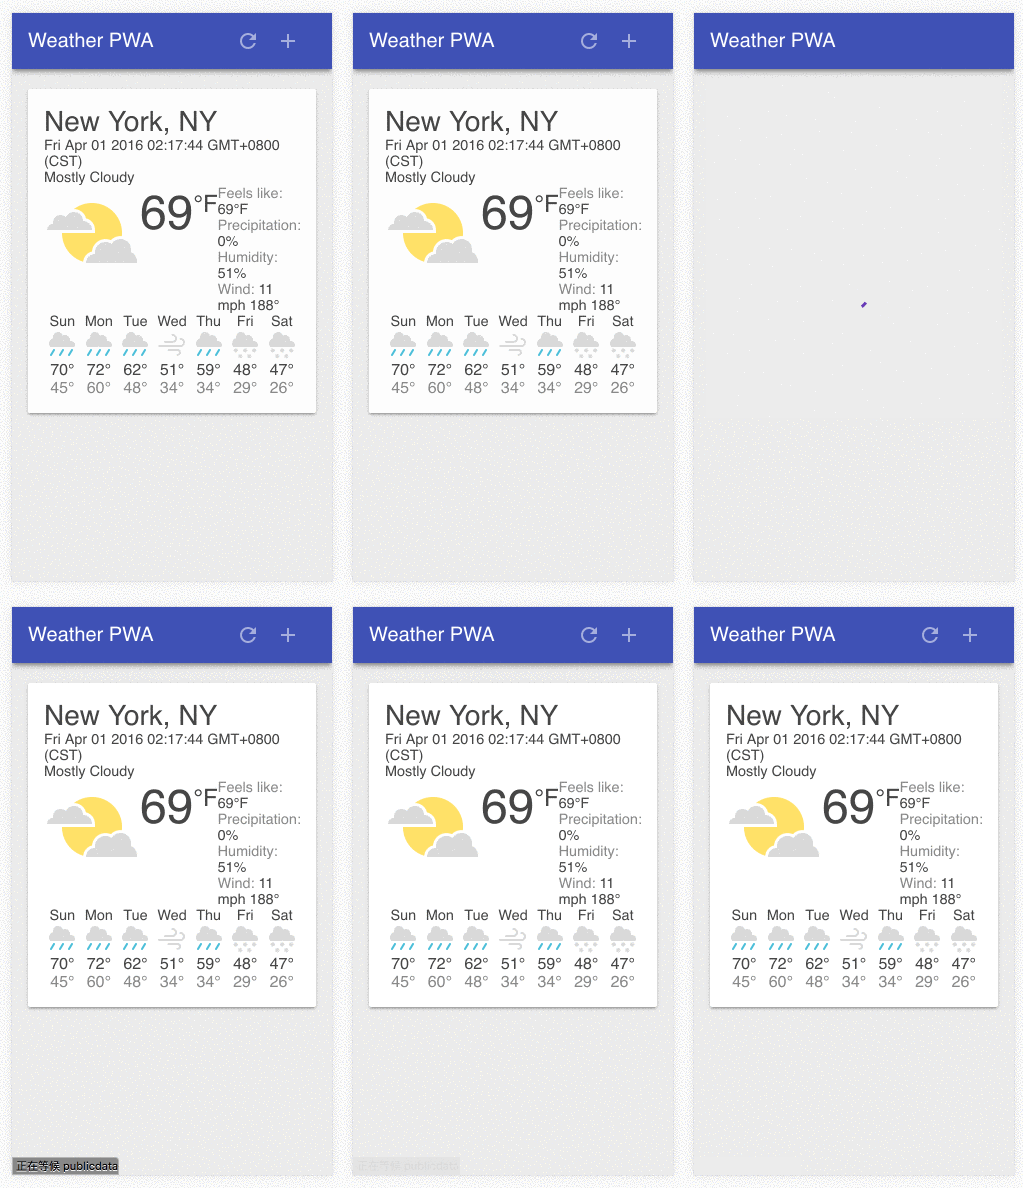
會先閃過 loading 圈圈,接著利用 initialWeatherForecast 做第一次資料繪製,這邊是先寫死一個假資料,但實務上應該要根據 user 當下 ip location 去抓取資料並更新。
但不管是假資料與否,重點在於,當處理完第一次資料 fetch 後,要能夠 cache 起來,才能應付 slow connection 或是 offline 的狀況。也就是待會 service-worker 要負責的事情。
此外,此 Wep app的功能中,要讓 user 能夠選擇想要的區域,我們總不能要 user 每次進來都重選,因此要能儲存這部分資訊,實務上可以用 IndexDB 來儲存,Google 推薦的 lib 為 idb,而這邊我們簡單用 LocalStorage API 來處理即可。
相關設定在 app.js 當中:
1 | // Iterate all of the cards and attempt to get the latest forecast data |
如此一來,你可以新增想要的城市,在當你重新載入時,就會看到剛剛所選的城市依然會出現了。
Use Service Worker to Pre-cache the App Shell
前情提要
Service worker 的功能只能在 localhost 或是 HTTPS 的環境下,並且目前的瀏覽器有支援的不多,至少要 Chrome 47 以上。不過相信會越來越多瀏覽器加入此支援的。
step 1. 註冊 service worker
在我們的 app.js 中,需要先檢查是否有 service worker 存在,若無,則透過 navigator.serviceWorker 去註冊。
1 | if('serviceWorker' in navigator) { |
當然,我們也要創建好我們的 service-worker.js。 Service worker 的檔案要放在根目錄底下,因為 service worker 的 js scope 是包含其所在之目錄。
step 2. Pre-cache assets
當 service worker 被註冊好後,當使用者初次開啟我們的 web app,會觸發一個 install event,而我們可以在這個 event handler 中 cache 住我們需要的 assets。
1 | self.addEventListener('install', function(e) { |
其中的 caches 是 Service Worker API 中的 CacheStorage,可以到 MDN 瞭解一下。
此外,chacheName 的設定也是蠻重要的,可以依此來分開你的資料與 App shell 的快取。
當你 caches.open後,裡面的 callback 可以呼叫 cache.addAll() 來將 assets 放入快取,cache.addAll() 接受 URL list,像是這樣的格式:
1 | var filesToCache = [ |
建議你加入版號來設置你的 cachName,這樣才能確保每次更新都能拿到最新資料。不過要記得將過期的 cache 清空!
我們可以在 activate 這個 event 的 handler 來做這件事情。
1 | self.addEventListener('activate', function(e) { |
step 3. Fetch assets from cache or not
到目前為止,我們知道了怎麼把 assets 存進 cache 裡面,但要怎麼拿出來呢?
我們註冊一個 fetch event handler,用來擷取 web app 發出的 request,當 request 有 match 到我們剛剛存入的那些 assets 時,我們就從中取出並回傳,若並沒有 match 到,則利用 fetch api 去真的打 request。 [ fetch api 也是目前實驗中的 web api,介紹可看 Fetch api ]
1 | self.addEventListener('fetch', function(e) { |
Beware of the edge cases
目前範例中的 code 實際上並不適合運用在 production 上頭,因為有許多 edge cases 沒有被考慮與處理到:
- 剛剛提過的,當你的 content 有變動時,cache key 要更新(範例內我們需要手動更新)。
- 只要你的檔案有一點點更動,小至 typo,大至 code refactor,都會造成 cache invalidated,需要重新下載,效率不好。
- 必須確保 service-worker 中的
install handler所發出的 https request 不會被 Brower cache 影響,否則會無法 update。 - 最重要的一點,範例採用 cache-first 的策略,任何 request 只要有 cache 在就會先拿 cache,若 service worker 相關的註冊與設定也被 cache 時,更新會變得很困難。
Google 提出一套 lib sw-precache 來幫助你避免上述的 edge cases,這超出此篇的範疇,但若要製作 Productoin 版本的 PWA 時,務必研究一下。
此外,在開發中,也可以透過 chrome://serviceworker-internals 來 stop、un-register 現存的 service workers 以及 fresh start service worker。
Test Service worker
現在我們可以來試試看剛剛的 service worker 到底能不能幫我們把 assets cache 起來,你可以像 Google 教學中 deploy 到 firebase,也可以學我直接用 express 來 host。
用 express 來 host 範例需要更動幾個地方:
- 把範例的 index.html, inline.css, app.js 和一些 images 放入 express 中的相對路徑。
- 修改 service-worker.js 中的
filesToCache相對路徑,主要是 app.js 與 inline.css
1 | var filesToCache = [ |
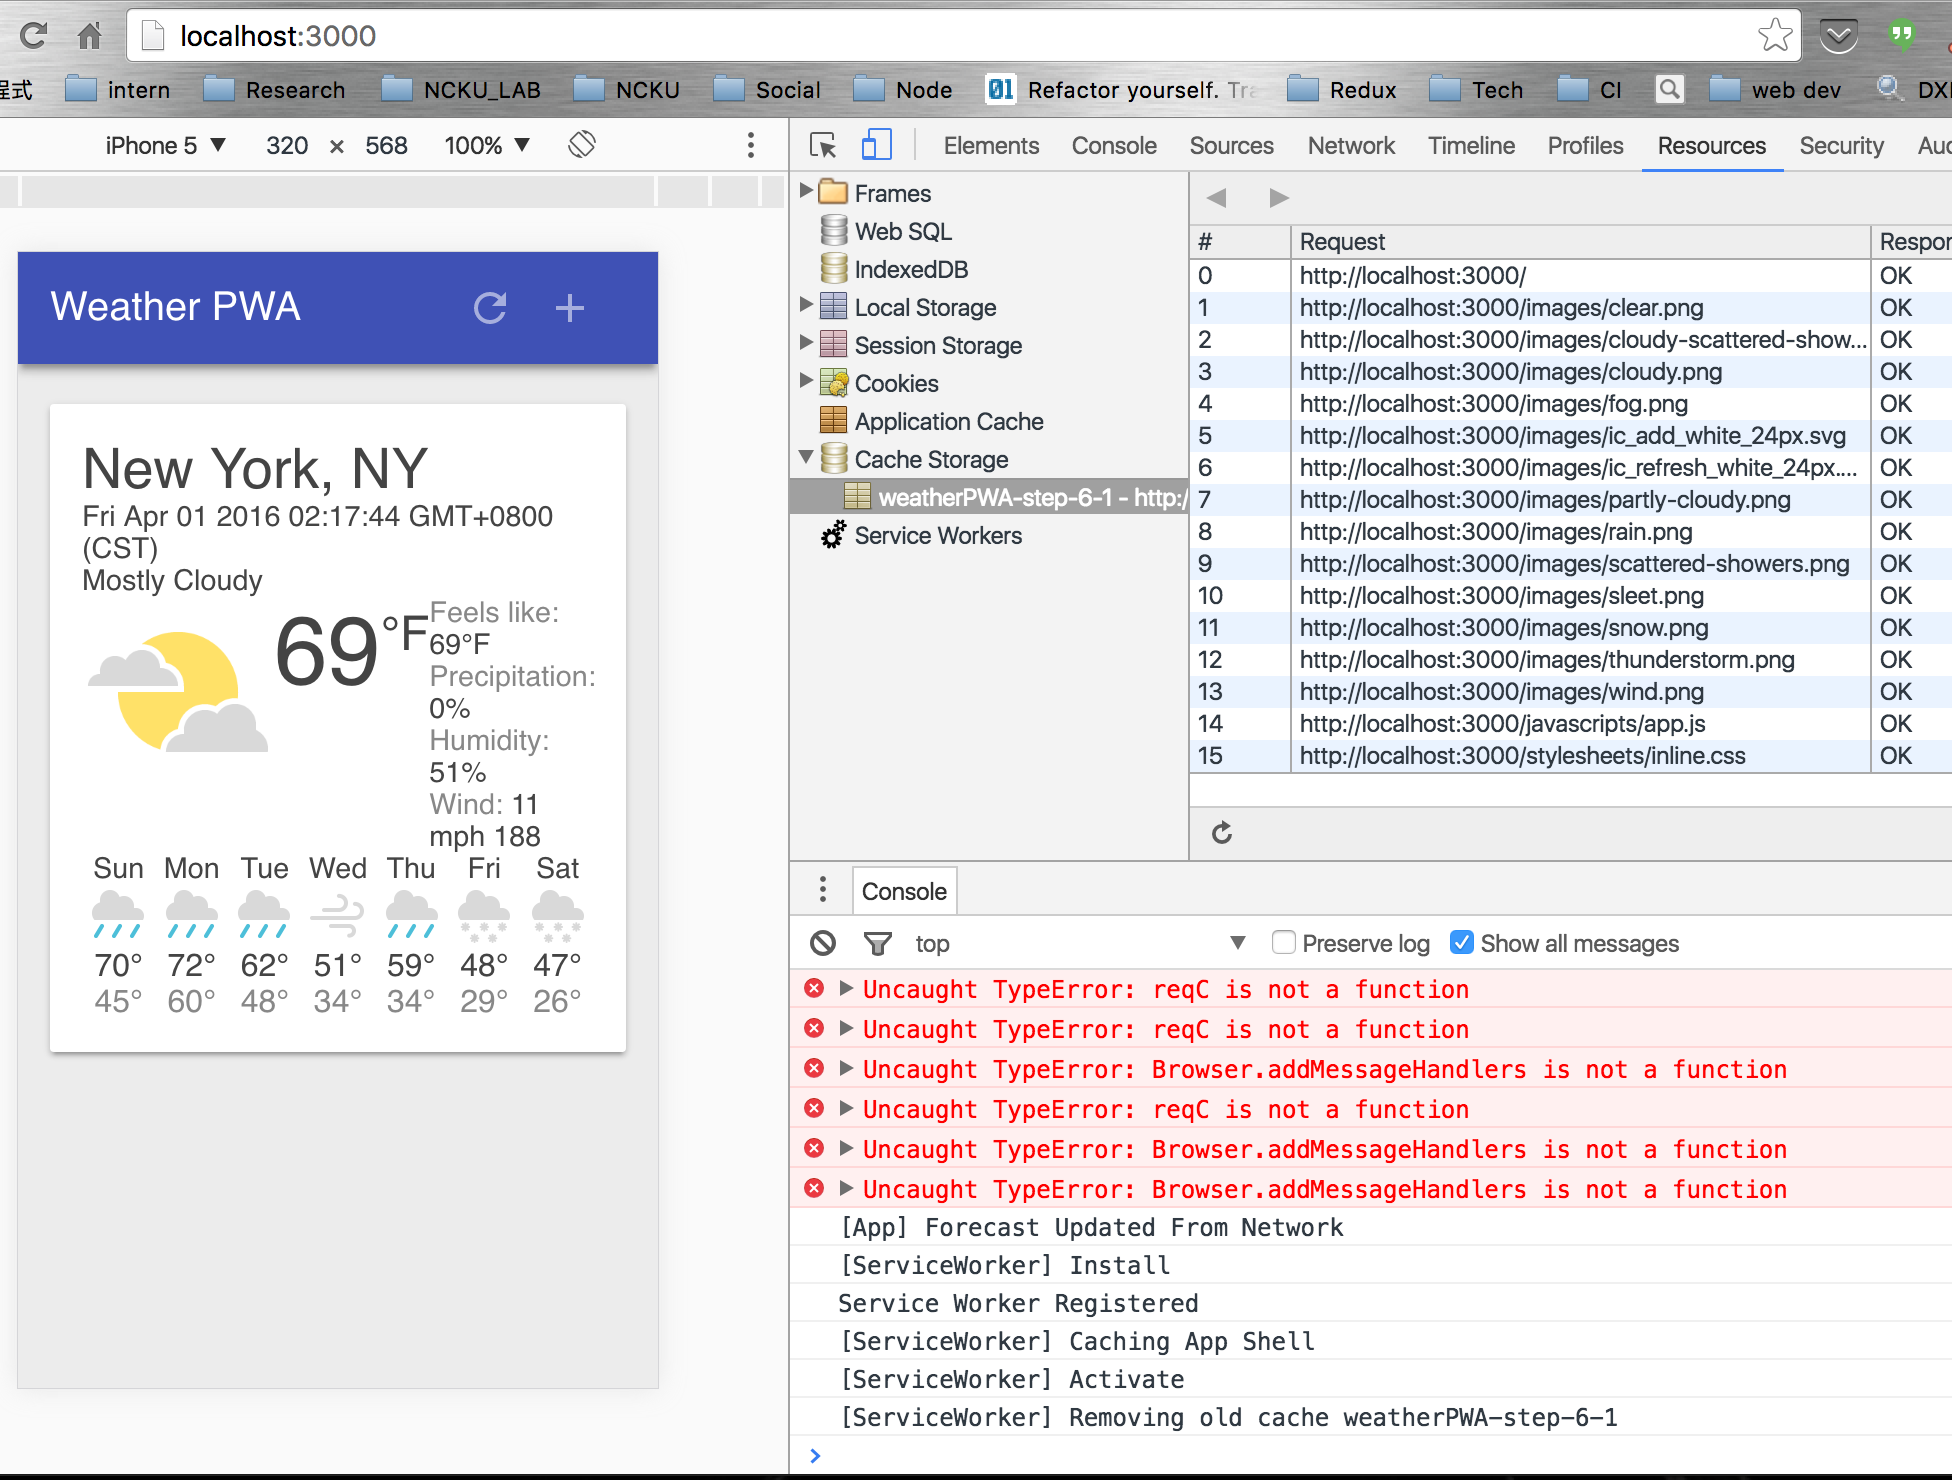
啟動server 後,開啟 Chrome devTool 的 resources tab,應該可以看到如下畫面,就代表你的 service worker 有成功幫你 cache 住 assets:
step 4. Cache Data
接下來我們要 cache 住資料!
策略上分兩種:
- cache first then network:一次發兩種 request,先抓 cache 資料,等 network request 回來後更新 cache。
- network first then cache:先發 network request,若 timeout 再撈 cache 資料。
這邊我們採用 cache-first,才能因應快速 response 與 offline 使用的需求。
首先我們得在 service-worker 中加入一個 dataCacheName,用以區分資料與 app shell 的 cache。
1 | var dataCacheName = 'weatherData-v1'; |
接著在 fetch event handler 中,我們將抓取資料的API request 與其他 request 分開。
1 | self.addEventListener('fetch', function(e) { |
上面的 code 中,service-worker 會擷取頁面發出的 request,如果包含 dataUrl,我們就另外處理:
1 | e.respondWith( |
利用 fetch API 發送 request,送回來的 response 再傳回去之前,會先 clone 一份到 cache 當中。
到這邊為止我們 cache 住資料了,但還是不能 offline 運作!因為還少了一個步驟,先前提到我們要同步發送 兩個 request,一個抓 cache,一個真的送資料。
在 app.js 中的 app.getForecast裡加入這段:
1 | if ('caches' in window) { |
先檢查 window 有無支援 caches object,接著從 caches 中拿出資料,這時要確認一下同時發送出去的 network request 是否已經 response 回來了,我們這邊用個 flag app.hasRequestPending 來控制。只有在 network response 還沒回來前我們會使用 caches 內的資料。
而在發送原本的 XMLHttpRequest 之前,記得加上 app.hasRequestPending = true;,並在 app.updateForecastCard(response)之前,將 app.hasRequestPending 設為 false。
Test Offline function
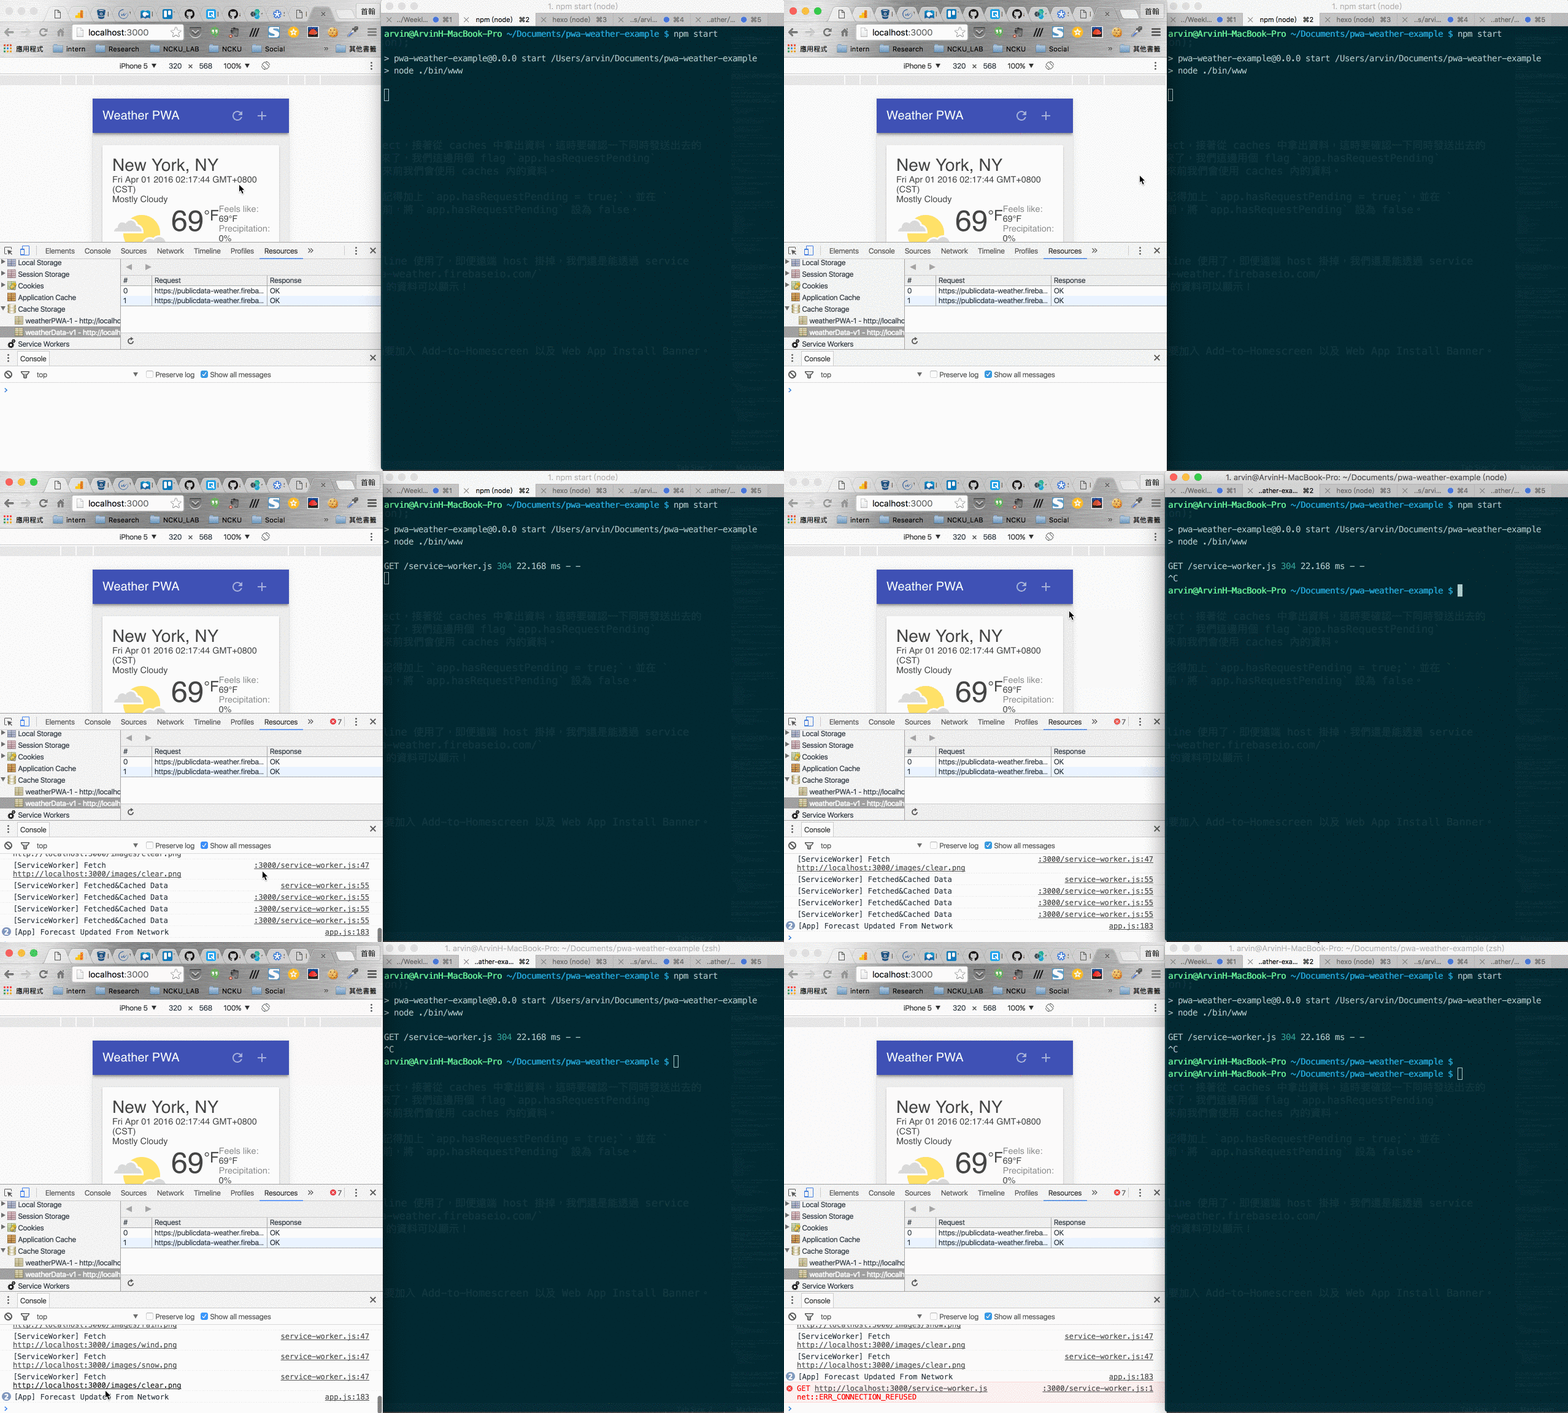
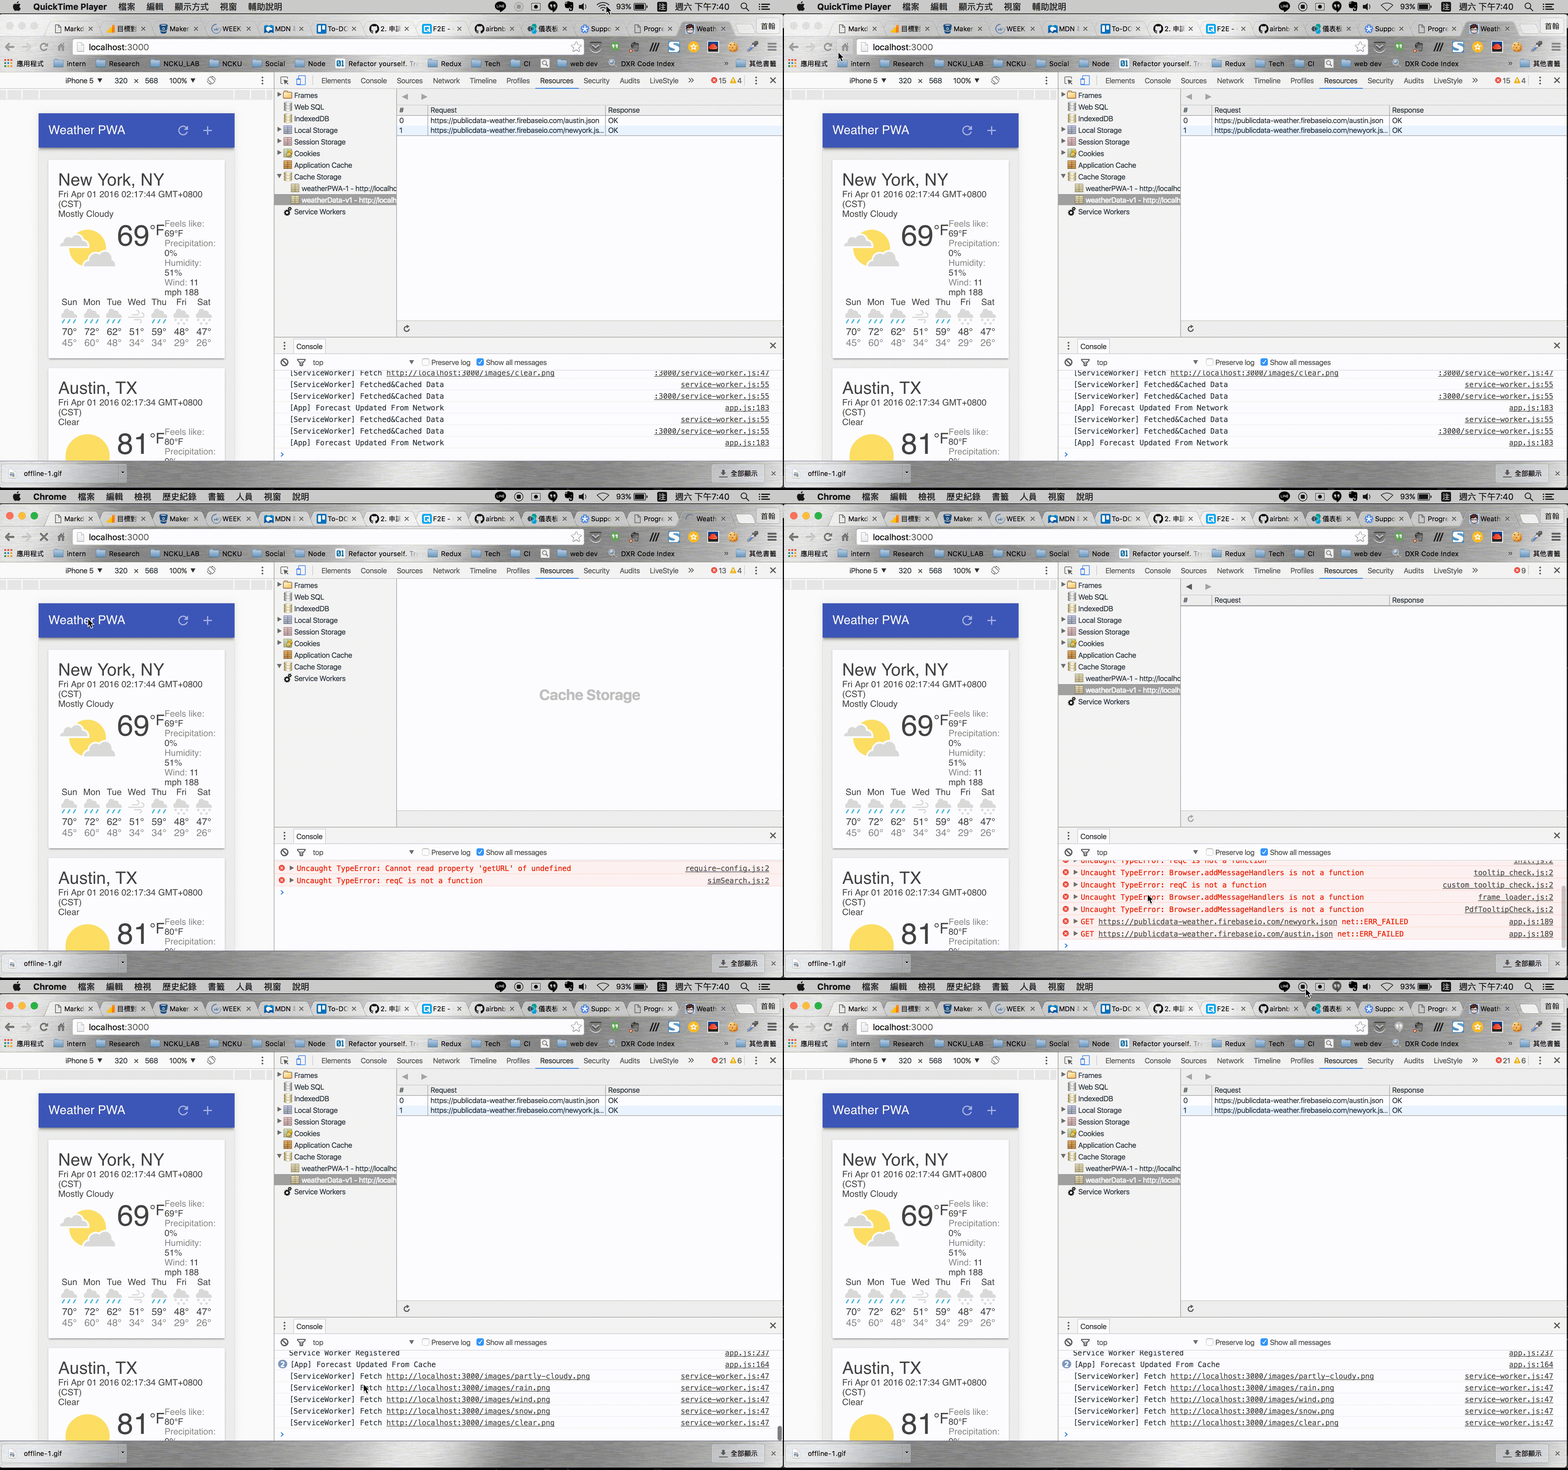
到目前為止我們的 Web app 已經可以在 offline 使用了,即便遠端 host 掛掉,我們能從 cache 中抓到我們的 App Shell,並且透過 service worker 幫我們去跟 https://publicdata-weather.firebaseio.com/ 要資料;若是連網路都沒有,至少會有 cache 的資料可以顯示!
Support Native Integration
Progressive Web App 的最後一哩路,我們要加入 Add-to-Homescreen。
要有 Add to Homescreen 的功能不難,只要加入一個 manifest.json 即可,透過這方式打開的 Web App 不會顯示出 URL bar,看起來就像一般的 App!你也可以再加入 Web app install banners,這邊就不討論,可以看這篇的教學 - Web app install banners
Web App Manifest
透過 web app manifest,你可以:
像 App 一般有個漂亮 icon 顯現在 Android 的 Homescreen 上。
開啟時可以進入全螢幕畫面,不顯示 URL bar!
控制 screen orientation。
設定
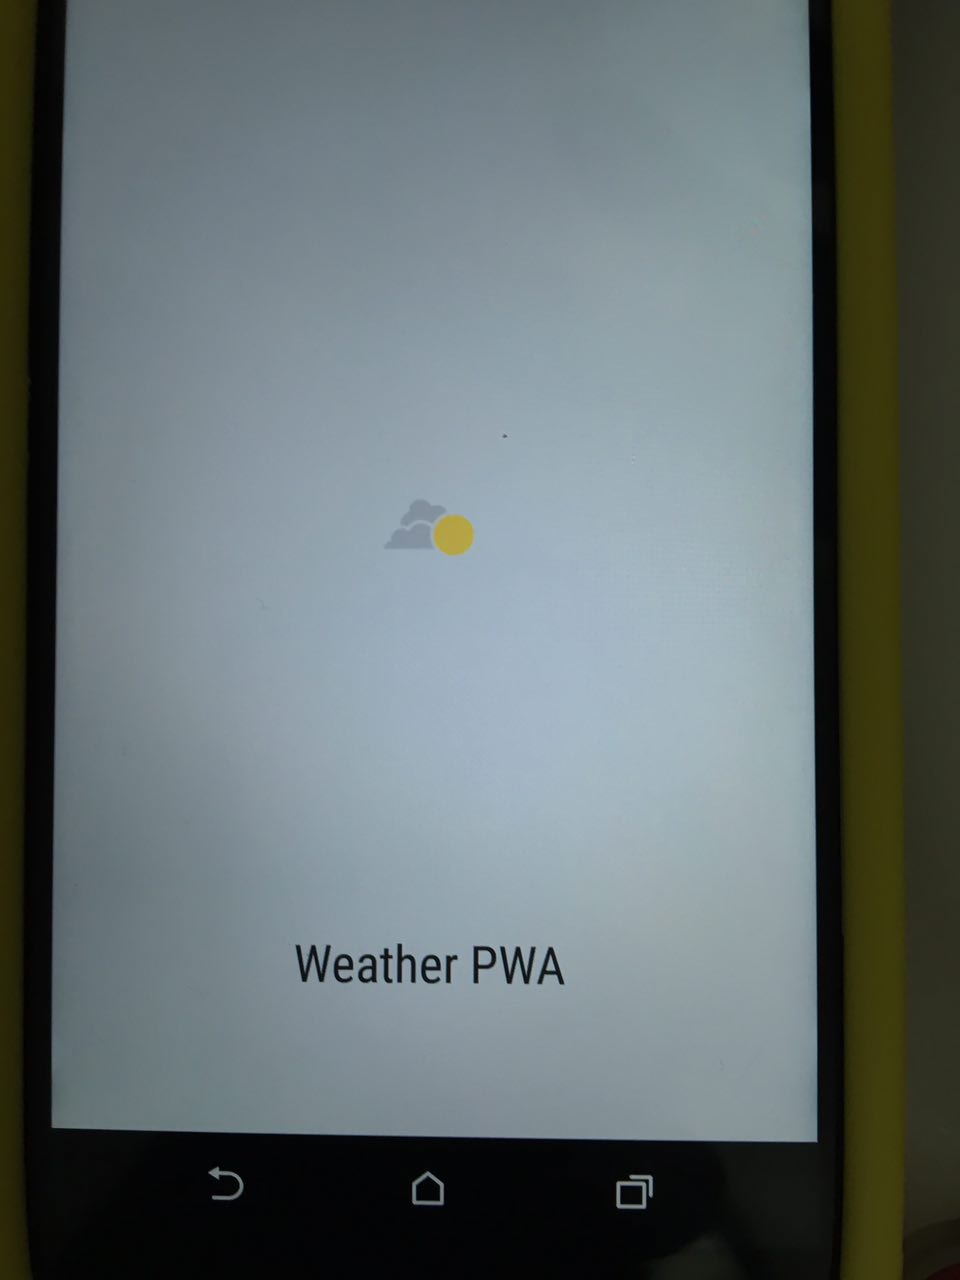
splash screen,以前是為了降低 User 等待載入時間,但現在通常都用來宣傳你的網站品牌等等(有些人是不推薦使用…)追蹤你的 App 是從 homescreen 還是 url 開啟。
1 | { |
[小技巧] 可以透過在 start_url 設置 query string 的參數來追蹤開啟來源。
manifest 檔案設定好後記得回到你的 index.html 的 <head> 加上 <link rel="manifest" href="/manifest.json">
for safari in ios
如果要用在 ios 上的 safari 還需要額外設定
1 | <!-- Add to home screen for Safari on iOS --> |
Best practices
- 在你網站的每個 page 都可放入 manifest.json,這樣不管 user 是從哪頁進去,Chrome都能偵測到
short_name盡量都要設置,優先權高於name這個 field。- icon 的大小要盡可能符合多種 device。
- icon 也要考量到是否符合 slash screen,並記得設置
background_color
Final
最終到你手機上的呈現就會像這樣:
IOS 版本 (ISO 版本看不到 splash screen,不確定原因,可能版本不支援):
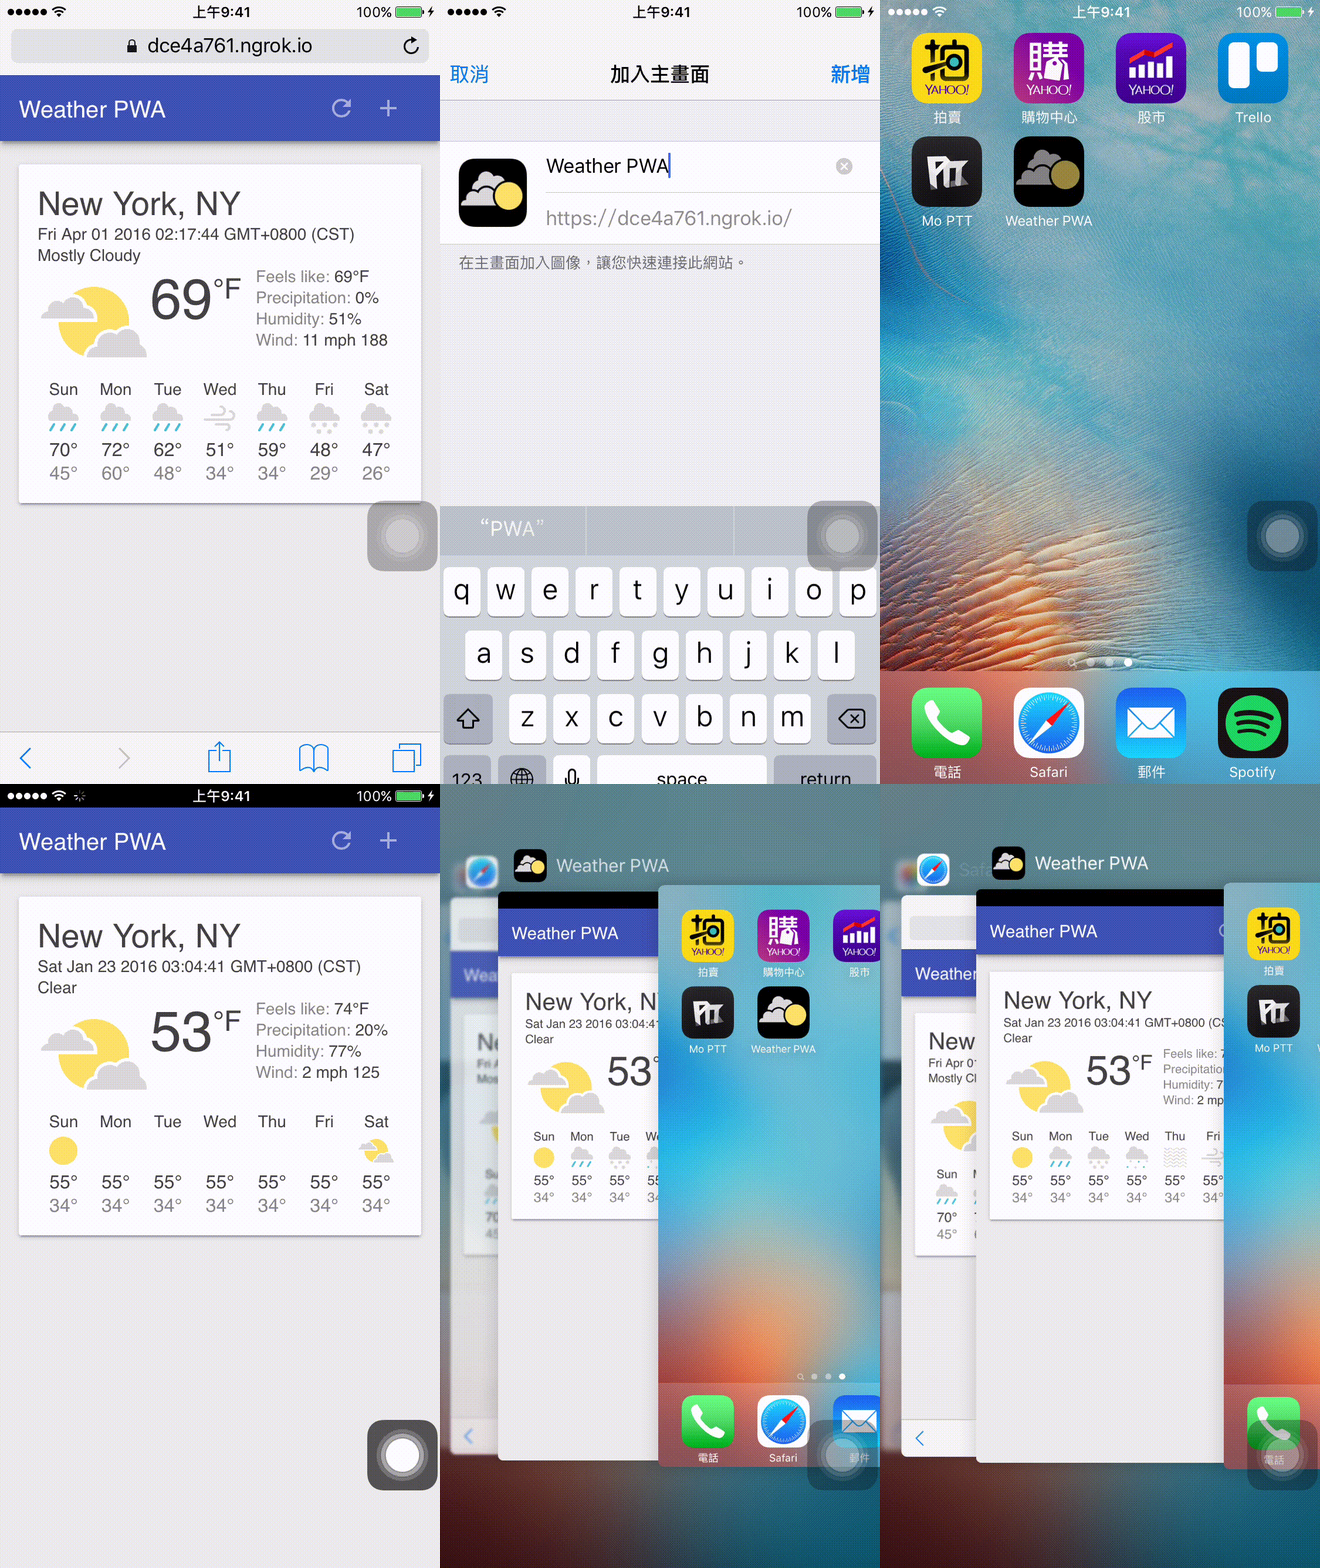
Android 版本(主要是看得到 splash screen..):
結論
看了今年 Google I/O 與 Apple WWDC 後,Apple 感覺想把 App 更融入他們的系統,以後或許不會再有 App 的概念,就是 Apple。而 Google 則持續推廣 Progressive Web App,希望讓 Web 能夠更行動化,似乎都希望能夠弭平一些隔閡。
我個人是蠻希望 Progressive Web App 的方式能普及,可惜現在的瀏覽器支援度還很差,需要更多時間,但大家應該有看過這張圖:
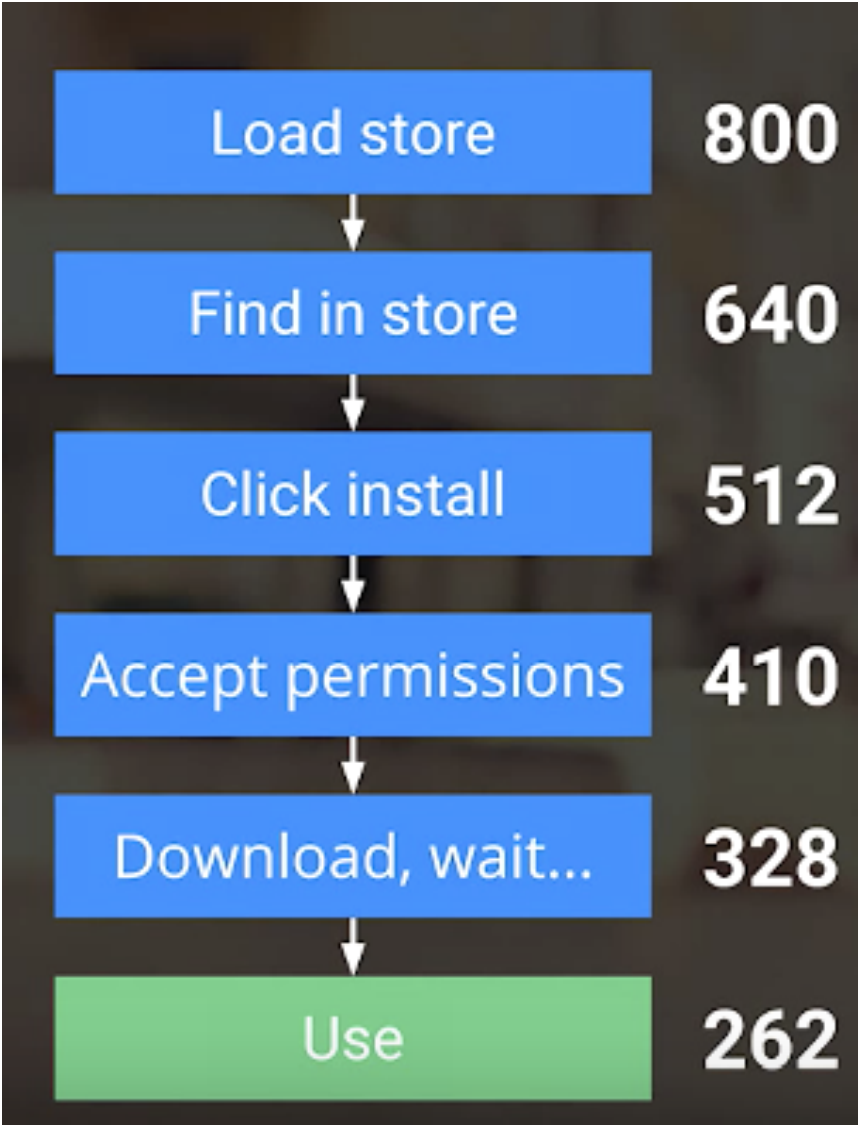
App 從下載到安裝使用的人數差了四分之一,如果 Progressive Web App 可以起來的話,相信對使用者與開發者來說都是雙贏的局面(更多人使用、又不會佔手機空間、又不用到 app store 更新),但大廠怎麼想就不知道了…
但至少 Progressive web app 會帶給使用者更好的 web 瀏覽體驗是無庸置疑的!
資料來源
- Google developer web fundamentals
- html5rocks: service-worker
- Google developer web app install banner
關於作者:
@arvinh 前端攻城獅,熱愛數據分析和資訊視覺化

留言討論