Web VR 初探
Web VR 出來也很久了,但沒有去玩過,因為想說我沒有相關設備,直到前陣子看到這篇文章 Minecraft in WebVR with HTML Using A-Frame
整個驚艷!
隨便加幾個 tag,然後調整一下就可以有 VR 效果,這東西不試試怎麼行!說不定以後能像這篇作者一樣,在自己的婚禮上搞一套 VR 的網站!因此決定跟著官網範例來了解一下 Web VR 到底該如何實作。
一樣先看個成品:
See the Pen webVR-test-demo5 by Arvin (@arvin0731) on CodePen.
A-frame
A-Frame 是 Mozilla VR team 為了在 browser 上利用 Javascript 提供 VR 體驗的一套 web framework,官網 上有很詳細的教學與介紹。
核心基於 HTML 與 entity-component-system framework (似乎是一套遊戲上常用的 pattern,像是 Unity),雖然我不懂遊戲,但他的概念頗簡單,**”ECS favors composition over inheritance”**。
在每個場景(scene)中的每個物件(object)都是一個 entity,entity 可以想做一個物件的空殼,而該空殼的動作、行為、外觀皆是由 components 來完成。
所以透過在場景中混搭組合各種 components 就能創造出無數種的物件,這種方式若是用繼承的方式則會需要 create 許多特殊的 class 才行。
在 A-frame 中,一個 entity 就是 <a-entity></a-entity>。
而這個 entity 可以掛載上各種 component,大致的方式如下:
1 | AFRAME.registerComponent('sun', { |
接著就能夠在 html 中使用 sun 這個 component,<a-entity sun="degree: 5; color: yellow"></a-entity>。
(這邊比較會跟一般的 html tag 混淆,因為 tag 上看似 attribute 的東西其實是 entity 掛載的 component。)
就像 Web component 一樣,A-frame 也有個 A-Frame Registry 在收集各種開發者貢獻的 component。
除了 <a-entity></a-entity> 以外,Web VR 還有許多原生原件,像是 <a-scene>、<a-assets>、<a-box> 等等。
這些 Primitives 的 tag 也是一種 entity,主要是包含了一些複雜但是 common 的元件(像是
以 <a-box> 為例,其實就是一個包含 geometry 與 material components 的 entity:
1 | <a-entity id="box" geometry="primitive: box" material="color: red"></a-entity> |
也可以透過 AFRAME.registerPrimitive 的方式來註冊:
1 | AFRAME.registerPrimitive('a-wave', { |
這樣就有一個 Primitives 元件可用,<a-wave color="aqua" depth="100" width="100"></a-wave>
其中可以看到我們有 defaultComponents 與 mappings 兩個 properties 可以用,分別讓你設置這個 entity 的 default component 與 將 HTML 的 attribute 映射到你自定義的 component 的屬性中,
向這邊就是將 html 的 width 映射到 wave 這個 component 的 width 屬性。
更詳細內容可以參考官網 primitives
Our first Web VR Scene (Skeleton)
接下來從實作一個最簡單的 Web VR Scene 來一步步認識 Web VR 的一些基礎元件。
Web VR 的基礎骨幹:
1 | <html> |
<a-scene> 會 setup 一切 VR 所需的東西,並包含所有 entities,包含 WebGL, canvas, camera 等等,另外還有一些針對不同平台的 WebVR support,一個 out of box 的 magic tag!
加上這個以後,整個 html 就會變成 WebVR 的骨幹了,你在 codepen 上的話就會看到右下角有個眼鏡的圖示。(當然記得要載入 aframe.js)
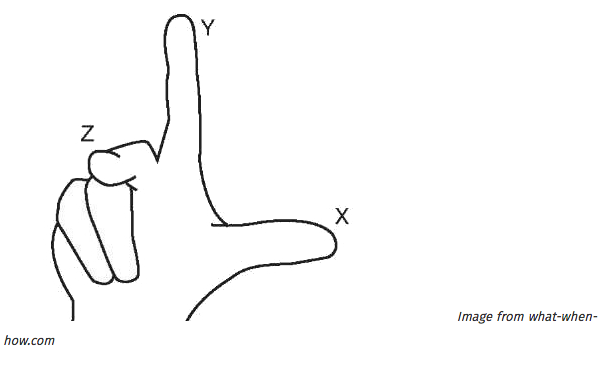
接著,我們需要瞭解一下在 A-frame 的世界中的座標系統,採用所謂的 right-hand rule

在 WebVR API 回傳的距離資料以 Meter 為單位,因此在 A-frame 中的距離單位也是 Meter,所以當你在設計你的 WebVR project 時要注意一下,height: 10 跟 width: 10 在一般開發 web 來說好像很小,
但在 A-frame 中可是會超大。
Add Entity
再來我們可以在 <a-scene> 中加入 <a-cylinder color="red"></a-cylinder>
1 | <a-scene> |
當你放上去以後應該會覺得奇怪,怎麼什麼都看不到,轉動了一下才發現東西在你腳下XD
原因很簡單,我們沒有設定 postion,所以 x, y, z 軸都是 0。根據 right-hand rule,我們可以給 position component 一些參數,另外還可以進行 rotation 與 scale:
1 | <a-scene> |
如此應該就能看到如下結果:
See the Pen webVR-test-demo1 by Arvin (@arvin0731) on CodePen.
Note:這邊岔開介紹一下 codepen 上的 WebVR 功能,點選右下角眼鏡可以進入全 VR 環境,在電腦上 default 的控制是用滑鼠拖拉,或是 WASD 控制,如果你有 VR headset 就能更直接的體驗。
Add Background
我們可以透過 <a-sky></a-sky> 來增加背景,裡面可以單純設置顏色、360度的影片或照片
1 | <a-sky src="http://i.imgur.com/JHZjdp6.jpg"></a-sky> |
See the Pen webVR-test-demo2 by Arvin (@arvin0731) on CodePen.
這樣我們就有一個漂浮在城市空中的圓柱體了 XD (圖片來源)
Asset Management System
在 A-frame 裡面有個 <a-assets>,用來管理所有 Entity 的 assets 資源,與其直接寫在 inline 裡面在 runtime 時讀取,透過定義在 <a-assets> 中可以讓 Browser 更輕易地做 cache,而 A-frame 會保證在 render 之前就把這些資源都載好,因此官方建議使用這種方式來處理圖片等 assets。
用法很簡單,在 <a-assets> 中宣告 <img>,然後設定好 id,接著在想使用該 asset 的 entity 中的 src 指定對應 id 即可。
1 | <a-scene> |
More entity (Ground, Light, Animation)
Ground & Light
基本的場景除了天空以外,當然還要有地板、燈光,地板其實有很多種選擇,可以用 <a-plane>,也能用 <a-cylinder>,只要設置對的高度跟方位即可。
以 <a-plane> 來說,因為他 defalut 的角度是與 XY 平行,因此我們要將 X 軸反轉九十度,讓他與 XZ 平行:
<a-plane src="#groundTexture" rotation="-90 0 0" width="30" height="30"></a-plane>
另外場景中很重要的燈光,在目前的例子中,我們都沒有特別設定,A-frame 會自己幫我們定義一個 ambient light 和 directional light,一旦我們有了自己的設定,default 值就會被拔掉。
基本有兩種燈光可以設定:
- ambient: 針對整個 scene 的燈光設定
- point: 像是一個電燈泡,我們可以調整其位置與強度,讓 entity 上的光影效果因應距離與角度的不同有所變化。
1 | <a-light type="ambient" color="#445451"></a-light> |
Animation
A-frame 有內建的 animation system,要使用很簡單,加上 <a-animation> 即可(文件上寫說這個 entity 將被取代,不過在我寫文的當下,該 issue 從 aframe 的 milestone 拔除了,所以還需要再觀察看看。)
1 | <a-cylinder color="red" position="0 2 -5" rotation="30 45 45" scale="1 1 1"> |
是的,A-frame 中的 entity 可以有 child,而 child 會擁有 parent 設定的位置與角度等等,A-frame 會幫你處理好。
這邊我們的動畫讓
如果要多個動畫,就再加上一個
1 | <a-cylinder color="red" position="0 2 -5" rotation="30 45 45" scale="1 1 1"> |
現在我們的圓柱體會上下左右旋轉移動了!
See the Pen webVR-test-demo3 by Arvin (@arvin0731) on CodePen.
Add user interation
VR 如果不能互動,還有什麼意義嗎?
雖然我們沒有 VR 設備,但 A-frame 有提供給 Desktop 的開發者一個好用的內建 component <a-cursor>,用來模擬 controllers,我們要讓 controller 固定在 camera 的中間,也就是跟著我們的眼睛,
只要當作 child 放在
(cursor 可以監聽的事件在此 https://aframe.io/docs/0.5.0/components/cursor.html)
1 | <a-camera> |
如此一來我們就可以用滑鼠來做點擊的動作。
要讓場景中的物件跟隨我們的點擊有所反應的話,有兩種做法:
Event Listener Component:
如同一般我們在 Web 當中一樣,用 javascript 去 querySelector 出 object,接著加上 EventListener:1
2
3
4
5
6<script>
const cylinderEl = document.querySelector('a-cylinder');
cylinderEl.addEventListener('mouseenter', function () {
cylinderEl.setAttribute('scale', {x: 2, y: 2, z: 2});
});
</script>也可以設置一個 component 然後 attach 到 Entity 上:
1
2
3
4
5
6
7
8
9
10
11
12
13
14
15
16
17<script>
AFRAME.registerComponent('scale-on-mouseenter', {
schema: {
to: {default: '2.5 2.5 2.5'}
},
init: function () {
var data = this.data;
// 在這邊設定 listener
this.el.addEventListener('mouseenter', function () {
this.setAttribute('scale', data.to);
});
this.el.addEventListener('mouseleave', function () {
this.setAttribute('scale', data.leave);
});
}
});
</script>
1
2
3
4
5
6
7
8<!-- 掛載一個 sacle-on-mouseenter component 上去 -->
<a-cylinder color="red" position="0 2 -5" rotation="30 100 0" scale="1 1 1" height="0.2"
scale-on-mouseenter="to: 2.2 2.2 2.2">
<a-animation attribute="rotation" to="30 90 90" direction="alternate" dur="2000"
repeat="indefinite"></a-animation>
<a-animation attribute="position" to="0 2.2 -5" direction="alternate" dur="2000"
repeat="indefinite"></a-animation>
</a-cylinder>Animating on Event:
另一種方式很簡單,是直接設定 Event 到上頭,但你就少了一些自由操作的彈性:
1
2
3
4
5
6
7
8
9
10<a-cylinder color="red" position="0 2 -5" rotation="30 100 0" scale="1 1 1" height="0.2"
scale-on-mouseenter="to: 2.2 2.2 2.2">
<a-animation attribute="rotation" to="30 90 90" direction="alternate" dur="2000"
repeat="indefinite"></a-animation>
<a-animation attribute="position" to="0 2.2 -5" direction="alternate" dur="2000"
repeat="indefinite"></a-animation>
<a-animation attribute="scale" begin="mouseenter" dur="300" to="2.2 2.2 2.2"></a-animation>
<a-animation attribute="scale" begin="mouseleave" dur="300" to="1 1 1"></a-animation>
<a-animation attribute="rotation" begin="click" dur="2000" to="30 405 0"></a-animation>
</a-cylinder>
中間的點(cursor)移入與移出圓柱體時會放大縮小,點擊時會旋轉:
See the Pen webVR-test-demo5 by Arvin (@arvin0731) on CodePen.
到目前為止學到的東西其實已經足夠我們回去最開始我提及的那篇文章 https://css-tricks.com/minecraft-webvr-html-using-frame/ 深入閱讀,
大部分的內容在我這篇都有涵括到了,但透過閱讀該篇文章可以更了解如何利用 reusable 的 component 製作出一個 VR 的 Minecraft!並且裡面還有教你怎麼要設置 Vive, Oculus 的 controller,很推薦閱讀!
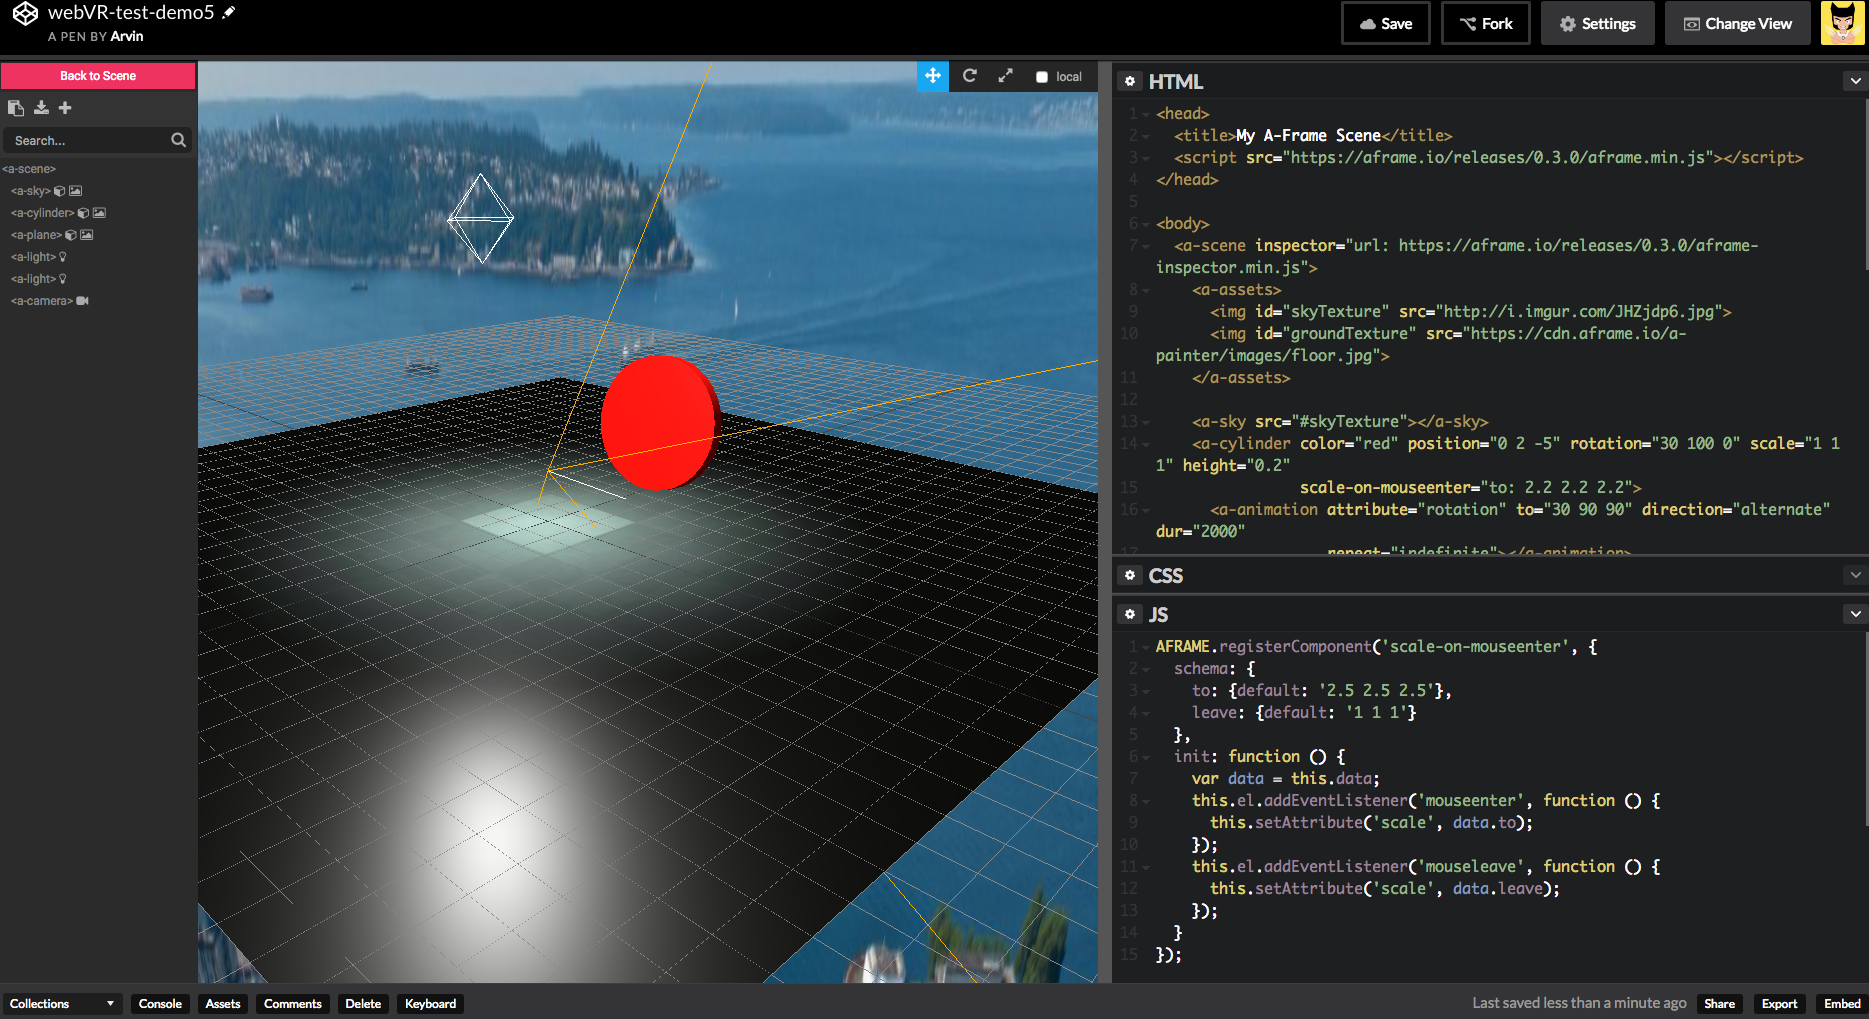
最後,再告訴大家一個好康,A-frame 有提供 Inspectorgithub!而且只要在你的 html 加上:
1 | <a-scene inspector="url: https://aframe.io/releases/0.3.0/aframe-inspector.min.js"> |
接著按下 <ctrl> + <alt> + i,就可以看到如下畫面了!

A-frame 使用起來真的很簡單方便,大家都來玩玩看吧!
這邊有瀏覽器支援度:https://webvr.rocks/
資料來源
- A-frame.io
- Minecraft webVR using A-frame
- Mozilla VR
- webvr.rocks
- Understanding Component-Entity-Systems
關於作者:
@arvinh 前端攻城獅,熱愛數據分析和資訊視覺化

留言討論