前言
Ceres 是用來求解 Optimization 問題的 C++ 開源函式庫,是由 Google 所釋出的,文件相當完整,而且這個函式庫還有不少 好處(例如 code 品質、使用的方便性等等)。
今天我們會一起來看看怎麼安裝 Ceres,並用 Ceres 來求解一個最簡單的問題。
安裝 Ceres (in Linux)
一開始呢,要先安裝一些 Ceres 會使用到的函式庫;
1
| sudo apt-get install liblapack-dev libsuitesparse-dev libcxsparse3.1.2 libgflags-dev libgoogle-glog-dev libgtest-dev
|
接下來,就是安裝 Ceres 了;
1
2
3
4
5
6
7
| git clone https://github.com/ceres-solver/ceres-solver.git
mkdir ceres-bin
cd ceres-bin
cmake ../ceres-solver
make -j3
make test
sudo make install
|
只要把 78 個 test 都跑過就算是安裝成功囉!
使用 Ceres 來求解一個超簡單的方程式
基本上,Ceres 是用來求解下列方程式的 least-squared error 解:
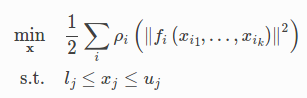
這種方程式在滿多應用中都會碰到,例如 SLAM 求解兩個 keyframe 中的 transform,使 pixel 間的誤差最小。值得注意的是,f() 可以是一個非線性的函數,也就是說你只需要把想求解的函式寫出來,Ceres 就可以幫你解,如果不能 formulate 成線性函數也沒有關係。
那從官網上可以看到一個最最最簡單的例子,求解如下方程式的最小值:

雖然我們一看就知道,答案就是 x=10 時可以達到最小值 0,但要怎麼用 Ceres 來解呢?
做法會是要先定義一個 functor,讓求解過程中可以使用這個 functor 來計算當前解的誤差:
1
2
3
4
5
6
7
| struct CostFunctor {
template <typename T>
bool operator()(const T* const x, T* residual) const {
residual[0] = T(10.0) - x[0];
return true;
}
};
|
有了這個計算 residual 的 functor 後,接下來就是要定義問題跟求解,讓我們直接看 helloworld.cc 的程式碼吧:
1
2
3
4
5
6
7
8
9
10
11
12
13
14
15
16
17
18
19
20
21
22
23
24
25
26
27
28
29
30
31
32
33
34
35
36
37
38
39
40
41
42
43
44
45
46
47
48
| #include "ceres/ceres.h"
#include "glog/logging.h"
using ceres::AutoDiffCostFunction;
using ceres::CostFunction;
using ceres::Problem;
using ceres::Solver;
using ceres::Solve;
struct CostFunctor {
template <typename T> bool operator()(const T* const x, T* residual) const {
residual[0] = 10.0 - x[0];
return true;
}
};
int main(int argc, char** argv) {
google::InitGoogleLogging(argv[0]);
double x = 0.5;
const double initial_x = x;
Problem problem;
CostFunction* cost_function =
new AutoDiffCostFunction<CostFunctor, 1, 1>(new CostFunctor);
problem.AddResidualBlock(cost_function, NULL, &x);
Solver::Options options;
options.minimizer_progress_to_stdout = true;
Solver::Summary summary;
Solve(options, &problem, &summary);
std::cout << summary.BriefReport() << "\n";
std::cout << "x : " << initial_x
<< " -> " << x << "\n";
return 0;
}
|
所以步驟大概就是:
- 定義 functor
- 定義欲求參數的初始值
- 定義 cost_function 並指定 problem 要使用 cost_function 求解
- 設定並執行 Solver 求解問題
- 看結果
假設你剛剛有編譯成功,你可以直接在 ceres-bin\bin 找到 helloworld 的執行檔,執行後的結果如下:
1
2
3
4
5
6
| iter cost cost_change |gradient| |step| tr_ratio tr_radius ls_iter iter_time total_time
0 4.512500e+01 0.00e+00 9.50e+00 0.00e+00 0.00e+00 1.00e+04 0 7.54e-05 1.94e-03
1 4.511598e-07 4.51e+01 9.50e-04 9.50e+00 1.00e+00 3.00e+04 1 8.24e-04 3.01e-03
2 5.012552e-16 4.51e-07 3.17e-08 9.50e-04 1.00e+00 9.00e+04 1 5.95e-05 3.16e-03
Ceres Solver Report: Iterations: 3, Initial cost: 4.512500e+01, Final cost: 5.012552e-16, Termination: CONVERGENCE
x : 0.5 -> 10
|
其中過了三步他就解出了答案是 x=10,收斂的速度算是滿快的。雖然這個問題其實是線性的,可以一步解出,但預設的 solver 是用來解 non-linear optimization 問題,所以會花好幾步。
總結
今天我們簡單介紹了 Ceres 這個函式庫,也跑了最簡單的程式來學習怎麼使用 Ceres,之後大家如果有遇到要求解 non-linear optimization 問題,就可以考慮使用 Ceres 來解囉!
延伸閱讀
- ceres-solver tutorial
關於作者:
@pojenlai 演算法工程師,對機器人跟電腦視覺有少許研究,最近在學習看清事物的本質與改進自己的觀念
喜歡我們的文章嗎?歡迎分享按讚給予我們支持和鼓勵!
留言討論