前端也能玩 Deep learning - 以 p5-deeplearn-js 為例
前言
還記得約莫是 2012 年我還在唸研究所的時候,有位清大教授(原諒我忘了是哪位…)來系上演講關於類神經網路的應用,當時的我聽得霧煞煞,覺得是離我很遙遠的一門學問,而如今 Machine Learning、Deep Learning 滿天飛,說你沒聽過 KNN 就像說你沒背過 99 乘法表一樣驚人。
對於一個成天在網頁打滾的前端工程師,可能真的沒太多機會碰觸到相關實作或研究。
但小心了!AI 的觸角也慢慢伸到前端的領域 - Screenshot to code in Keras,從圖片就能轉成 HTML,以後該怎麼辦啊…
你可能會想,身處於變化快速的前端領域,我們最擅長的不就是快速學習應對嗎?現在已經有很多 js 版本的機器學習函式庫啦,像是 Keras.js、Deeplearn.js 等等,讓你可以在 browser 上透過 WebGL 的幫助來使用 GPU 做運算。
但是這些 Library 的宗旨比較是拓展機器學習的應用層面,對於沒接觸過 Deeplearning 的前端工程師來說,要做出 teachablemachine 這樣的東西,其實沒這麼簡單。
而今天要介紹的這款 library 就是想提供一個 Higher level 的 js library,降低採用 Machine learning 實作產品的門檻。
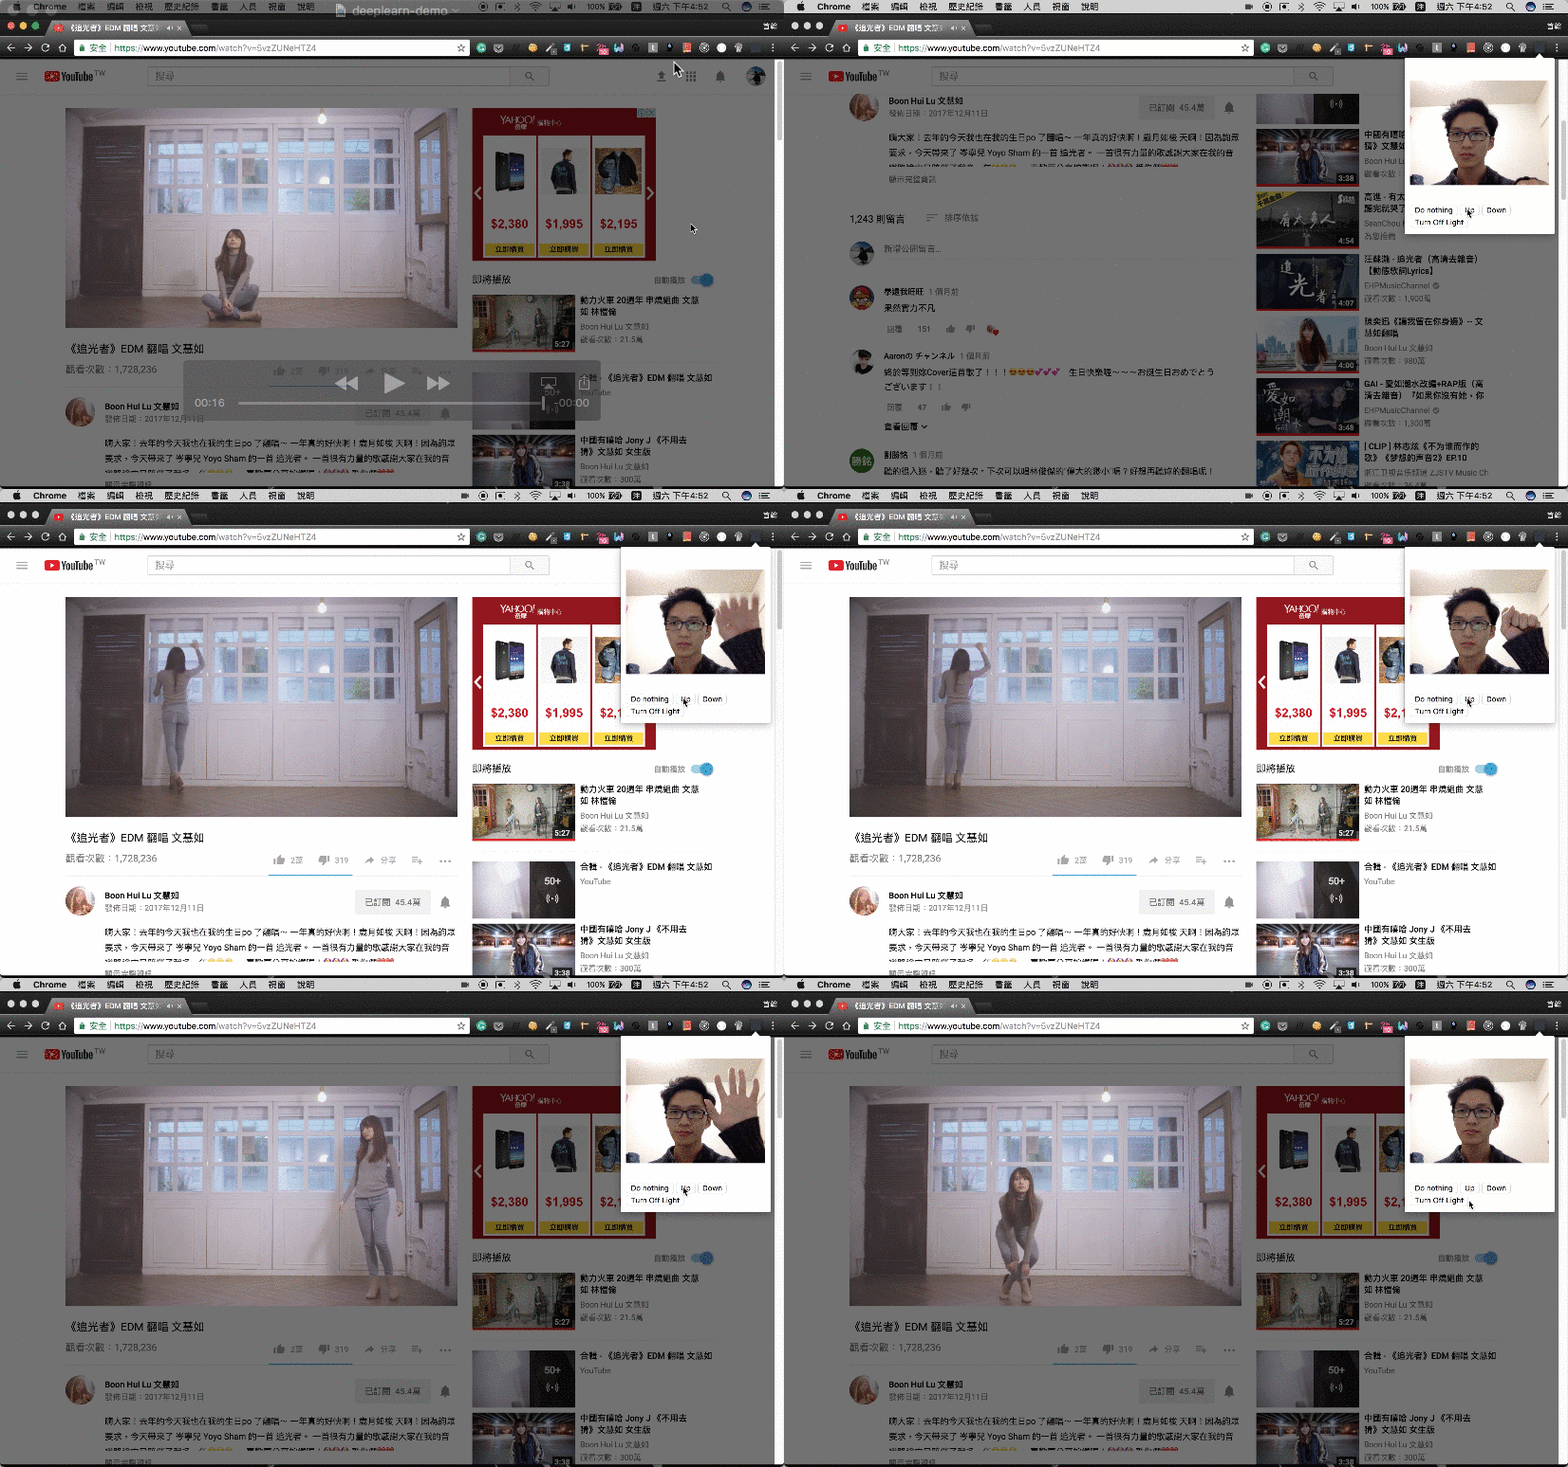
先來看個 Demo:

Demo 裡是一個簡單的 Chrome extension,透過 WebCam 擷取圖片來分析,利用 KNN image classifier model,來判斷出不同動作,並對應到網頁上的互動,像是 scroll dow, scroll up 或是修改 DOM 元件( Demo 中的開關燈效果 )。主要參考自 deeplearn-chrome_extension。
沒有,我的另一隻手絕對沒有在下面控制滑鼠。
這一切的實現都是依靠 p5ML 與 deeplearnjs 的 knn image classifier。
p5ML
p5ML 還持續在開發中,主要是提供一系列的 API wrapper,讓你能忽略掉一些直接使用 deeplearn.js 需要知道的細節,像是 NDArrayMath, Scalar, Array3D 等 deeplearn 提供的物件。
使用方式很簡單,直接在 html 中載入:
<script src="p5ML.min.js"></script>
或是 npm install p5ML --save 下載皆可。
p5ML.min.js 會 expose 一個 p5ml 的全域變數,裡面提供以下幾種目前實作的 Modal 演算法:
- LSTM
- 沒研究過 LSTM 的讀者可以看看這篇介紹,LSTM直觀理解
- ImageNet - 目前只支援 SqueezeNet Modal
- KNNImage
- 其中採用了 Deeplearn.js 的 knn models,寫得很簡潔,又是 Typescript,對於理解這種演算法很有幫助。
- NeuralNetwork
除了 Neura Network 外,上述其餘每個 Modal 在 p5ML 的 github 上都有對應的 Demo,以及簡短的使用方式。
實作範例
以剛剛開頭看到的例子來說,我們使用到的是 KNNImgae 這個 API:
let knn = new p5ml.KNNImageClassifier(callback);
建立出 KNNImageClassifier 的物件 knn 後,我們可以透過 knn.addImage(video, index); 來加入 example(video 變數),並告知其 class 類別(index 變數)。
當加入的 example 足夠多以後,就能透過 knn.predict(input, callback) 來預測 input 是屬於哪種類別:
1 | knn.predict(video, function(data) { |
使用起來就是這麼簡單。
整合 Extension - popup.js
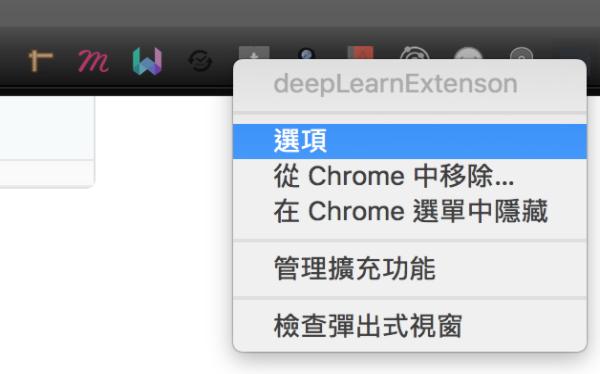
要整合到 Chrome extension 中的話,需要使用到的是 popup.js, popup.html, content.js 以及 option.html。
疑?為什麼需要 option.html?這次的範例應該還用不著需要使用者設定什麼參數吧?
原因是為了取得使用者的攝影機權限。
一般 Web 上是呼叫 navigator.mediaDevices.getUserMedia(options, callback)來取得使用者 WebCam 權限:
1 | navigator.mediaDevices.getUserMedia({ audio: true, video: true }, function() { |
但要讓 Chrome extension 也拿到權限的話,你的這段程式碼,必須放置在由 extension 本身開啟的 html 內才可以,popup.html 不算。
因此,利用設置頁面 option.html 是最為適合的,只要在你的 manifest.json 中設定:
1 | "options_ui": { |
之後就能透過開啟 Extension 的設定頁面,來徵求使用者的攝影權限。

取得權限後,在我們的 popup.html 中要繪製一些頁面元件,以供之後我們在前端進行 Image 的分類:
1 | <!doctype html> |
popup.js 中則是放入最主要的 knn 相關程式碼:
1 |
|
Line 1 我們初始化 p5ml.KNNImageClassifier 物件 knn,接著在 turnoffButton 按下時加入範例 knn.addImage(video, 4),並設定該範例類別為 4。
接著在 Line 8 開始,利用 setInterval() 不斷的進行 knn.predict(),這樣就能盡量即時分辨 WebCam 傳來的資料。
其他部分,像是如何讓 WebCam 的影像顯示在 <video> tag 中的程式碼也是在 popup.js 中實作。
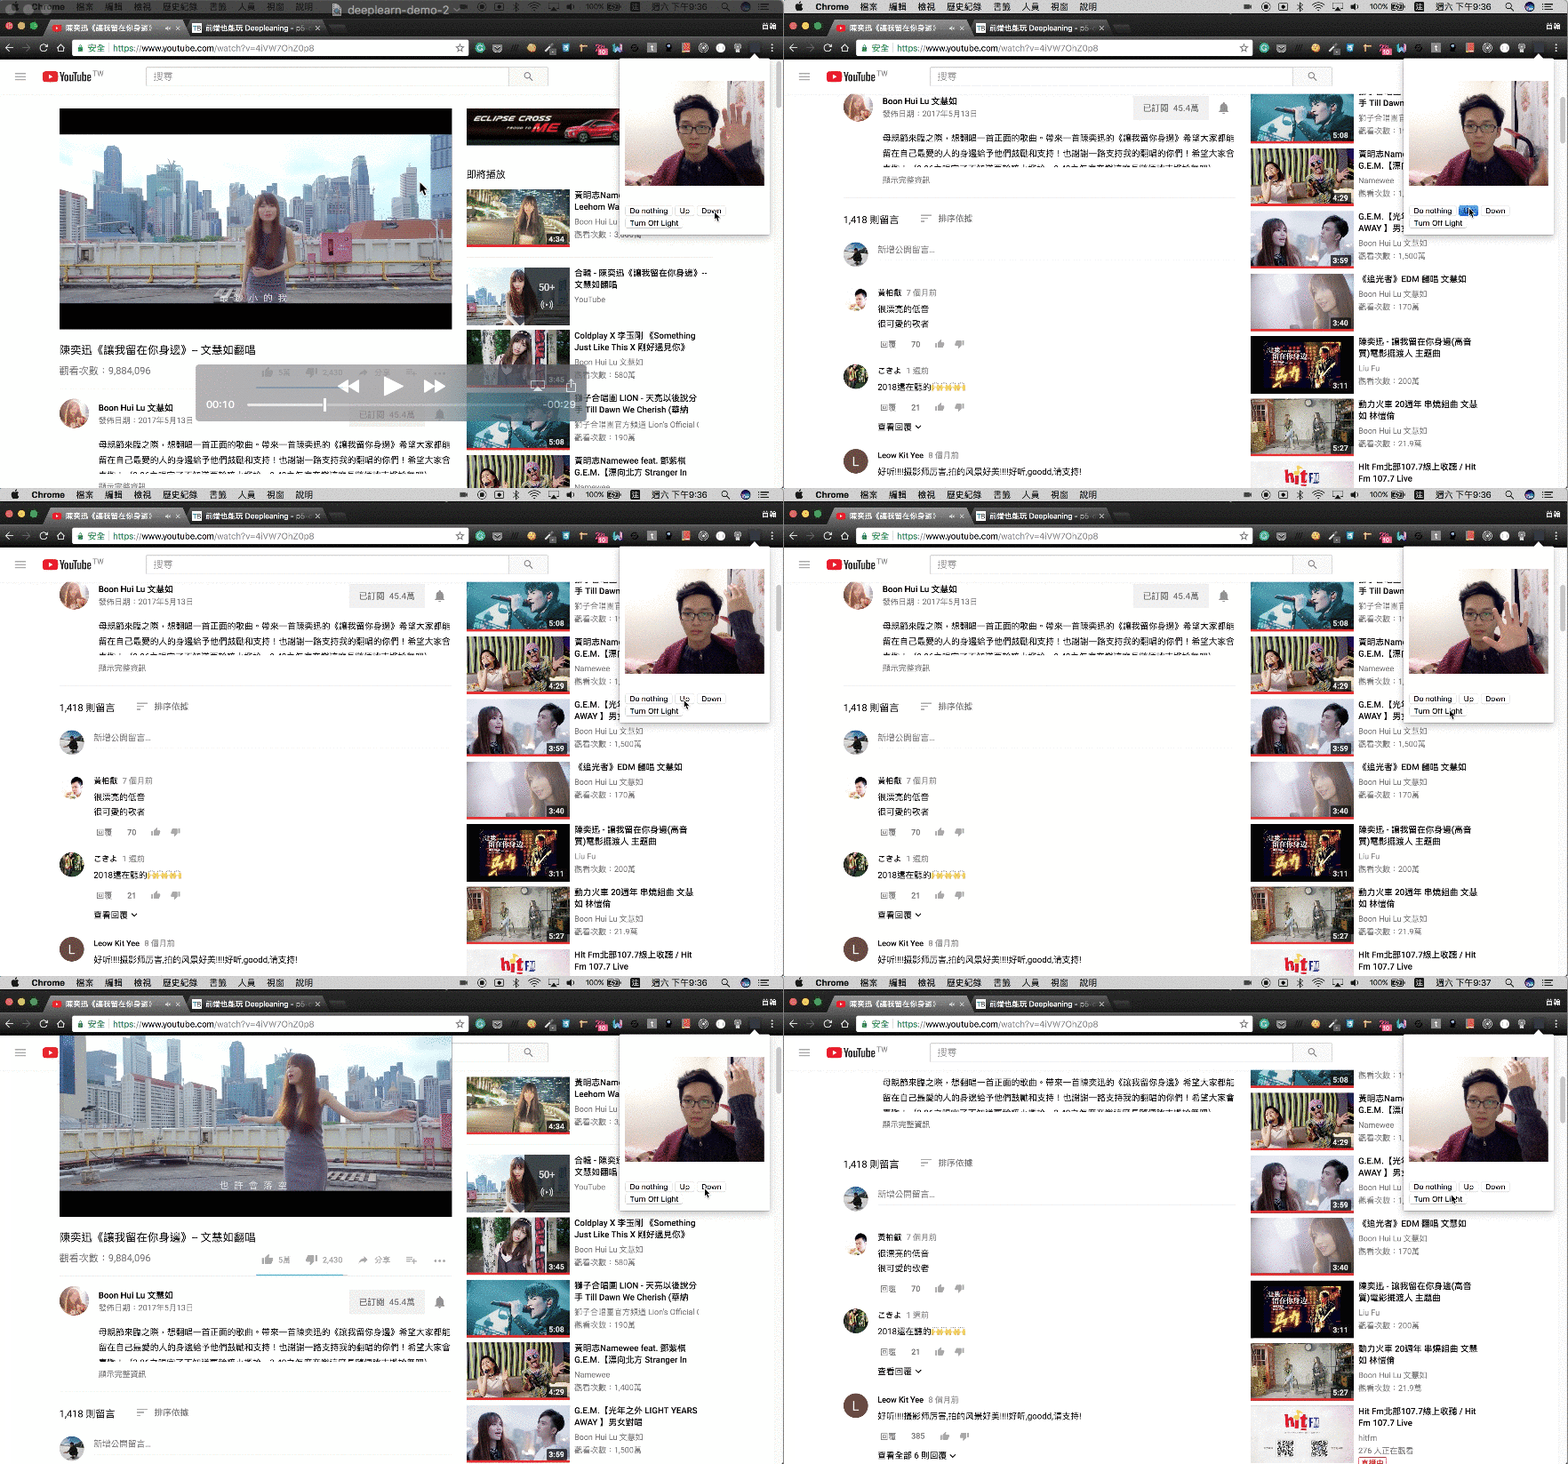
實作到這裡以後,基本上你就可以開啟 Extension 然後進行一些影片的分類,像是這樣:

可以從上面的片段發現,你需要點擊對應分類的按鈕,並且做出你想要的動作來教導你的 extension,讓他認得你的手勢!
當你給予的 example 越多,就愈有機會判斷得更好。
整合 Extension - content.js
這邊假定大家都知道 Extension 的實作方式(如果不知道可以從這邊學習)。
在 Extension 中,可以透過 chrome.runtime.sendMessage() 與 chrome.runtime.onMessage.addListener() 來針對 Popup page 與 當前頁面的 content script 進行溝通,我們就是利用這點來將辨識完的手勢,轉換成頁面上的互動操作:
1 | chrome.runtime.onMessage.addListener(gotMessage) |
到這邊為止基本上就完成了範例的所有功能,對完整程式碼(或是遮罩實作方式 XD)有興趣的人可以從這邊取得。
結論
這次算是初步嘗試在前端上應用 ML 相關的功能,介紹大家有像是 p5-deeplearn-js 這樣有趣的 library 可以使用,希望可以有多一點的前端高手來發揮創意,並分享作品出來,不然真的很難找到相關的經驗分享。
不過當然,這只是個非常粗淺的應用,更是用非常 High level 的 API 來實作,還是需要真正去了解 ML 相關的演算法,才是比較正確的學習方向,接下來我也會繼續學習,p5-deeplearn-js 會是一個不錯的起點,加上 deeplearn.js 的 KNN 演算法程式碼都算蠻簡潔的,以 Typescript 實作,閱讀起來比起純 JS 好理解一些(多了 Type 很有幫助啊!),推薦給各位!
資料來源
關於作者:
@arvinh 前端攻城獅,熱愛數據分析和資訊視覺化

留言討論