使用 TensorFlow 來做簡單的手寫數字辨識


Posted by Po-Jen on 2018-01-27

前言

相信大家都知道 TensorFlow 是可以用來建立跟訓練機器學習的模型,今天我們就來跑一個最簡單的 Neural Network,來辨識手寫數字,讓他吐出結果。有了這個程式之後,之後就可以再銜接其他的工具,例如讓機器人裝一個 camera,讀到 camera 的影像之後可以辨識數字,這樣就可以透過數字來對機器人下指令。或是可以再抽換辨識手寫數字的 node,改成辨識物體之類的。

接下來就讓我們開始吧。

TensorFlow 辨識手寫數字

首先,我們可以直接參考現成的程式碼,裡面兜出了一個 2 層的 Fully Connected Neural Network(也稱作 Multilayer Perceptron),裡面原本就有滿清楚的註解,讓大家易於理解:

""" Neural Network.
A 2-Hidden Layers Fully Connected Neural Network (a.k.a Multilayer Perceptron)
implementation with TensorFlow. This example is using the MNIST database
of handwritten digits (http://yann.lecun.com/exdb/mnist/).
Links:
    [MNIST Dataset](http://yann.lecun.com/exdb/mnist/).
Author: Aymeric Damien
Project: https://github.com/aymericdamien/TensorFlow-Examples/
"""

from __future__ import print_function

# Import MNIST data
from tensorflow.examples.tutorials.mnist import input_data
mnist = input_data.read_data_sets("/tmp/data/", one_hot=True)

import tensorflow as tf

# Parameters
learning_rate = 0.1
num_steps = 500
batch_size = 128
display_step = 100

# Network Parameters
n_hidden_1 = 256 # 1st layer number of neurons
n_hidden_2 = 256 # 2nd layer number of neurons
num_input = 784 # MNIST data input (img shape: 28*28)
num_classes = 10 # MNIST total classes (0-9 digits)

# tf Graph input
# place
X = tf.placeholder("float", [None, num_input])
Y = tf.placeholder("float", [None, num_classes])

# Store layers weight & bias
weights = {
    'h1': tf.Variable(tf.random_normal([num_input, n_hidden_1])),
    'h2': tf.Variable(tf.random_normal([n_hidden_1, n_hidden_2])),
    'out': tf.Variable(tf.random_normal([n_hidden_2, num_classes]))
}
biases = {
    'b1': tf.Variable(tf.random_normal([n_hidden_1])),
    'b2': tf.Variable(tf.random_normal([n_hidden_2])),
    'out': tf.Variable(tf.random_normal([num_classes]))
}


# Create model
def neural_net(x):
    # Hidden fully connected layer with 256 neurons
    layer_1 = tf.add(tf.matmul(x, weights['h1']), biases['b1'])
    # Hidden fully connected layer with 256 neurons
    layer_2 = tf.add(tf.matmul(layer_1, weights['h2']), biases['b2'])
    # Output fully connected layer with a neuron for each class
    out_layer = tf.matmul(layer_2, weights['out']) + biases['out']
    return out_layer

# Construct model
logits = neural_net(X)
prediction = tf.nn.softmax(logits)

# Define loss and optimizer
loss_op = tf.reduce_mean(tf.nn.softmax_cross_entropy_with_logits(
    logits=logits, labels=Y))
optimizer = tf.train.AdamOptimizer(learning_rate=learning_rate)
train_op = optimizer.minimize(loss_op)

# Evaluate model
correct_pred = tf.equal(tf.argmax(prediction, 1), tf.argmax(Y, 1))
accuracy = tf.reduce_mean(tf.cast(correct_pred, tf.float32))

# Initialize the variables (i.e. assign their default value)
init = tf.global_variables_initializer()

# Start training
with tf.Session() as sess:

    # Run the initializer
    sess.run(init)

    for step in range(1, num_steps+1):
        batch_x, batch_y = mnist.train.next_batch(batch_size)
        # Run optimization op (backprop)
        sess.run(train_op, feed_dict={X: batch_x, Y: batch_y})
        if step % display_step == 0 or step == 1:
            # Calculate batch loss and accuracy
            loss, acc = sess.run([loss_op, accuracy], feed_dict={X: batch_x,
                                                                 Y: batch_y})
            print("Step " + str(step) + ", Minibatch Loss= " + \
                  "{:.4f}".format(loss) + ", Training Accuracy= " + \
                  "{:.3f}".format(acc))

    print("Optimization Finished!")

    # Calculate accuracy for MNIST test images
    print("Testing Accuracy:", \
        sess.run(accuracy, feed_dict={X: mnist.test.images,
                                      Y: mnist.test.labels}))

執行這個程式之後,你應該會看到以下的結果,表示功能正常,可以拿來辨識手寫數字的 dataset:

ros@ros-K401UB:~/code/standalone/tensorflow$ python3.4 simple_nn.py 
Successfully downloaded train-images-idx3-ubyte.gz 9912422 bytes.
Extracting /tmp/data/train-images-idx3-ubyte.gz
Successfully downloaded train-labels-idx1-ubyte.gz 28881 bytes.
Extracting /tmp/data/train-labels-idx1-ubyte.gz
Successfully downloaded t10k-images-idx3-ubyte.gz 1648877 bytes.
Extracting /tmp/data/t10k-images-idx3-ubyte.gz
Successfully downloaded t10k-labels-idx1-ubyte.gz 4542 bytes.
Extracting /tmp/data/t10k-labels-idx1-ubyte.gz
2018-01-27 13:10:45.868367: I tensorflow/core/platform/cpu_feature_guard.cc:137] Your CPU supports instructions that this TensorFlow binary was not compiled to use: SSE4.1 SSE4.2 AVX AVX2 FMA
Step 1, Minibatch Loss= 12711.9502, Training Accuracy= 0.305
Step 100, Minibatch Loss= 473.9966, Training Accuracy= 0.852
Step 200, Minibatch Loss= 67.3683, Training Accuracy= 0.938
Step 300, Minibatch Loss= 102.2178, Training Accuracy= 0.883
Step 400, Minibatch Loss= 43.7579, Training Accuracy= 0.914
Step 500, Minibatch Loss= 49.5792, Training Accuracy= 0.820
Optimization Finished!
Testing Accuracy: 0.8672

但是,上面這個範例跑起來有點空虛,因為只是跑了一個 dataset,但我們是希望用來辨識一張圖片。

儲存可以辨識手寫數字的 Model

雖然要訓練這個範例很簡單,但我們不希望每次啟動程式時都重新訓練一次,所以我們希望可以將訓練完的 model 儲存下來,我們主要可以參考這個範例程式碼,然後把儲存 model 需要用到的幾個函式放到我們上面的範例中:

""" Neural Network.
A 2-Hidden Layers Fully Connected Neural Network (a.k.a Multilayer Perceptron)
implementation with TensorFlow. This example is using the MNIST database
of handwritten digits (http://yann.lecun.com/exdb/mnist/).
Links:
    [MNIST Dataset](http://yann.lecun.com/exdb/mnist/).
Author: Aymeric Damien
Project: https://github.com/aymericdamien/TensorFlow-Examples/
"""

from __future__ import print_function

# Import MNIST data
from tensorflow.examples.tutorials.mnist import input_data
mnist = input_data.read_data_sets("/tmp/data/", one_hot=True)

import tensorflow as tf

# Parameters
learning_rate = 0.1
num_steps = 500
batch_size = 128
display_step = 100
model_path = "/tmp/model.ckpt"

# Network Parameters
n_hidden_1 = 256 # 1st layer number of neurons
n_hidden_2 = 256 # 2nd layer number of neurons
num_input = 784 # MNIST data input (img shape: 28*28)
num_classes = 10 # MNIST total classes (0-9 digits)

# tf Graph input
X = tf.placeholder("float", [None, num_input])
Y = tf.placeholder("float", [None, num_classes])

# Store layers weight & bias
weights = {
    'h1': tf.Variable(tf.random_normal([num_input, n_hidden_1])),
    'h2': tf.Variable(tf.random_normal([n_hidden_1, n_hidden_2])),
    'out': tf.Variable(tf.random_normal([n_hidden_2, num_classes]))
}
biases = {
    'b1': tf.Variable(tf.random_normal([n_hidden_1])),
    'b2': tf.Variable(tf.random_normal([n_hidden_2])),
    'out': tf.Variable(tf.random_normal([num_classes]))
}


# Create model
def neural_net(x):
    # Hidden fully connected layer with 256 neurons
    layer_1 = tf.add(tf.matmul(x, weights['h1']), biases['b1'])
    # Hidden fully connected layer with 256 neurons
    layer_2 = tf.add(tf.matmul(layer_1, weights['h2']), biases['b2'])
    # Output fully connected layer with a neuron for each class
    out_layer = tf.matmul(layer_2, weights['out']) + biases['out']
    return out_layer

# Construct model
logits = neural_net(X)
prediction = tf.nn.softmax(logits)

# Define loss and optimizer
loss_op = tf.reduce_mean(tf.nn.softmax_cross_entropy_with_logits(
    logits=logits, labels=Y))
optimizer = tf.train.AdamOptimizer(learning_rate=learning_rate)
train_op = optimizer.minimize(loss_op)

# Evaluate model
correct_pred = tf.equal(tf.argmax(prediction, 1), tf.argmax(Y, 1))
accuracy = tf.reduce_mean(tf.cast(correct_pred, tf.float32))

# Initialize the variables (i.e. assign their default value)
init = tf.global_variables_initializer()

# 'Saver' op to save and restore all the variables
saver = tf.train.Saver()

# Start training
with tf.Session() as sess:

    # Run the initializer
    sess.run(init)

    for step in range(1, num_steps+1):
        batch_x, batch_y = mnist.train.next_batch(batch_size)
        # Run optimization op (backprop)
        sess.run(train_op, feed_dict={X: batch_x, Y: batch_y})
        if step % display_step == 0 or step == 1:
            # Calculate batch loss and accuracy
            loss, acc = sess.run([loss_op, accuracy], feed_dict={X: batch_x,
                                                                  Y: batch_y})
            print("Step " + str(step) + ", Minibatch Loss= " + \
                  "{:.4f}".format(loss) + ", Training Accuracy= " + \
                  "{:.3f}".format(acc))

    print("Optimization Finished!")

    # Save model weights to disk
    save_path = saver.save(sess, model_path)
    print("Model saved in file: %s" % save_path)

# Running a test dataset by loading the model saved earlier
with tf.Session() as sess:

    # Run the initializer
    sess.run(init)

    saver.restore(sess, model_path)
    print("Model restored from file: %s" % save_path)

    # Calculate accuracy for MNIST test images
    print("Testing Accuracy:", \
    sess.run(accuracy, feed_dict={X: mnist.test.images,
                                      Y: mnist.test.labels}))

把這個程式跑起來之後,你應該可以看到以下的輸出:

ros@ros-K401UB:~/code/standalone/tensorflow$ python3.4 simple_nn_store.py 
^[[Z^[[ZExtracting /tmp/data/train-images-idx3-ubyte.gz
Extracting /tmp/data/train-labels-idx1-ubyte.gz
Extracting /tmp/data/t10k-images-idx3-ubyte.gz
Extracting /tmp/data/t10k-labels-idx1-ubyte.gz
2018-01-27 16:56:13.000020: I tensorflow/core/platform/cpu_feature_guard.cc:137] Your CPU supports instructions that this TensorFlow binary was not compiled to use: SSE4.1 SSE4.2 AVX AVX2 FMA
Step 1, Minibatch Loss= 9857.0781, Training Accuracy= 0.320
Step 100, Minibatch Loss= 320.8330, Training Accuracy= 0.859
Step 200, Minibatch Loss= 121.9466, Training Accuracy= 0.805
Step 300, Minibatch Loss= 55.0800, Training Accuracy= 0.891
Step 400, Minibatch Loss= 89.7953, Training Accuracy= 0.828
Step 500, Minibatch Loss= 52.5457, Training Accuracy= 0.836
Optimization Finished!
Model saved in file: /tmp/model.ckpt
Model restored from file: /tmp/model.ckpt
Testing Accuracy: 0.847

將辨識手寫數字的 Model 變成可以吃一張 28x28 的影像並輸出答案

上面的兩步,我們已經把基本範例用起來,不過他還不太直覺,因為我們是希望讓手寫辨識的 node 可以吃進一張影像,然後吐出結果,所以在這一步我們要改寫一下。

一步一步來,首先我們可以將 training 的地方改成直接讀取 train 好的 model,然後把計算 accuracy 的地方改成直接輸出辨識的結果:

from __future__ import print_function

import tensorflow as tf

from tensorflow.examples.tutorials.mnist import input_data
mnist = input_data.read_data_sets("/tmp/data/", one_hot=True)

# Parameters
model_path = "/tmp/model.ckpt"

# Network Parameters
n_hidden_1 = 256 # 1st layer number of neurons
n_hidden_2 = 256 # 2nd layer number of neurons
num_input = 784 # MNIST data input (img shape: 28*28)
num_classes = 10 # MNIST total classes (0-9 digits)

# tf Graph input
X = tf.placeholder("float", [None, num_input])

# Store layers weight & bias
weights = {
    'h1': tf.Variable(tf.random_normal([num_input, n_hidden_1])),
    'h2': tf.Variable(tf.random_normal([n_hidden_1, n_hidden_2])),
    'out': tf.Variable(tf.random_normal([n_hidden_2, num_classes]))
}
biases = {
    'b1': tf.Variable(tf.random_normal([n_hidden_1])),
    'b2': tf.Variable(tf.random_normal([n_hidden_2])),
    'out': tf.Variable(tf.random_normal([num_classes]))
}

# Create model
def neural_net(x):
    # Hidden fully connected layer with 256 neurons
    layer_1 = tf.add(tf.matmul(x, weights['h1']), biases['b1'])
    # Hidden fully connected layer with 256 neurons
    layer_2 = tf.add(tf.matmul(layer_1, weights['h2']), biases['b2'])
    # Output fully connected layer with a neuron for each class
    out_layer = tf.matmul(layer_2, weights['out']) + biases['out']
    return out_layer

# Construct model
logits = neural_net(X)
prediction = tf.nn.softmax(logits)

# Evaluate model
# argmax returns the index with the largest value across axes of a tensor
ans = tf.argmax(prediction, 1)

# Initialize the variables (i.e. assign their default value)
init = tf.global_variables_initializer()

# 'Saver' op to save and restore all the variables
saver = tf.train.Saver()

# Running a test dataset by loading the model saved earlier
with tf.Session() as sess:
    # Run the initializer
    sess.run(init)

    saver.restore(sess, model_path)
    print("Model restored from file: %s" % model_path)

    # Calculate accuracy for MNIST test images
    print("Answer:", sess.run(ans, feed_dict={X: mnist.test.images}))

跑出來之後,你應該會看到下列結果:

ros@ros-K401UB:~/code/standalone/tensorflow$ python3.4 simple_nn_srv.py
Extracting /tmp/data/train-images-idx3-ubyte.gz
Extracting /tmp/data/train-labels-idx1-ubyte.gz
Extracting /tmp/data/t10k-images-idx3-ubyte.gz
Extracting /tmp/data/t10k-labels-idx1-ubyte.gz
2018-01-27 20:06:24.861211: I tensorflow/core/platform/cpu_feature_guard.cc:137] Your CPU supports instructions that this TensorFlow binary was not compiled to use: SSE4.1 SSE4.2 AVX AVX2 FMA
Model restored from file: /tmp/model.ckpt
Answer: [7 2 1 ..., 4 5 6]

然後,我們可以將他改成只吃一張影像,並輸出這張影像的辨識結果:

""" Neural Network.
A 2-Hidden Layers Fully Connected Neural Network (a.k.a Multilayer Perceptron)
implementation with TensorFlow. This example is using the MNIST database
of handwritten digits (http://yann.lecun.com/exdb/mnist/).
Links:
    [MNIST Dataset](http://yann.lecun.com/exdb/mnist/).
Author: Aymeric Damien
Project: https://github.com/aymericdamien/TensorFlow-Examples/
"""

from __future__ import print_function

import tensorflow as tf
import matplotlib.pyplot as plt

from tensorflow.examples.tutorials.mnist import input_data
mnist = input_data.read_data_sets("/tmp/data/", one_hot=True)

# Parameters
model_path = "/tmp/model.ckpt"

# Network Parameters
n_hidden_1 = 256 # 1st layer number of neurons
n_hidden_2 = 256 # 2nd layer number of neurons
num_input = 784 # MNIST data input (img shape: 28*28)
num_classes = 10 # MNIST total classes (0-9 digits)

# tf Graph input
X = tf.placeholder("float", [None, num_input])

# Store layers weight & bias
weights = {
    'h1': tf.Variable(tf.random_normal([num_input, n_hidden_1])),
    'h2': tf.Variable(tf.random_normal([n_hidden_1, n_hidden_2])),
    'out': tf.Variable(tf.random_normal([n_hidden_2, num_classes]))
}
biases = {
    'b1': tf.Variable(tf.random_normal([n_hidden_1])),
    'b2': tf.Variable(tf.random_normal([n_hidden_2])),
    'out': tf.Variable(tf.random_normal([num_classes]))
}

# Create model
def neural_net(x):
    # Hidden fully connected layer with 256 neurons
    layer_1 = tf.add(tf.matmul(x, weights['h1']), biases['b1'])
    # Hidden fully connected layer with 256 neurons
    layer_2 = tf.add(tf.matmul(layer_1, weights['h2']), biases['b2'])
    # Output fully connected layer with a neuron for each class
    out_layer = tf.matmul(layer_2, weights['out']) + biases['out']
    return out_layer

# Construct model
logits = neural_net(X)
prediction = tf.nn.softmax(logits)

# Evaluate model
# argmax returns the index with the largest value across axes of a tensor
ans = tf.argmax(prediction, 1)

# Initialize the variables (i.e. assign their default value)
init = tf.global_variables_initializer()

# 'Saver' op to save and restore all the variables
saver = tf.train.Saver()

# Show image that we want to predict
plt.imshow(mnist.test.images[0].reshape((28, 28)))
plt.show()

# Running a test dataset by loading the model saved earlier
with tf.Session() as sess:
    # Run the initializer
    sess.run(init)

    saver.restore(sess, model_path)
    print("Model restored from file: %s" % model_path)

    # Calculate the answer for the image
    print("Answer:", sess.run(ans, feed_dict={X: mnist.test.images[0:1]}))

跑起來之後,你應該會先看到這個圖片的輸出:
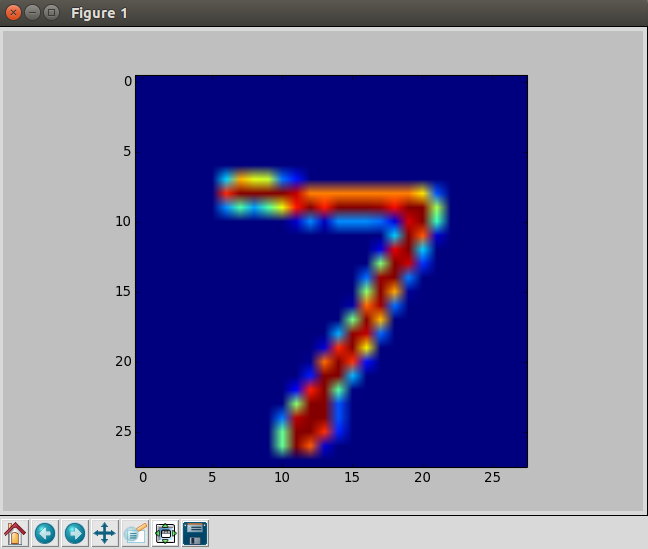
minst_img

然後會看到下列的命令列輸出:

ros@ros-K401UB:~/code/standalone/tensorflow$ python3.4 simple_nn_srv.py
Extracting /tmp/data/train-images-idx3-ubyte.gz
Extracting /tmp/data/train-labels-idx1-ubyte.gz
Extracting /tmp/data/t10k-images-idx3-ubyte.gz
Extracting /tmp/data/t10k-labels-idx1-ubyte.gz
2018-01-27 23:08:35.638018: I tensorflow/core/platform/cpu_feature_guard.cc:137] Your CPU supports instructions that this TensorFlow binary was not compiled to use: SSE4.1 SSE4.2 AVX AVX2 FMA
Model restored from file: /tmp/model.ckpt
Answer: [7]

可以看到自己的 model 成功辨識數字了!

總結

今天我們一起使用 TensorFlow 了一個可以辨識手寫數字的程式,其實這個範例可以用來做很多事情,例如你可以將辨識手寫數字的程式跟 ROS 串起來,變成可以辨識手寫數字的 node(只需要再串接 ROS),然後建立一個 service ,就可以讓其他人拿圖片來跟這個 node 要求辨識結果。或是將 node 裡面的功能和訊息格式修改一下,就可以做到物體辨識。之後有機會再一起來實作。

關於作者:
@pojenlai 演算法工程師,對機器人跟電腦視覺有少許研究,最近在學習看清事物的本質與改進自己的觀念


#TensorFlow #Neural Network


Related Posts

分類相似語法

分類相似語法

Pinia練習-製作購物車

Pinia練習-製作購物車

JS中的淺拷貝和深拷貝

JS中的淺拷貝和深拷貝


Newsletter


Comments