前言 前幾天的時候我在 Medium 上發了這篇文:Medium 中文寫作者追蹤人數排名與不專業數據分析 ,內文是我用 Node.js 寫了一個簡單的 Medium 爬蟲之後整理出來的數據。
在原本那篇文章裡面有簡單提到爬蟲的資料來源,但是對技術的部分沒有太多著墨。事實上,在寫 Medium 爬蟲的時候其實踩了一些坑,與其教大家寫一個 Medium 爬蟲,不如讓大家跟我一起走過這些坑,盡可能地還原我當初在寫這個爬蟲時碰到的障礙以及解決方法,我覺得這樣會更有趣一點。
因此,這篇就是用來記錄我寫這個 Medium 爬蟲的經過,其中也會有點教學的成份在,所以看完之後你應該也能夠寫出一個類似的爬蟲,或至少你看到 source code 的時候不會一頭霧水。
雖然說最後寫出來的是這個跟使用者資料有關的爬蟲,但我一開始其實是先從文章列表開始的,因為那時候剛好有一個需求,想要把自己的文章全部爬下來。
會有這個需求是因為 Medium 內建的功能其實滿爛的,你很難找到一個作者 po 過的所有文章,或者是說很難一目瞭然。所以早期的文章除了透過 Google 以外,是很難被找到的。
所以我後來就手動做了一個文章的索引 ,自己整理了以前發過的所有文章。但是身為工程師,這明明就是一件可以寫程式來做的事啊!所以想嘗試看看能不能先寫一個文章列表的爬蟲。
第一次嘗試:尋找資料來源 對我來說,爬蟲的第一步也是最困難的一步就是找到資料來源。只要這一步完成了,其他的相比之下都比較簡單。
如果能拿到 Medium 的 API 那當然是最好的。若是沒有的話,就必須用 puppeteer 之類的東西去爬 HTML 然後自己 parse 了。
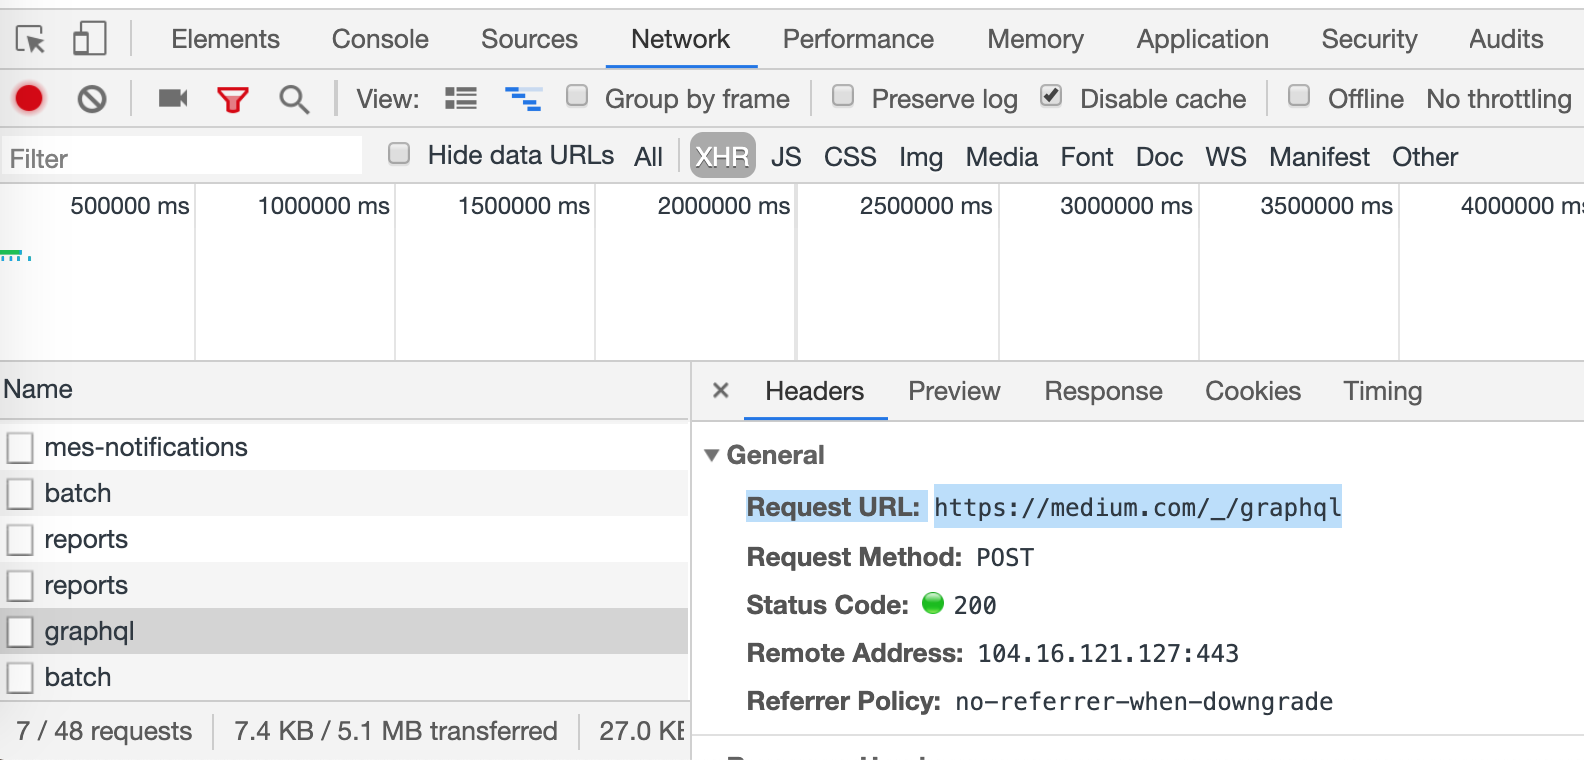
在 Medium 的文章列表那邊捲動一下並且打開 devtool,可以看到 medium 後面是用 GraphQL:
這個就麻煩了…我對 GraphQL 不太熟,要花時間去研究一下它的資料結構,感覺要花不少時間,於是那時我就暫時先放棄這條路,決定來試試看用 puppeteer。
第二次嘗試:puppeteer 如果你不知道什麼是 puppeteer,我在這邊簡單介紹一下。你可以想成 puppeteer 會自動幫你打開一個瀏覽器,你可以寫程式去操控這個瀏覽器。例如說我要打開一個頁面並且在這頁面上執行 JS 等等,所以使用 puppeteer 的話,爬蟲的原理就是打開某個頁面,執行一段 JS 拿到頁面上的資料。
puppeteer 用起來很簡單,只要找一下現成的範例看一下語法,改一改就可以直接拿來用了。稍微研究了一下 HTML 結構之後,可以寫出下面的程式碼:
1
2
3
4
5
6
7
8
9
10
11
12
13
14
15
16
17
18
19
20
21
22
23
24
25
26
27
28
29
30
31
32
33
34
35
36
37
38
39
40
41
42
43
const puppeteer = require ('puppeteer' ) async function main ( const username = 'hulitw' const url = 'https://medium.com/@' + username const browser = await puppeteer.launch ({ headless : true }) const page = await browser.newPage () await page.goto (url, { waitUntil : 'domcontentloaded' }) const data = await page.evaluate (mediumParser) console .log (data) await page.close () await browser.close () } function mediumParser ( const elements = document .querySelectorAll ('section > div:nth-child(2) > div > div' ) const result = [] for (let i = 0 ; i < elements.length ; i++) { const h1 = elements[i].querySelector ('h1' ) const a = elements[i].querySelectorAll ('a' ) if (h1) { result.push ({ title : h1.innerText , link : a[3 ].href }) } } return result } main ()
只要觀察出 HTML 與 CSS 的規則之後,就可以取得想拿的資料。但 Medium 不好爬是因為在 class name 的部分有使用 functional CSS ,而且 class 的命名都有經過處理,看起來是用程式自動去跑的,所以只要 Medium 一更新,元素的命名應該會不太一樣。
所以最後只能從 HTML 的結構下手,去把文章給抓出來。
解決了這個問題之後,還有一個問題,那就是無限捲動。Medium 跟很多網頁一樣,要一直往下滑才會載入新文章,而這邊必須觀察的規律是滑到什麼時候才要停止。
觀察之後發現當發表過的文章載入完以後,才會顯示 Highlighted by xxx 這個區塊,所以可以用這個元素有沒有出現當作終止條件。
接著可以寫一段程式碼,讓頁面不斷往下捲動直到載入所有文章為止:
1 2 3 4 5 6 7 8 9 10 11 12 13 14 15 16 17 18 19 20 21 22 23 24 25 26 27 function getArticlesCount ( const elements = document .querySelectorAll ('section > div:nth-child(2) > div > div' ) return elements.length } async function scroll (page ) { await page.evaluate ('window.scrollTo(0, document.body.scrollHeight)' ) try { await page.waitForSelector ('h4 ~ p' , { timeout : 1000 }) } catch (err) { const count = await page.evaluate (getArticlesCount); console .log (`Fetching... ${count} articles` ) await scroll (page); } }
為了在 console 上讓我能看到現在的進度(可以確認程式是不是有 bug),還加了一段是每一次捲動都會印出現在畫面上有的文章數量。
做到這邊,就可以抓到使用者所有的文章標題以及連結了。
那發文日期呢?也拿得到嗎?
拿得到,但是麻煩很多。看看下面的 Medium 截圖就知道了:
如果是今年(2019)的文章,就不會顯示年份,否則的話就會顯示出發文年份。所以這邊要再經過特殊的判斷處理,而且只拿得到日期,拿不到詳細發文時間。
做到這邊,我就懶得再繼續下去了。想說有很多眉眉角角要處理,而且抓到的資料有限,還不如轉去研究 API 比較實在。
第三次嘗試:puppeteer + API 前面已經說過我那時對 GraphQL API 不熟,所以暫時放棄了。但是嘗試了 puppeteer 之後,反而讓我有了新的思路。
在 puppeteer 裡面你可以加上監聽 network response 的事件,而頁面在載入文章的時候,一定會呼叫 API 去拿文章。這樣子事情不就好辦多了嗎?我不用自己研究怎麼 call API,我讓頁面自己去 call API,我自己只要監聽 response,研究一下 response 的格式就行了!
程式碼大概是長這樣的:
1
2
3
4
5
6
7
8
9
10
11
12
13
14
15
16
17
18
19
20
21
22
23
24
25
26
27
const apiResponses = [] page.on ('response' , async (response) => { if (response._url .indexOf ('graphql' ) < 0 ) return const json = await response.json () try { const post = parsePosts (json) apiResponses.push (...post) } catch (err) { } }) function parsePosts (json ) { const result = [] try { const streams = json.data .user .profileStreamConnection .stream for (stream of streams) { if (stream.itemType .__typename === 'StreamItemCompressedPostList' ) { } } } catch (err) { } }
每次有新的 response 進來就可以解析一下並丟到 array 裡面,最後拿到的就會是完整的從 API 傳來的資料。
但後來我發現這條路也行不通。
為什麼呢?因為頁面在第一次載入的時候,從 Server 回傳的 HTML 就已經有前幾筆文章的資料了,往下捲動的時候才是使用 ajax 來載入新的文章。意思是說,如果我想靠監聽 ajax response 的方式拿到所有文章的資料是沒辦法的,前幾筆是拿不到的。
做到這邊的時候我有點心灰意冷,想說花了兩天寫出一個不能用的東西。抓取文章列表的部分做到這我就放棄了,懶得繼續花時間去研究,並且把心力轉向我真正想抓的東西。
最前面提到的抓文章列表的需求其實是突然蹦出來的,在這之前我有更想抓的東西:follower,我想統計臺灣寫作者的 follower 人數,然後看看自己可以排到第幾名(滿足一下虛榮心)。
在嘗試了抓文章列表並失敗以後,我有試過用類似的方式去抓 follower,但做到一半發現這樣抓的話效率也太差了,每次捲動載入 25 個 follower 的話,1000 人可是要捲動 40 次。
自己如果做不出來的話,答案就很明顯了:Google,就拜託你了!
第四次嘗試:Google 大神 直接在 Google 打上關鍵字:medium follower api,出現的第一個搜尋結果是最無用的官方 API,幾乎什麼資料都沒給,而且要申請還要寄信給客服,有夠麻煩。
但是第二個搜尋結果讓我眼睛為之一亮,是一個 gist 檔案:Medium API: get number of followers for User · GitHub 。
程式碼才五十行而已,很短,掃過一遍可以看到最關鍵的一行:
1 2 3 4 function generateMediumProfileUri (username ) { return `https://medium.com/@${username} ?format=json` ; }
什麼!原來還有這招,在網址後面加 ?format=json 就可以拿到 json 格式的資料,這真是太神奇了。
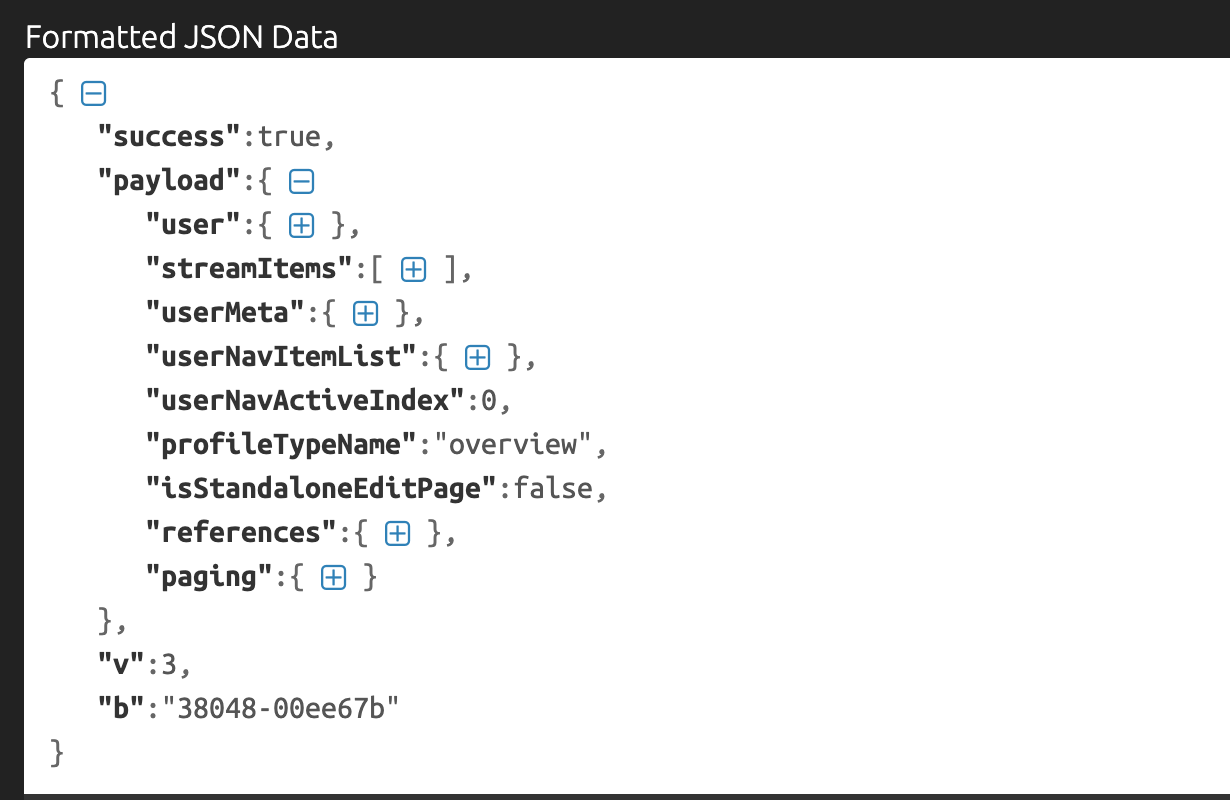
把得到的資料丟到 JSON Formatter 之後,可以看到大概的結構:
在這邊可以拿到使用者的個人資料以及發過的一些文章,也可以拿到我們的目標:follower!
我們順便來看一下使用者資料可以拿到些什麼:
1
2
3
4
5
6
7
8
9
10
11
12
13
14
15
"user" :{ "userId" :"f1fb3e40dc37" , "name" :"Huli" , "username" :"hulitw" , "createdAt" :1487549030919 , "imageId" :"1*WQyJUJBQpBNIHH8GEWE6Sg.jpeg" , "backgroundImageId" :"" , "bio" :"自學程式,後來跑去唸哲學系但沒念完,前往新加坡工作了兩年半後決定放一年的假,到處旅遊。喜歡教學,發現自己好像有把事情講得簡單又清楚的能力,相信分享與交流可以讓世界更美好。\bMedium 文章列表請參考:https://aszx87410.github.io/blog/medium" , "allowNotes" :1 , "mediumMemberAt" :1542441600000 , "isNsfw" :false , "isWriterProgramEnrolled" :true , "isQuarantined" :false , "type" :"User" }
除了基本的自介跟姓名以外,還可以拿到成為 Medium 付費會員的時間以及成為 Medium 會員的時間,還滿有趣的,還有一個 flag 也很有趣:isNsfw。
唯一缺的就是 follower 的清單了。
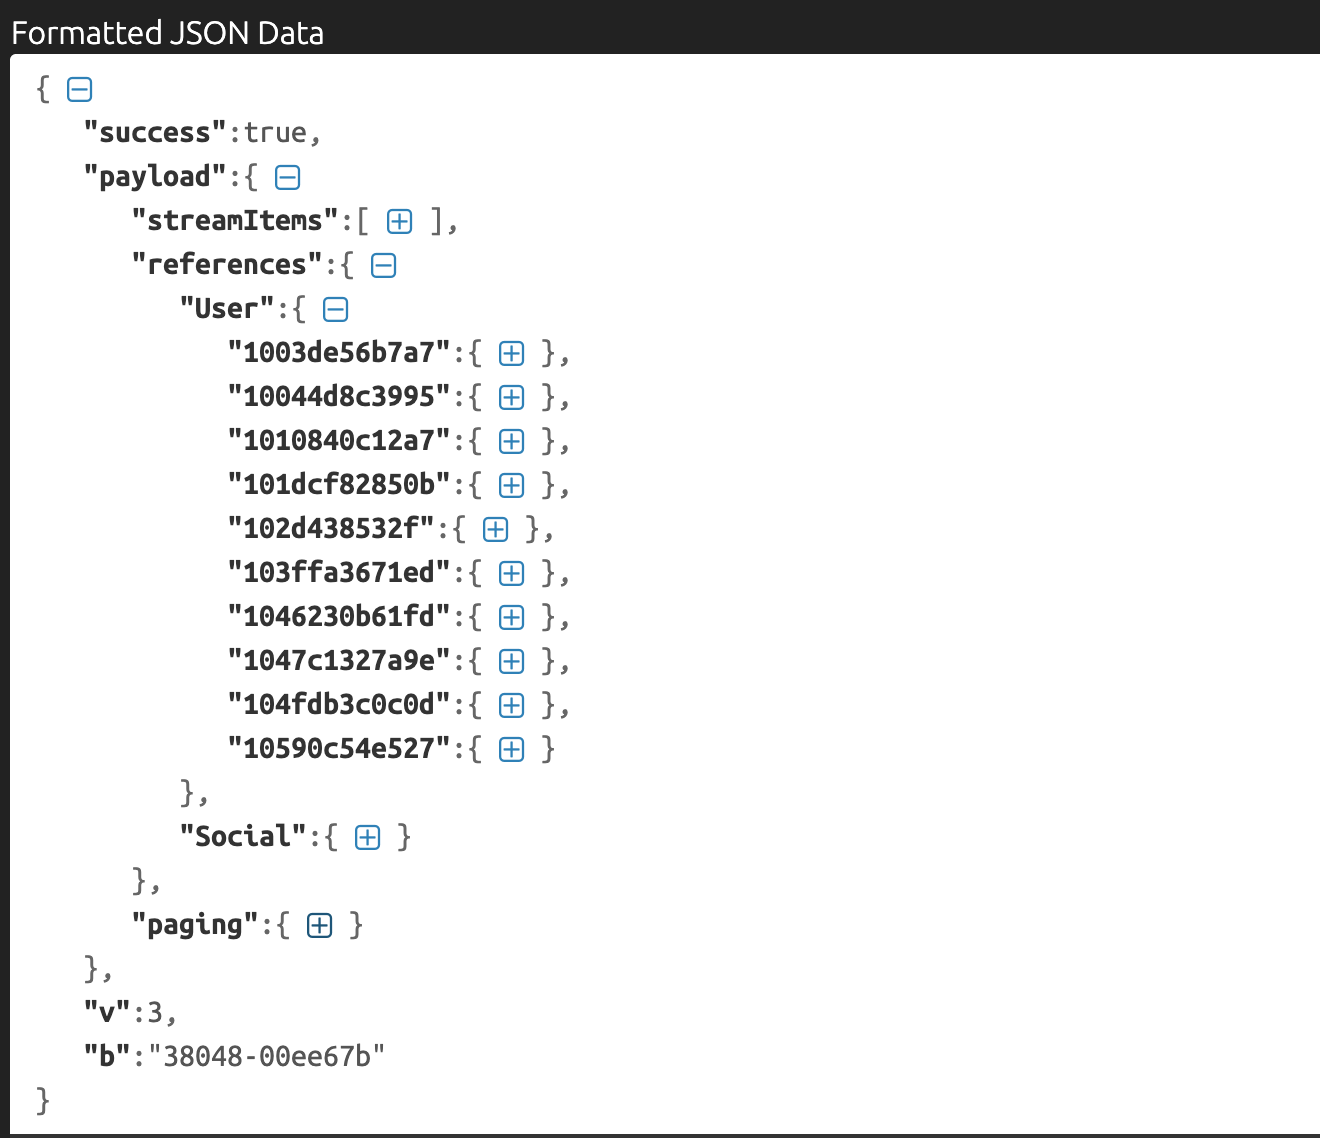
這邊我嘗試用一樣的方法,在 Medium 網址後面接了參數:https://medium.com/@hulitw/followers?format=json,沒想到還真的有東西!在 response 裡面可以找到 10 個 follower 的資料。
有了資料之後就確定這個 API 是有用的,再來直接跳到 response 最下面 paging 的部分:
1
2
3
4
5
6
7
8
9
"paging" :{ "path" :"https://medium.com/_/api/users/f1fb3e40dc37/profile/stream" , "next" :{ "limit" :10 , "to" :"10590c54e527" , "source" :"followers" , "page" :2 } }
path 的部分看起來是個 API 網址,next 應該是參數,試著把這些參數帶到網址上面:https://medium.com/_/api/users/f1fb3e40dc37/profile/stream?limit=10&to=10590c54e527&source=followers&page=2 ,就出現了只有 follower 相關的資料!
試著把 limit 換一下,發現最大值應該是 25,一次可以抓 25 筆資料;page 換一下之後發現沒什麼作用,於是把 to 也改一下,發現可以成功抓到新的資料。看來分頁機制是採用 cursor based 的。
在經過了幾次嘗試之後,終於拿到了兩個 API 的網址,一個可以獲得詳細個人資料,另外一個可以拿到 follower 的列表!
資料來源確定有了之後,就可以來構思一下爬蟲的架構了。
爬蟲架構 我要怎麼樣才能儘可能爬到所有的台灣寫作者?
首先第一個問題是我們必須把範圍放大一點,因為中文寫作者裡面可能有香港來的或是中國來的,你比較難靠程式去辨別到底是哪裡來的,尤其是香港跟台灣,因為都使用繁體中文。
為了不讓問題變得更複雜,我們只要能抓到「中文使用者就好」。
那要怎麼樣才能抓到最多中文使用者?一個很簡單的策略就是我們預設中文使用者的 follower 應該都是中文使用者,所以我們只要從某個使用者開始,把他所有的 follower 都丟進一個 queue 裡面,一直持續這個動作就好。
用文字簡化就是這樣:
從 queue 裡面拿出一個使用者
把他的資料寫進資料庫
把他的所有 follower 丟進 queue
回到步驟一
這樣子就可以靠著一個使用者無限延伸出去,而且理論上來說可以抓到超級多使用者的資料。這邊之所有選擇 follower(追蹤我的人)而不是 following(我追蹤的人),是考量到追蹤的使用者可能會有別的國家的,例如說我可能會追蹤國外的工程師之類的,但因為我不寫英文,所以國外的工程師應該不會來追蹤我。這樣的話就可以讓使用者侷限在中文,符合我們的目標。
接著就是系統架構的部分,這邊依據你想達成的效率會有不同種做法。
對我來說效率會最高的就是找那種很適合用來當 queue 的 service,例如說 redis 之類的,然後資料庫的部分可以選用 MySQL 或任何你熟悉的軟體。這樣子的好處是你可以開不同機器,然後每一台機器都是一個 worker,例如說你開五台機器,就會有五個 worker 一直從 queue 裡面拿東西出來並且把 follower 丟進去。
這邊之所以開很多台機器而不是開很多 thread 或 process,是因為 rate limiting 的問題。一般 API 都會有流量限制,你如果同一個 IP 發太多 request 會被 ban 掉或者是一段時間拿不到 response,所以開再多 process 跟 thread 都沒有用,只能開不同機器來解決(或只要有辦法換 IP 的話就可以)。
後來因為我沒有很在乎效率而且懶得開很多機器,所以只打算開一台讓他慢慢抓。如果只有一個 worker 的話,queue 的部分也可以簡單做一下,這邊我就也用 MySQL 來實做簡單的 queue,讓整個爬蟲的架構變得很簡單。
我們可以來看一下資料庫的架構:
Users
id
userId
username
name
bio
follower
fr
mediumMemberAt
createdAt
自增ID
使用者 ID
前面加上 @ 就是 profile 網址
使用者名稱
自介
追蹤人數
分類
成為付費會員的時間
加入會員的時間
Queue
程式的執行流程是這樣的:
從 Queue 裡面拿出一個 userId
如果 userId 已存在 Users,回到步驟一
把他的資料寫進 Users
把他的所有 follower 丟進 Queue
回到步驟一
從 queue 拿出來的時候先確保沒有爬過這個使用者,有的話就跳過,然後把所有追蹤者再丟到 queue 裡面,這樣程式就會一直跑,直到 queue 裡面沒有東西為止。
架構設計好之後,就可以來開始 coding 啦!
第一版爬蟲 首先我們需要有一個 queue,能夠 push 跟 pop,還要能確定現在拿的 userId 是不是已經爬過了。這個很適合用 class 來實作:
1
2
3
4
5
6
7
8
9
10
11
12
13
14
15
16
17
18
19
20
21
22
23
24
25
26
27
28
29
30
31
32
33
34
35
36
37
38
39
40
41
42
43
44
45
46
47
48
49
50
51
52
53
54
55
56
57
58
class Queue { constructor (conn ) { this .conn = conn } get ( return new Promise ((resolve, reject ) => { this .conn .query ('SELECT userId from Queues limit 1' , (error, results ) => { if (error) { console .log (error) return reject (error) } if (results.length !== 1 ) { return resolve (null ) } const data = results[0 ] this .conn .query ('DELETE from Queues where userId=?' , [data.userId ], (err, results ) => { if (error) { console .log (error) return reject (error) } return resolve (data.userId ) }) }); }) } check (uid ) { return new Promise ((resolve, reject ) => { this .conn .query ('SELECT userId from Users where userId=?' , [uid], function (error, results ) { if (error) { return reject (error) } if (results.length > 0 ) { return resolve (false ) } return resolve (true ) }); }) } push (list ) { return new Promise ((resolve, reject ) => { const values = [] for (let item of list) { values.push ([item]) } this .conn .query (` INSERT IGNORE INTO Queues (userId) VALUES ?` , [values], (err ) => { if (err) { } resolve () } ) }) } }
有了 queue 以後可以來寫主要邏輯,主程式的架構會長這樣:
1
2
3
4
5
6
7
8
9
10
11
12
13
14
15
16
17
18
19
20
21
22
23
24
25
26
27
28
29
30
var connection = mysql.createPool ({ connectionLimit : 10 , host : process.env .host , user : '' , password : '' , database : 'medium' , charset : 'utf8mb4' }) async function main ( const queue = new Queue (connection) while (true ) { const userId = await queue.get () if (!userId) { console .log ('no data from queue, end' ) break ; } const check = await queue.check (userId) if (!check) { continue } console .log ('uid:' , userId) } }
接著只要實作以下兩個功能就好:
抓取使用者資料
把使用者資料寫進資料庫
把 follower 丟回 queue
由於 Medium API 的 response 都會有一個防 json hijacking 的開頭,因此我們可以包裝一個函式專門來 parse API 的 response:
1
2
3
4
5
6
7
8
9
async function getMediumResponse (url ) { try { const response = await axios.get (url) const json = JSON .parse (response.data .replace ('])}while(1);</x>' , '' )) return json } catch (err) { return null } }
接著就可以寫兩個 function,一個抓使用者資料,一個抓 follower 資料(有出現 _ 的都是 lodash 的 function):
1
2
3
4
5
6
7
8
9
10
11
12
13
14
15
16
17
18
19
20
21
22
23
24
25
26
27
28
29
30
31
32
33
34
35
36
37
async function getUserInfo (uid ) { const url = `https://medium.com/_/api/users/${uid} /profile/stream` const json = await getMediumResponse (url) if (!json) { return {} } const userId = _.get (json, 'payload.user.userId' ) const follower = _.get (json, `payload.references.SocialStats.${userId} .usersFollowedByCount` , 0 ) return { followerCount : follower, userId : userId, name : _.get (json, 'payload.user.name' ), username : _.get (json, 'payload.user.username' ), bio : _.get (json, 'payload.user.bio' ), mediumMemberAt : _.get (json, 'payload.user.mediumMemberAt' ), isWriterProgramEnrolled : _.get (json, 'payload.user.isWriterProgramEnrolled' ), createdAt : _.get (json, 'payload.user.createdAt' ), } } async function getFollowers (uid, to ) { let url = `https://medium.com/_/api/users/${uid} /profile/stream?source=followers&limit=200` if (to) { url += '&to=' + to } const json = await getMediumResponse (url) if (!json) { return {} } const followers = _.keys (json.payload .references .Social ) || [] const nextTo = _.get (json, 'payload.paging.next.to' ) return { followers, nextTo } }
基本上都是 call API 之後稍微處理一下資料,然後把我們關注的東西傳回去。
上面我們只實做了「抓一次 follower」的 function,所以最後還要再實作一個「抓全部 follower 並且丟進 queue」的 function:
1
2
3
4
5
6
7
8
9
10
11
12
13
14
15
16
17
18
async function getAllFollowers (uid, queue ) { const followers = [] let to = undefined while (true ) { const data = await getFollowers (uid, to) if (!data) { break ; } followers.push (...data.followers ) to = data.nextTo console .log (uid, 'fetching...' , followers.length ) if (data.followers .length === 0 || !to) { break ; } await queue.push (data.followers ) } return followers }
這個函式會不斷去抓 follower 出來並丟進 queue,並且印出現在總共抓了幾筆 follower 的資料,全部抓完會把所有的 follower 回傳回去(會回傳是因為一開始我是全部抓完才一次寫進 queue,但後來發現比較沒效率,所以改成現在這樣抓一次就寫一次)。
最後是把使用者資料寫進去資料庫的程式碼:
1
2
3
4
5
6
7
8
9
10
11
12
13
14
15
16
17
18
19
20
21
function format (time ) { if (!time) return null return moment (time).format ('YYYY-MM-DD HH:mm:ss' ) } function saveUserInfo (conn, info ) { conn.query (` INSERT INTO Users ( userId, username, name, bio, follower, mediumMemberAt, createdAt, isWriterProgramEnrolled ) VALUES ?` , [[[ info.userId , info.username , info.name , info.bio , info.followerCount , format (info.mediumMemberAt ), format (info.createdAt ), info.isWriterProgramEnrolled ]]], (err ) => { if (err) { } } ) }
把這幾個核心功能的 function 寫完以後,只要修正一下我們的主程式,就可以把整個爬蟲完成了:
1
2
3
4
5
6
7
8
9
10
11
12
13
14
15
16
17
18
19
20
21
22
23
24
25
26
27
28
29
30
31
32
33
34
35
36
37
38
39
40
41
42
43
44
async function main ( const queue = new Queue (connection) while (true ) { const userId = await queue.get () if (!userId) { console .log ('no data from queue, end' ) break ; } const check = await queue.check (userId) if (!check) { continue } console .log ('uid:' , userId) try { const info = await getUserInfo (userId) if (!info.userId ) { console .log ('sleep...' ) await sleep (3000 ) } saveUserInfo (connection, info) if (info.followerCount > 0 ) { const followerList = await getAllFollowers (userId, queue) console .log ('Add ' + followerList.length + ' into queue.' ) } } catch (err) { console .log ('error...sleep' ) await sleep (3000 ) } } }
上面就是我們按照先前的邏輯寫出來的程式碼:
從 Queue 裡面拿出一個 userId
如果 userId 已存在 Users,回到步驟一
把他的資料寫進 Users
把他的所有 follower 丟進 Queue
回到步驟一
不過這邊額外加了一個邏輯是當呼叫 API 有問題的時候,就先暫停 3 秒鐘,這樣是為了防止被 rate limiting 擋到。但這個機制做的不是很好,因為沒有 retry,所以一但發生錯誤,這個 userId 就被跳過了。
當初的想法是只跳過一個 userId 無傷大雅,畢竟 queue 裡面可能有十萬筆的 userId,而且就算跳過,之後還是有可能再被丟到 queue 裡面,所以不做 retry 的機制也無所謂。
上面的程式碼全部組裝起來,就是第一版爬蟲的雛形了。運作的 ok 沒什麼問題,就只是速度比較慢而已。而且 queue 增長的速度比想像中驚人,我跑了一個晚上 queue 大概就多了十萬筆資料,而 users 裡面卻只有四五千筆而已。
不過在跑了一個晚上之後,我發現了一個致命的錯誤。
第二版爬蟲:判斷中文 這個致命的錯誤就是當初的預設:「中文作者的 follower 都是中文作者」是有問題的,而且仔細想想會發現這個預設的確很不可靠。
所以跑了一個晚上的爬蟲,我發現資料庫裡面多了一大堆外國使用者。而且一但多了一個,你的 queue 裡面就會出現一大堆的外國使用者。
為了避免這個情形,我決定從自介跟暱稱下手,寫一個判斷自介跟暱稱是否含有中文的函式,如果有中文才被放進來。這邊我直接複製在 Stack Overflow 上找到的程式碼,看起來十分神奇:
1
2
3
4
5
function isChinese (text = '' ) { const regex = /(\p{Script=Hani})+/gu ; return text.match (regex) }
在 queue 裡面抓完使用者資料後會進行判斷:
1
2
3
4
5
6
const info = await getUserInfo (userId) if (!isChinese (info.bio ) && !isChinese (info.name )) { continue ; }
做這個判斷的時候我就已經想到會有一個問題,那就是有些人他們喜歡國際化一點,在自介會放全英文,暱稱也會是英文,所以會被誤判。明明就是用中文寫作,但是卻沒有被加進 queue 裡面。
這邊我當時覺得無所謂,畢竟這樣的人不多,而且要解的話有點麻煩。當時我腦中本來就有浮現一個解法,就是去抓他最近拍手過或發表過的文章,看看標題是不是中文,這樣的判斷會準確很多。但當時我懶得實作,想說先讓爬蟲繼續跑一天看看。
隔天早上,又發現了一個完全沒想過會碰到的問題。
第三版爬蟲:判斷日文 使用者清單裡面出現一大堆日本人。
因為他們有些暱稱是漢字,要嘛就是自介有漢字,所以不會被中文判斷篩掉。發現這個問題的時候我第一個想法是:「如果這是在面試我一定被刷掉,這種 case 居然當初沒想到…」。
為了解決這種情況,就再找了一個判斷是不是有日文(不含漢字)的正則表達式:
1
2
3
4
5
6
7
8
9
function isJapanese (text = '' ) { const regexJP = /[\u3040-\u309F]|[\u30A0-\u30FF]/g ; const jp = text.match (regexJP) if (jp && jp.length >= 3 ) { return true } return false }
如果含有三個以上的日文字母,就回傳是日文。這邊會設定數量是我怕有些台灣人用什麼 の 之類的,就會被誤判。不過除了寫死數量以外,還有個比較好的做法可能是看比例,例如說一句話如果有八九成是中文字,就是中文之類的。
判斷邏輯的部分改成這樣:
1
2
3
4
5
6
7
8
9
10
const info = await getUserInfo (userId) if (!isChinese (info.bio ) && !isChinese (info.name )) { continue ; } if (isJapanese (info.bio ) || isJapanese (info.name )) { continue ; }
如果不是中文就跳過,再來確認是不是日文,如果自介或是暱稱是日文也跳過。
好,這樣就沒有問題了吧!於是我把資料砍光,再讓爬蟲跑一個晚上試試看。
隔天起來,發現我真是天真的可以。
第四版爬蟲:直接重構 打開資料庫,發現還是有很多日本使用者。原因在於他們可能暱稱是用漢字,然後沒有寫自介,或者自介只有一兩個字之類的,所以還是會被判定為是中文使用者。
追根究底,都是這個判斷機制太不可靠的原因。
既然事情已經到這個地步,就沒辦法偷懶了,我只能實作剛開始提到的更準確的解法:「看看最近發表過或是拍手過的文章是不是中文」,而這部分的資料幸好原本的 API 就有提供,實作起來比想像中簡單許多。
除了這個以外,由於 queue 增長的速度比消耗的速度快太多,因此我一度改變了一下方法。我寫了另外一支小程式,把原本流程中的「把 followers 丟到 queue」拿掉,並且一次拿 10 筆使用者資料出來。
換句話說,這個新的小程式做的事情很簡單,就是不斷抓使用者資料並存到資料庫,這樣 queue 就會一直變小,讓使用者資料愈來愈多。大概一個小時可以抓兩萬筆,累積一個晚上的 queue 白天花半天就可以跑完。
好處就是我可以快速累積使用者資料,畢竟原本的實作太慢了,一天大概只能跑個一萬筆左右,現在新的實作因為不用把東西丟到 queue 裡面,會讓使用者資料長得很快。
那時候偷懶直接複製程式碼改一下就做完這個新的小程式,導致程式寫到這邊愈來愈亂,考量到之後想要 open source,是時候整理一下程式碼了,於是就順便把程式重構一下。
重構完的架構如下:
1
2
3
4
5
6
7
8
9
10
. ├── README.md // 說明 ├── app.js // 主程式 ├── getUsers.js // 只抓使用者資料的小程式 ├── config.js // 設定檔 ├── db.js // 資料庫相關 ├── medium.js // medium API 相關 ├── package.json ├── queue.js └── utils.js
我們先從 config 開始看起吧:
1
2
3
4
5
6
7
8
9
10
11
12
13
14
15
16
module .exports = { db : { connectionLimit : 10 , host : '' , user : '' , password : '' , database : 'medium' , charset : 'utf8mb4' }, batchLimit : 1 , randomDelay : function ( return Math .floor (Math .random () * 200 ) + 100 }, errorRateTolerance : 0.2 , delayWhenError : 500 }
這邊就是放一些設定檔,包括資料庫的設定以及一些抓資料的參數,大多數都是跟抓使用者資料的那個小程式有關,例如說要抓幾筆,然後每一次要停多久之類的。這些都是為了避免送太多 request 被擋而做的措施。
再來看一下 utils.js:
1
2
3
4
5
6
7
8
9
10
11
12
13
14
15
16
17
18
19
20
21
22
23
24
25
26
27
28
module .exports = { isChinese : (text = '' ) => { const regex = /(\p{Script=Hani})+/gu ; return text.match (regex) }, isJapanese : (text = '' ) => { const regexJP = /[\u3040-\u309F]|[\u30A0-\u30FF]/g ; const jp = text.match (regexJP) if (jp && jp.length >= 2 ) { return true } return false }, sleep : ms =>new Promise (resolve => setTimeout (resolve, ms) }), log : function ( const args = Array .prototype slice .call (arguments ); console .log .apply (console , args) } }
這邊基本上就是把剛剛用到的一些函式搬過來統一放在這邊,日文字母的限制縮小為兩個,然後把 console.log 包裝了一下,想說之後要客製化比較方便。
然後是 medium.js,這邊是有關 medium API 的部分,並且新增了一個函式 isMandarinUser 來判斷是否是中文使用者:
1
2
3
4
5
6
7
8
9
10
11
12
13
14
15
16
17
18
19
20
21
22
23
24
25
26
27
28
29
30
31
32
33
34
35
36
37
38
39
40
41
42
43
44
45
46
47
48
49
50
51
52
53
54
55
56
57
58
59
60
61
62
63
64
65
66
67
68
69
70
71
72
73
74
75
76
77
78
79
80
const axios = require ('axios' )const _ = require ('lodash' )const utils = require ('./utils' )const JSON _HIJACKING_PREFIX = '])}while(1);</x>' async function getMediumResponse (url ) { try { const response = await axios.get (url) const json = JSON .parse (response.data .replace (JSON _HIJACKING_PREFIX, '' )) return json } catch (err) { return null } } function isMandarinUser (name, bio, posts ) { if (utils.isJapanese (name) || utils.isJapanese (bio)) { return false } if (!posts) { return utils.isChinese (name) || utils.isChinese (bio) } const contents = _.values (posts).map (item =>title + _.get (item, 'content.subtitle' )) return Boolean ( contents.find (item => return utils.isChinese (item) && !utils.isJapanese (item) }) ) } module .exports = { getFollowers : async (uid, to) => { let url = `https://medium.com/_/api/users/${uid} /profile/stream?source=followers&limit=200` if (to) { url += '&to=' + to } const json = await getMediumResponse (url) if (!json) { return null } const followers = _.keys (json.payload .references .Social ) || [] const nextTo = _.get (json, 'payload.paging.next.to' ) return { followers, nextTo } }, getUserInfo : async (uid) => { const url = `https://medium.com/_/api/users/${uid} /profile/stream` const json = await getMediumResponse (url) if (!json) { return {} } const userId = _.get (json, 'payload.user.userId' ) const follower = _.get (json, `payload.references.SocialStats.${userId} .usersFollowedByCount` , 0 ) const posts = _.get (json, 'payload.references.Post' ) const name = _.get (json, 'payload.user.name' ) const bio = _.get (json, 'payload.user.bio' ) return { isMandarinUser : isMandarinUser (name, bio, posts), userId, name, username : _.get (json, 'payload.user.username' ), bio, followerCount : follower, mediumMemberAt : _.get (json, 'payload.user.mediumMemberAt' ), isWriterProgramEnrolled : _.get (json, 'payload.user.isWriterProgramEnrolled' ), createdAt : _.get (json, 'payload.user.createdAt' ), } } }
isMandarinUser 會根據三個參數來決定:暱稱、自介以及相關文章。相關文章可能是使用者最近發表過的或者是回覆過與拍手過的文章,會根據文章的標題以及副標題來做判定。
如果使用者沒有任何活動的話,就會跟之前一樣採用自介跟暱稱來判定,所以還是有誤判的可能,但實測過後誤判率已經滿低的了。
接著來看與資料庫相關的操作,db.js:
1
2
3
4
5
6
7
8
9
10
11
12
13
14
15
16
17
18
19
20
21
22
23
24
25
26
27
28
29
30
31
32
33
34
35
36
37
38
39
40
41
42
43
44
45
46
47
48
49
50
51
52
53
54
55
56
57
58
59
60
61
62
63
64
65
66
67
68
69
70
71
72
73
74
75
76
77
78
79
80
81
82
83
84
85
86
87
88
const mysql = require ('mysql' )const moment = require ('moment' ) function format (time ) { if (!time) return null return moment (time).format ('YYYY-MM-DD HH:mm:ss' ) } function transform (info ) { return [ info.userId , info.username , info.name , info.bio , info.followerCount , format (info.mediumMemberAt ), format (info.createdAt ), info.isWriterProgramEnrolled , null ] } class DB { constructor (config ) { this .conn = mysql.createPool (config) } getExistingUserIds ( return new Promise ((resolve, reject ) => { this .conn .query ('SELECT userId from Users' , (err, results ) => { if (err) { return reject (err) } return resolve (results.map (item =>userId )) }); }) } getUserIds (limit ) { return new Promise ((resolve, reject ) => { this .conn .query ('SELECT userId from Users where fr="TW" order by follower desc limit ' + limit, (err, results ) => { if (err) { return reject (err) } return resolve (results.map (item =>userId )) }); }) } deleteUserIds (userIds ) { return new Promise ((resolve, reject ) => { this .conn .query ('DELETE from Queues WHERE userId IN (?)' , [userIds], (err, results ) => { if (err) { return reject (err) } return resolve (userIds) }) }) } insertUserData (info ) { if (!info) return const data = Array .isArray (info) ? info.map (transform) : [transform (info)] this .conn .query (` INSERT INTO Users ( userId, username, name, bio, follower, mediumMemberAt, createdAt, isWriterProgramEnrolled, fr ) VALUES ?` , [data], (err ) => { if (err) { } } ) } insertIntoQueue (list ) { return new Promise ((resolve, reject ) => { const values = [] for (let item of list) { values.push ([item]) } this .conn .query (` INSERT IGNORE INTO Queues (userId) VALUES ?` , [values], (err ) => { if (err) { } resolve () } ) }) } } module .exports = DB
基本上就是把一大堆 SQL query 包裝成 Promise 以及 function,方便其他的 module 來使用。大部分的函式都能夠接收一個 array 來做批次操作,這樣會更有效率一點。
而且把這些東西包裝起來之後,queue 的程式碼就會變得非常單純:
1
2
3
4
5
6
7
8
9
10
11
12
13
14
15
16
17
class Queue { constructor (db ) { this .db = db } async get (limit ) { const items = await this .db .getUserIds (limit) await this .db .deleteUserIds (items) return items } async push (list ) { await this .db .insertIntoQueue (list) } } module .exports = Queue
最後來看一下我們的主程式 app.js,在重構之後程式碼變得乾淨很多,可讀性也提昇了不少:
1
2
3
4
5
6
7
8
9
10
11
12
13
14
15
16
17
18
19
20
21
22
23
24
25
26
27
28
29
30
31
32
33
34
35
36
37
38
39
40
41
42
43
44
45
46
47
48
49
50
51
52
53
54
55
56
57
58
59
60
61
62
63
64
65
66
67
68
69
70
71
72
73
74
const DB = require ('./db' )const Queue = require ('./queue' )const config = require ('./config' )const medium = require ('./medium' )const utils = require ('./utils' ) async function main ( const db = new DB (config.db ) const queue = new Queue (db) const existingUserIds = await db.getExistingUserIds () const userIdMap = {} for (let userId of existingUserIds) { userIdMap[userId] = true } utils.log ('Existing userId:' , existingUserIds.length ) while (true ) { const userIds = await queue.get (1 ) if (userIds.length === 0 ) { utils.log ('Done' ) break } const userId = userIds[0 ] if (userIdMap[userId]) { continue } userIdMap[userId] = true utils.log ('userId:' , userId) try { const userInfo = await medium.getUserInfo (userId) if (!userInfo.userId ) { utils.log ('getUerrInfo error, sleep for' , config.delayWhenError ) await utils.sleep (config.delayWhenError ) } if (!userInfo.isMandarinUser ) { utils.log (userId, 'not MandarinUser' ) continue } db.insertUserData (userInfo) if (userInfo.followerCount > 0 ) { let to = undefined let count = 0 while (true ) { const data = await medium.getFollowers (userInfo.userId , to) if (!data) { break } const { nextTo, followers } = data to = nextTo count += followers.length utils.log (userInfo.userId , 'fetching' , count, 'followers' ) await queue.push (followers.filter (uid => if (followers.length === 0 || !to) { break } } } } catch (err) { utils.log ('sleep for' , config.delayWhenError ) utils.log (err) await utils.sleep (config.delayWhenError ) } } process.exit () } main ()
這邊有個機制與之前不一樣,之前是每次從 queue 拿一個 userId 出來就去資料庫確認一下是否爬過,但是這樣太沒有效率。在這個版本改成程式執行時就直接從資料庫裡面把所有資料拿出來,並且變成一個 map,如果有值的話就代表已經抓取過,反之亦然。
重構過的程式碼把 module 切開之後看起來順眼很多,而且要改什麼都很容易,沒有重構過的話我還真不敢 open source 出去…
這邊是重構完的程式碼:https://github.com/aszx87410/medium-user-crawler
總結 在寫爬蟲的過程中也是踩了滿多坑的,其中最麻煩的就是語言判斷那一塊,當初沒有想到日文漢字這個 case 要判斷,花了不少時間。偷懶也花了很多時間,原本偷懶不想用更精確的方法來做判定,沒想到最後還是得用,中間浪費了不少時間。
這爬蟲還有滿多地方可以改進的,例如說執行速度的部分,或者是判定語言的部分,目前是我把資料撈出來之後手動標是香港、台灣還是中國,但或許可以寫一些小程式來自動判定,例如說簡體就是中國,有出現一些粵語的字就是香港,反之則是台灣等等,雖然不一定準確,但至少用程式來輔助會方便很多。
這篇主要是分享一下我寫這個爬蟲的歷程,其實只要資料來源能確定抓得到,其他都不是什麼大問題。再加上這個爬蟲沒有很完整(例如說沒有 retry 機制),所以花個一兩天就能夠實作完成了。
希望這篇有吸引到大家,也很希望大家能試試看自己爬資料,做出有趣的數據分析!
關於作者:@huli 野生工程師,相信分享與交流能讓世界變得更美好
喜歡我們的文章嗎?歡迎分享按讚給予我們支持和鼓勵!
留言討論