一起來了解 Web Authentication
前言
在今年年初的時候,W3C 正式將 Web Authentication (WebAuthn) 列入正式標準,開發者可以透過 API 啟動 FIDO 2 驗證,讓使用者透過行動裝置、指紋辨識或硬體安全金鑰來登入帳號,不需輸入密碼!
雖然目前支援度還不高,但既然已成為標準,沒理由不來認識一下何謂 Web Authentication,以及我們可以如何使用。今天就一起來了解我們能如何使用 Web Authentication,增加網站安全性,並免除密碼帶給我們的諸多麻煩。
先回憶一下我們平常的註冊登入方式
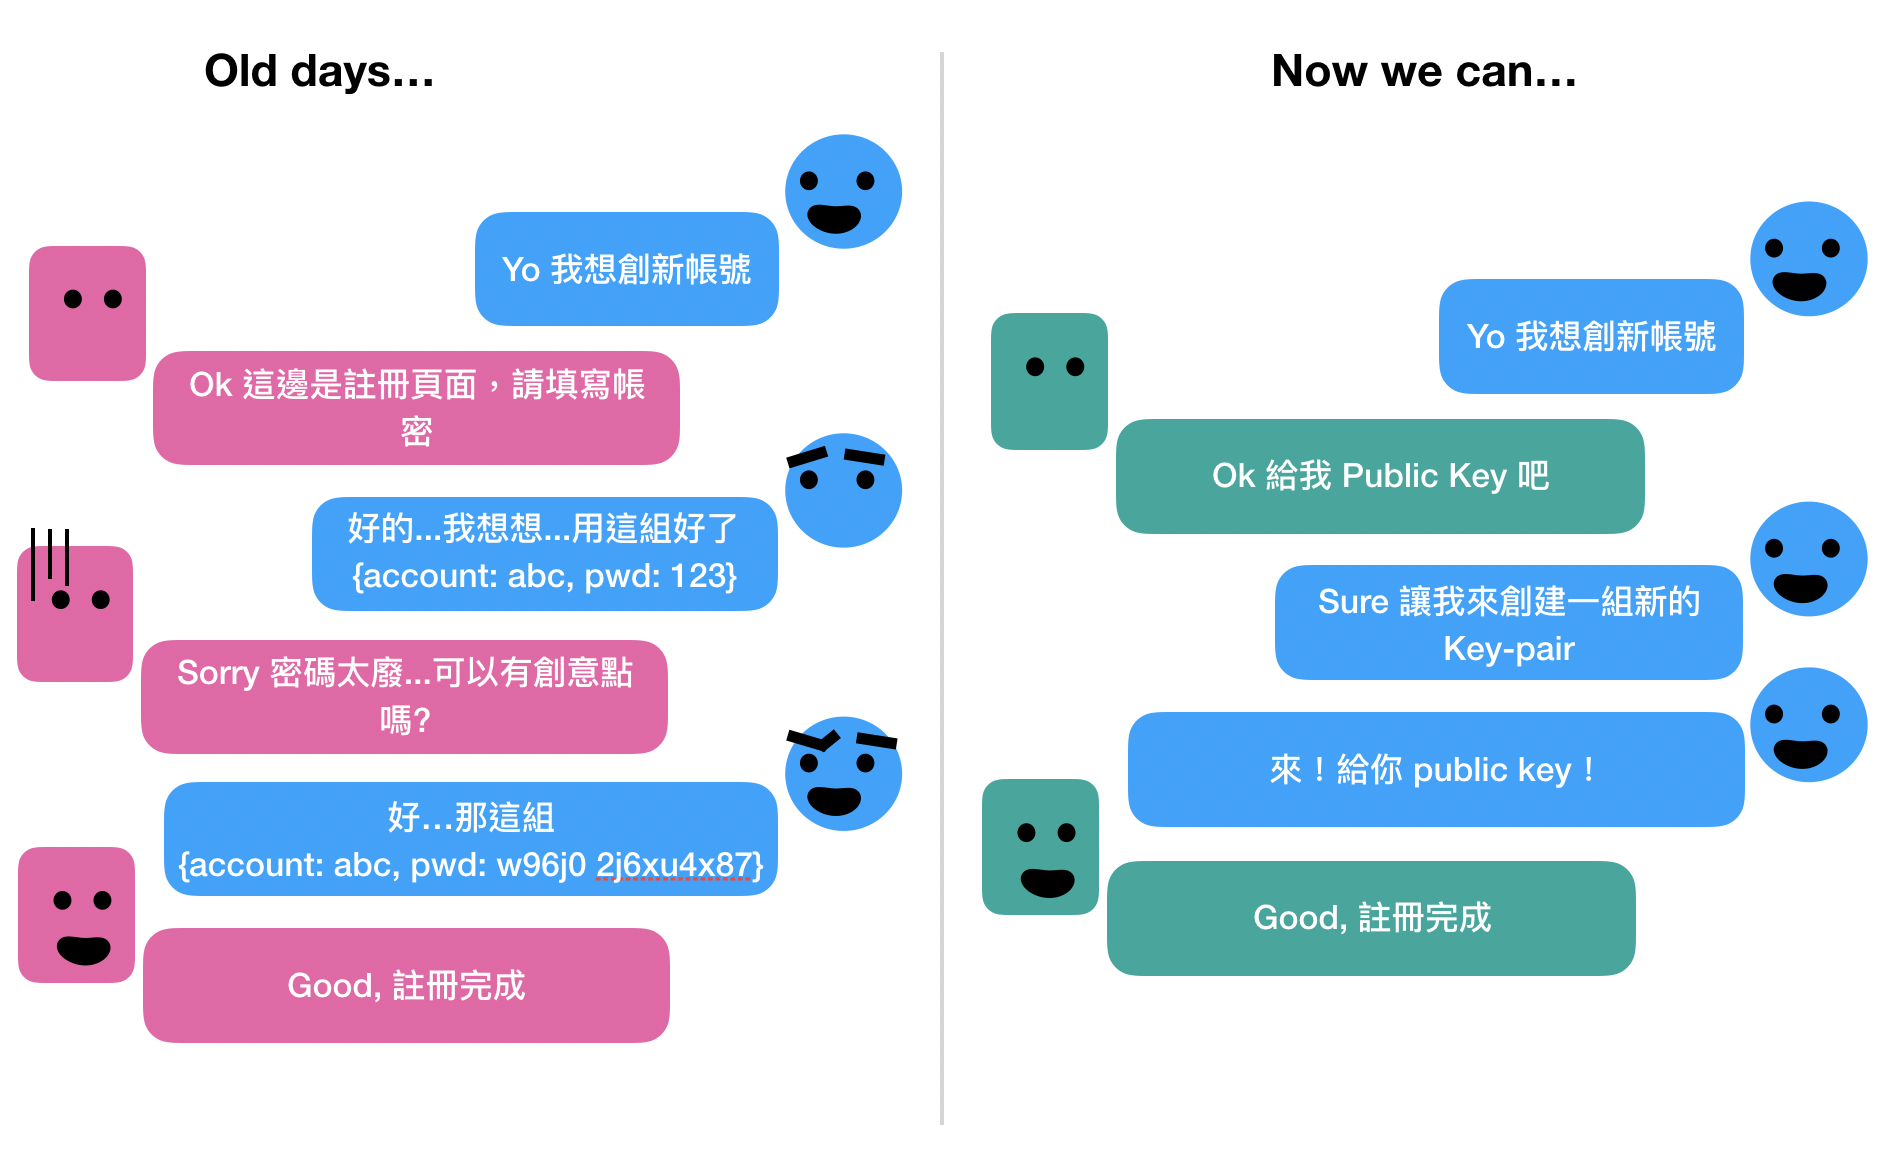
不管是手機 application 或是網站,只要是需要登入操作的,勢必都會提供一個頁面讓你註冊帳號與密碼,接著你才能拿著這組帳密登入進行使用。這是我們習以為常的使用方式,但隨之而來的問題大家也是見怪不怪:
- 每個網站都要想一組新密碼,若用太固定的 pattern 又容易被猜到。
- 太複雜的密碼容易忘記。
- 自己要防範釣魚網站。
- 需要擔心該網站被入侵,密碼遭偷竊。
而大約有三成左右危機意識較高的使用者會啟用 2FA (2 factor authentication),但這何嘗不是為使用上帶來更多不便?
因此 WebAuthn 就是希望來解決這些問題,為我們使用者提供一個除了密碼登入以外的選項。
再來說明一下基本觀念
聽到所謂免密碼登入,應該很容易聯想到我們透過 SSH 連進遠端 Server 時,大多也會設定免密碼登入,透過的是 Public-key cryptography 或又稱 asymmetric cryptography,也就是利用產生一組非對稱的加密金鑰:private key 與 public key,又可稱作 credential,讓使用者自己保管 private key,而服務端利用 public key 來驗證使用者的身份。
WebAuthn 也是利用相同的加密原理來達成免密碼的 Authentication。
進入 API 細節前,我們科普一下,Web Authentication 與 FIDO
其實很多人會誤解,以為 WebAuthn 指的就是上述利用非對稱加密來達到 authentication 的技術,但實際上,真正規範這項技術的是 FIDO2,FIDO2 是 FIDO Alliance 的最新規範,裡面包含了一系列技術,讓使用者能透過一些普通的設備,輕易的與線上服務進行 authentication,無論是 Mobile 或是 Desktop。
FIDO2 規範包含了 WebAuthn 與 Client-to-Authenticator Protocol (CTAP)
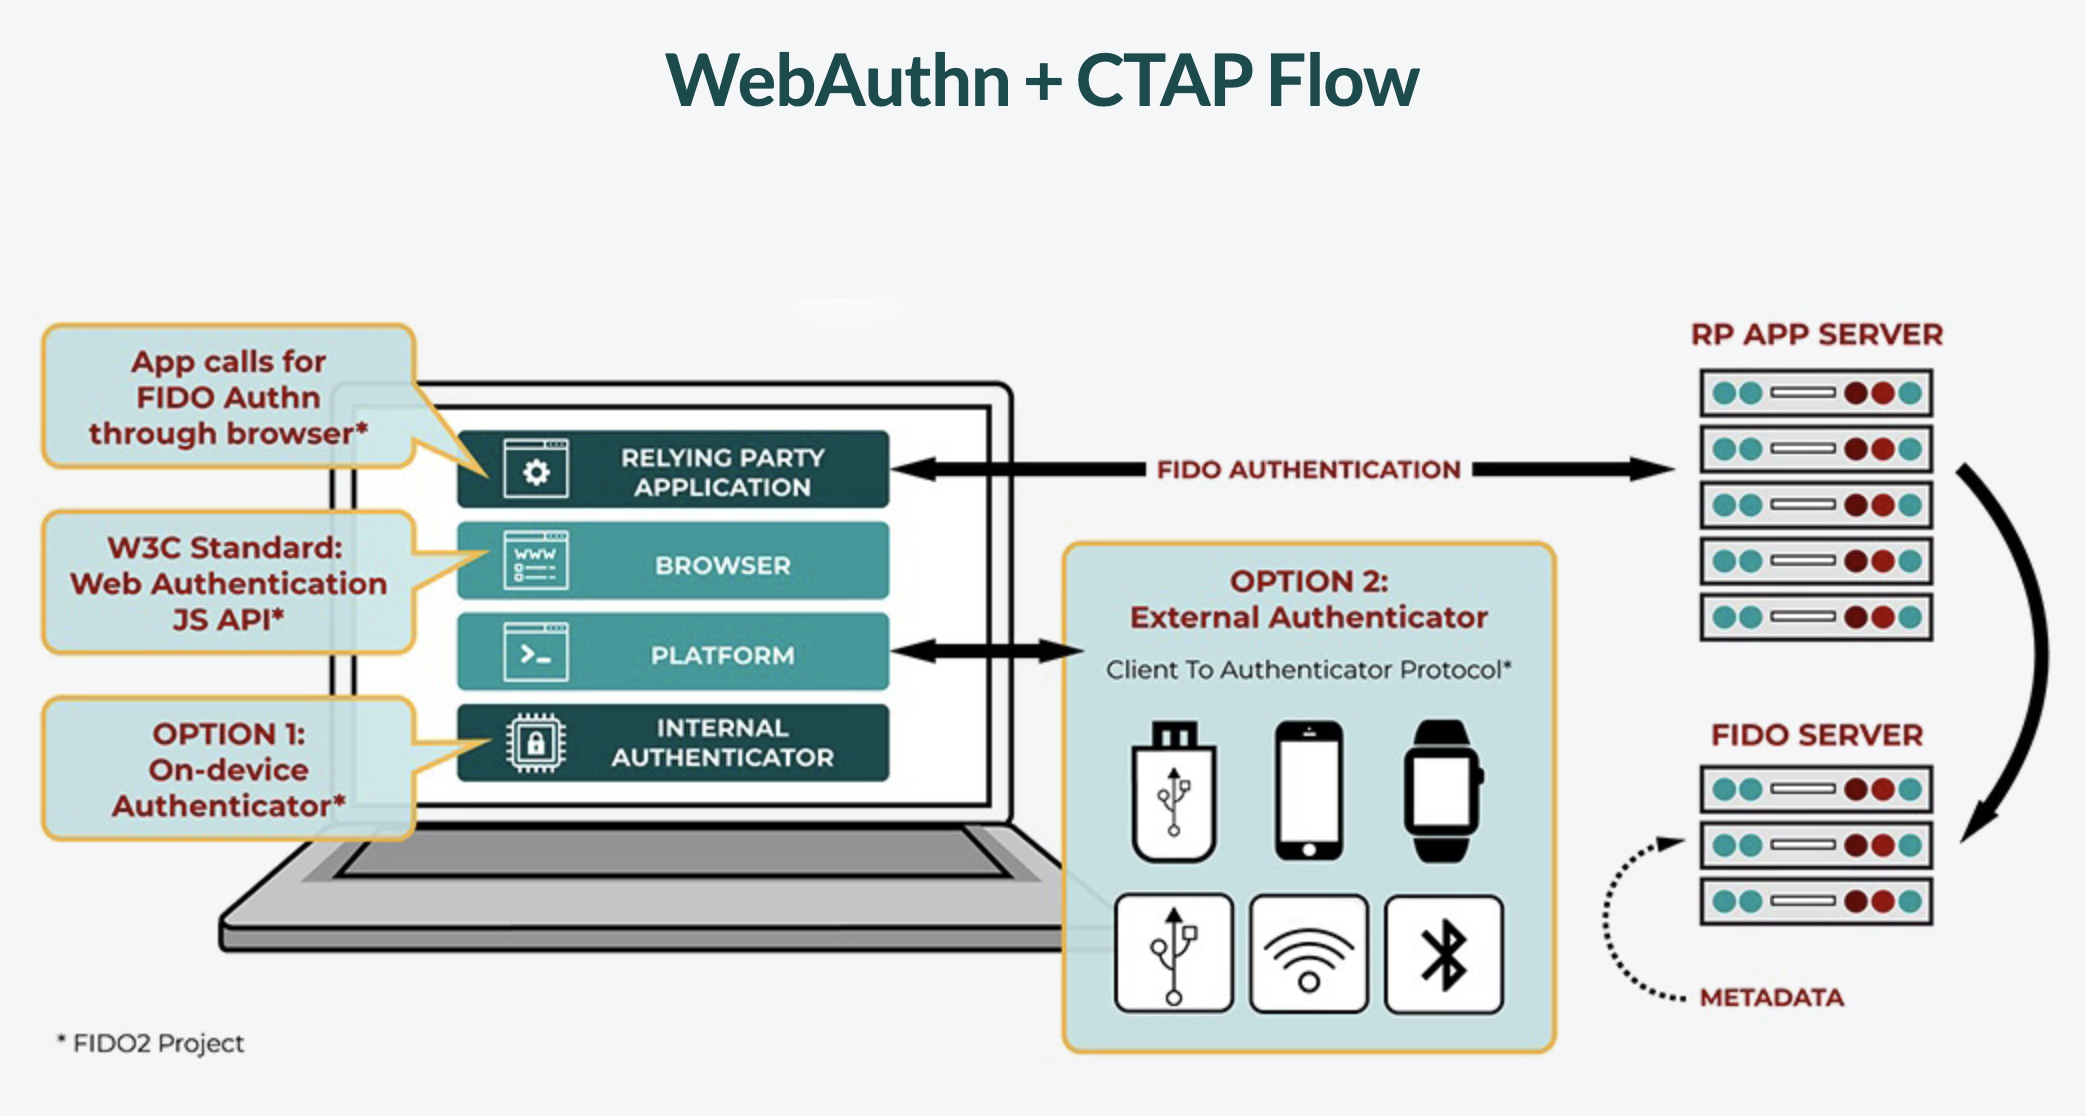
ref: fidoalliance.org
也就是說,WebAuthn 其實是 FIDO2 的一部分,用來規範標準的 Web API 讓瀏覽器實作。
目前支援的瀏覽器有 Chrome, Firefox, Edge 與 Safari preview 版。另外也可以再多參考 Duo 的文章。
我們稍微解釋一下上圖:
當使用者像應用程序要求註冊或登入時,使用 FIDO2 的服務端 (RP App Server) 會告知瀏覽器說,我們現在要用 FIDO Authentication,而瀏覽器則會使用 WebAuthn API,透過 CTAP protocol 來與 Authenticator 溝通,存取到需要的資訊並產生 public key 傳回給服務端。
這邊出現兩個新名詞:RP app server 與 Authenticator。
所謂的 RP (Relying Party),描寫的就是負責註冊與認證使用者的組織或是服務,基本上我覺得就是你的伺服器。
而 Authenticator 就是負責產生 credential 的軟硬體,例如:TouchID, YubiKey 等等。TouchID 這種存在於設備內部的,屬於 “platform” type,而 Yubikey 這類外部硬體設施則屬於 “cross-platform” type。
Web Authentication 的主要特性:
強健的安全體系:Authentication 有安全性硬體作為支援,來儲存私鑰與進行 Web Authentication 需要的加密運算。
效用受到作用域規範:產生的 Credential keypair 是綁定在 origin 上的,意思是說,註冊在 “techbridge.com” 的 keypair 是不能用在 “bad-techbridge.com” 的網域上頭,消除了釣魚攻擊的危險。
受認證的(Attested):上面提到負責產生 credential 的 Authenticators 可以提供 certificate 來幫助服務端驗證拿到的 public key 是由可信任的 authenticators 發出,而非有害的來源。
Web Authentication API - Registering
接著我們可以開始來看看如何使用 Web Authentication API 來註冊使用者 (參考至 Duo 的 webauthn.guide:
navigator.credentials.create()
首先,Server 利用 navigator.credentials.create() 來產生 client 的 credential
1 | const credential = await navigator.credentials.create({ |
publicKeyCredentialCreationOptions 中有一堆 required 與 optional 的欄位需要填寫:
1 | // should generate from server |
challenge:challenge 是由 server 產生的一個 buffer,裡面含有一串隨機加密過的 bytes,用來防止 “replay attacks”。這邊單純 demo,用 Unit8Array 與 window.crypto.getRandomValues 做個示範。
rp:先前解釋過,代表 “relying party”,指的就是註冊與認證使用者的網站。其中,id 一定要是目前網站的 domain 的 subset,像是如果是從 techbridge.cc 觸發 WebAuthn 認證,那這邊的 id 就得填寫 techbridge.cc。
user:就是目前想要註冊的使用者的資訊,這邊的 id 很重要,authenticator 會用這個 id 來與 credential 做連結,這樣之後才能透過一樣的 id 與一樣的 autenticator 去認證你是同個 user。而這資訊可能會被存在 authenticator 中,依據不同載具與實作會有不同,但是因為有這可能性存在,所以一般不建議 id 內藏有可以認出你本身的相關個人資訊,像是生日等等的。
pubKeyCredParams:這個 array 用來描述 Server 支援哪些 types 的 public key (signing algorithms) 。目前 FIDO2 servers 授權支援 RS1、RS256 與 ES256。 alg 的數字對應可以從 COSE 去找。
authenticatorSelection (optional):可以用來限制 Relying parties 支援的 authenticators 種類,像這邊我指定 platform,就是 Touch ID 之類內建的 authenticators。
timeout (optional):以 milliseconds 為單位,表示說如果使用者在這段 timeout 時間內沒有回應 prompt 的話,就會回傳認證失敗。
attestation (optional):attestation data 是從 authenticator 回傳的內容,server 可以用這個選項來決定要跟 authenticators 拿多少資訊,有三種選項:none、indirect 與 direct。none 指的是 server 不在意 attestation 資料;indirect 表示願意只拿匿名的 attestation 資料;而 direct 代表要求 authenticator 回傳所有 attestation data。
看了一些程式碼,來嘗試一下吧
現在打開瀏覽器的 console,把上面那段 code 複製上去,然後你會發現什麼事都沒發生?!
因為上面那段 code 當中,我們在 rp 中的 id 有指定 techbridge.inc,而這並非你目前所在的 domain,因此無法啟用 WebAuthn。
修改一下,將 rp 中的 id 移除,再試一次:
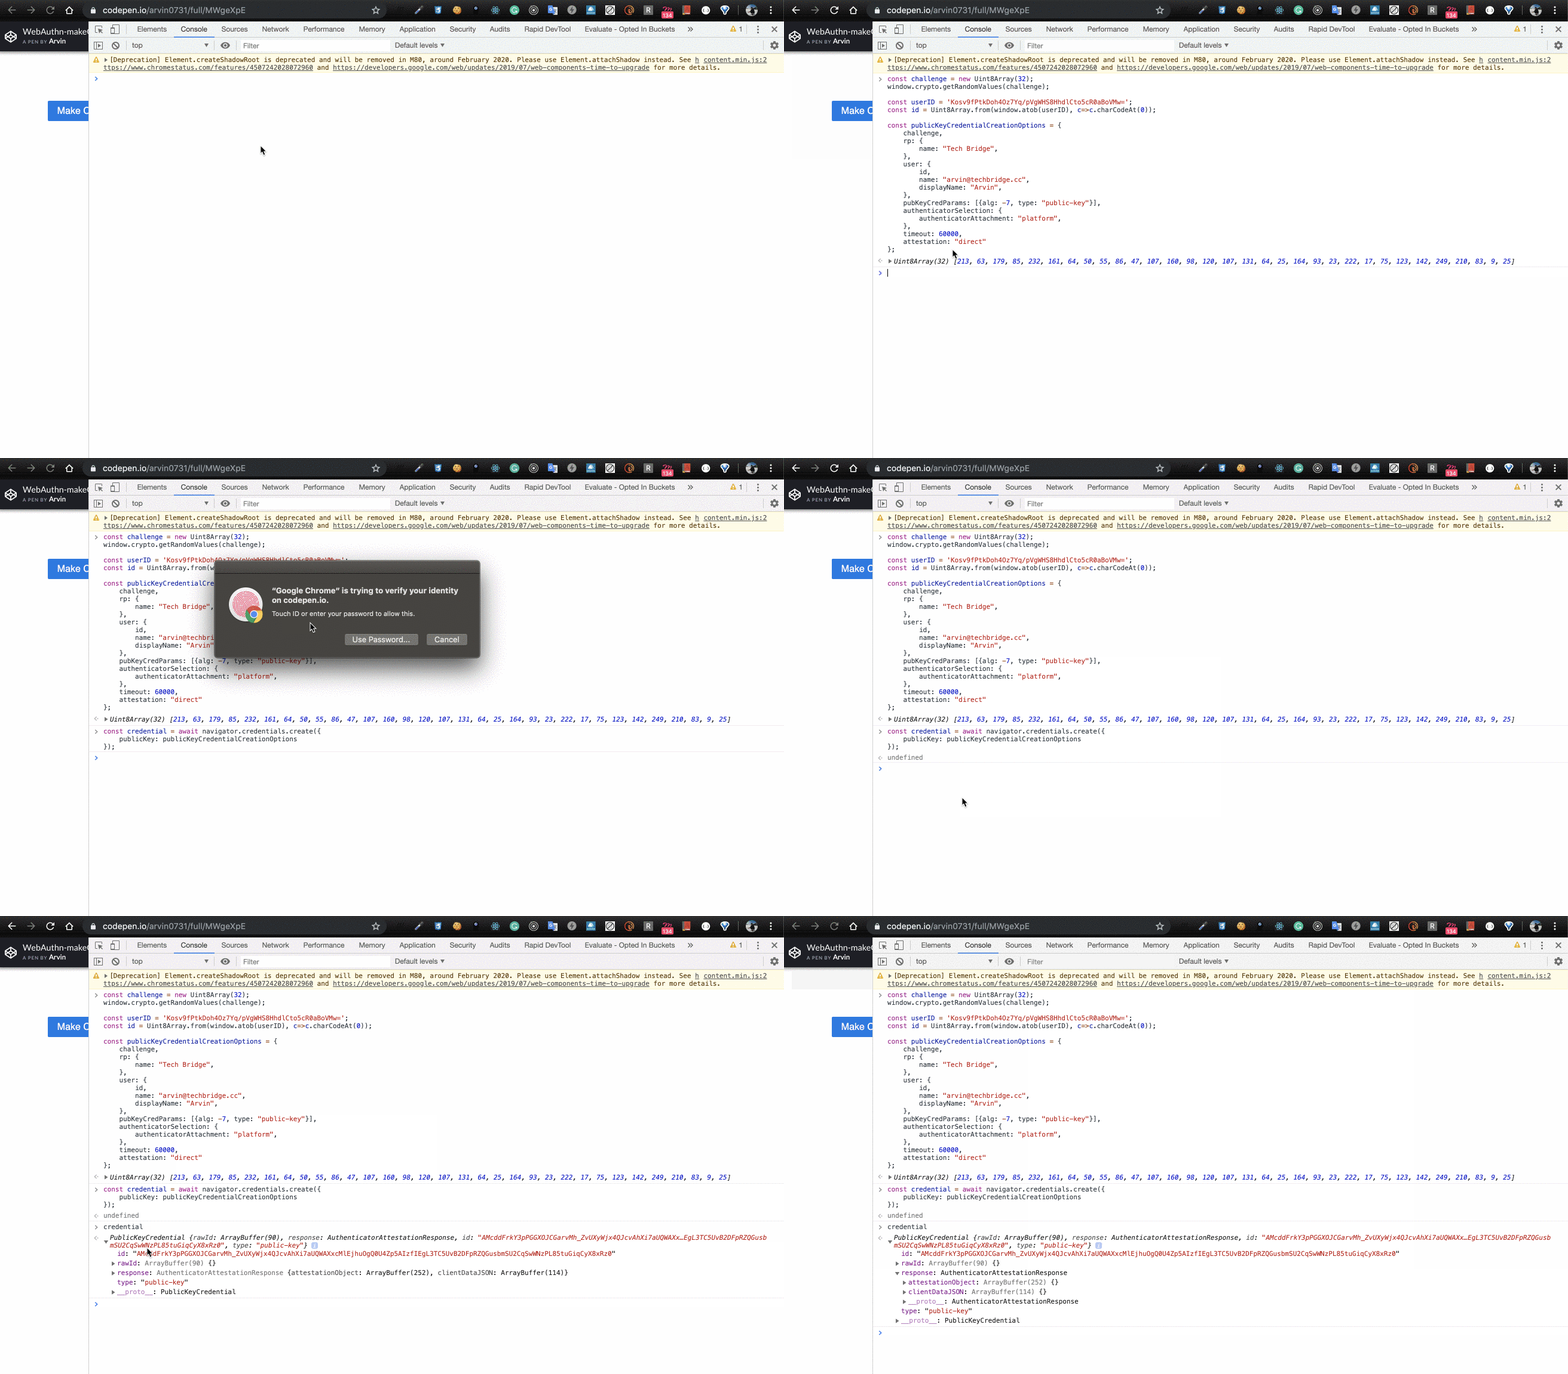
就可以 credentials 了!
另外,因為我們在 authenticatorSelection.authenticatorAttachment 中有指定 platform,所以當我們一請求 credential 後,Chrome 會直接跳出 prompt 要求使用 TouchID(上面出現 codepen.io 是因為我在 codepen.io 的頁面 console 測試:
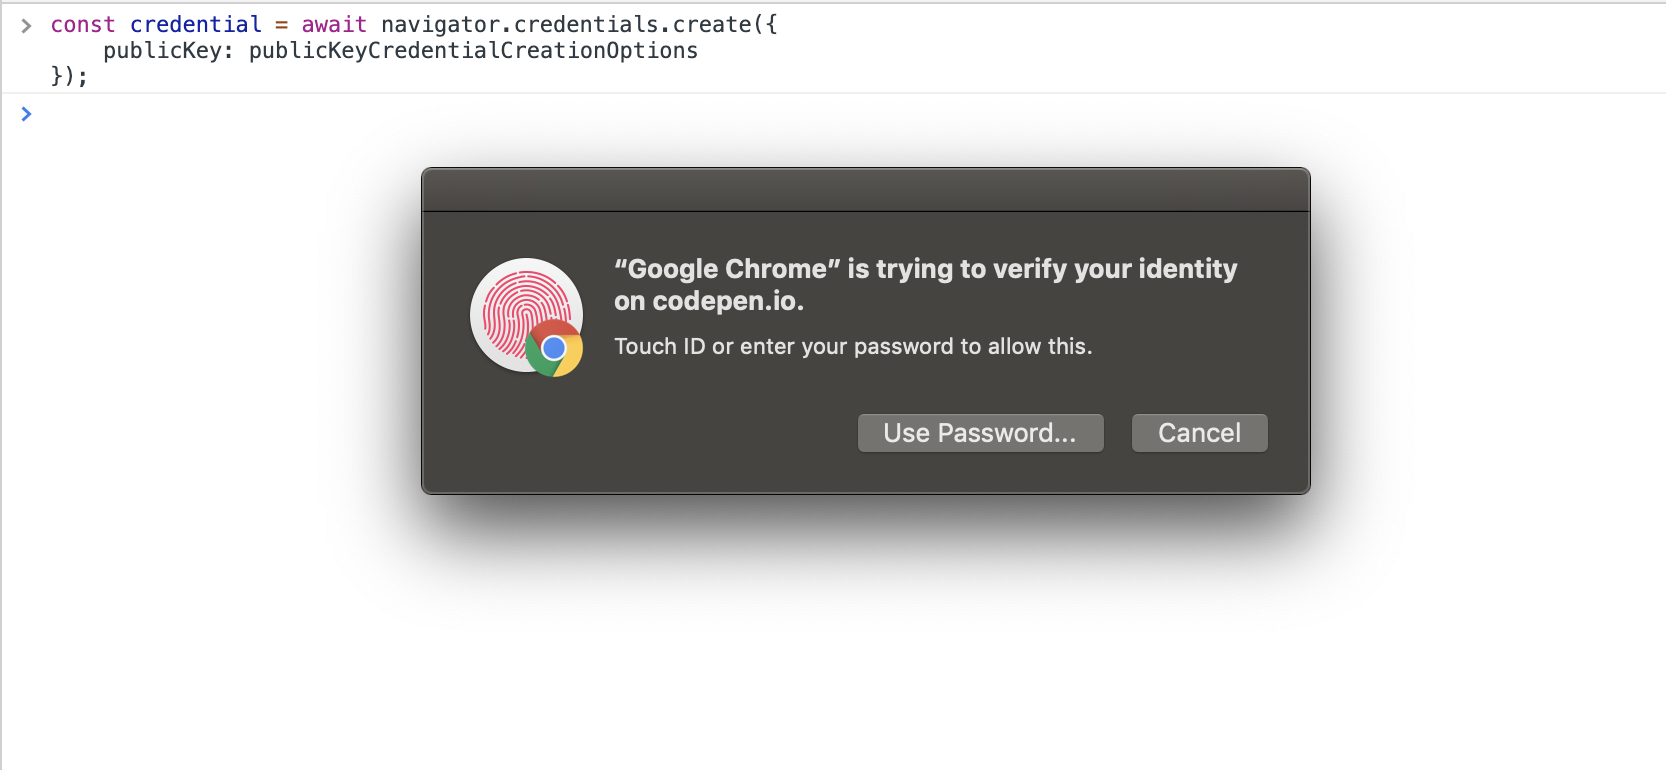
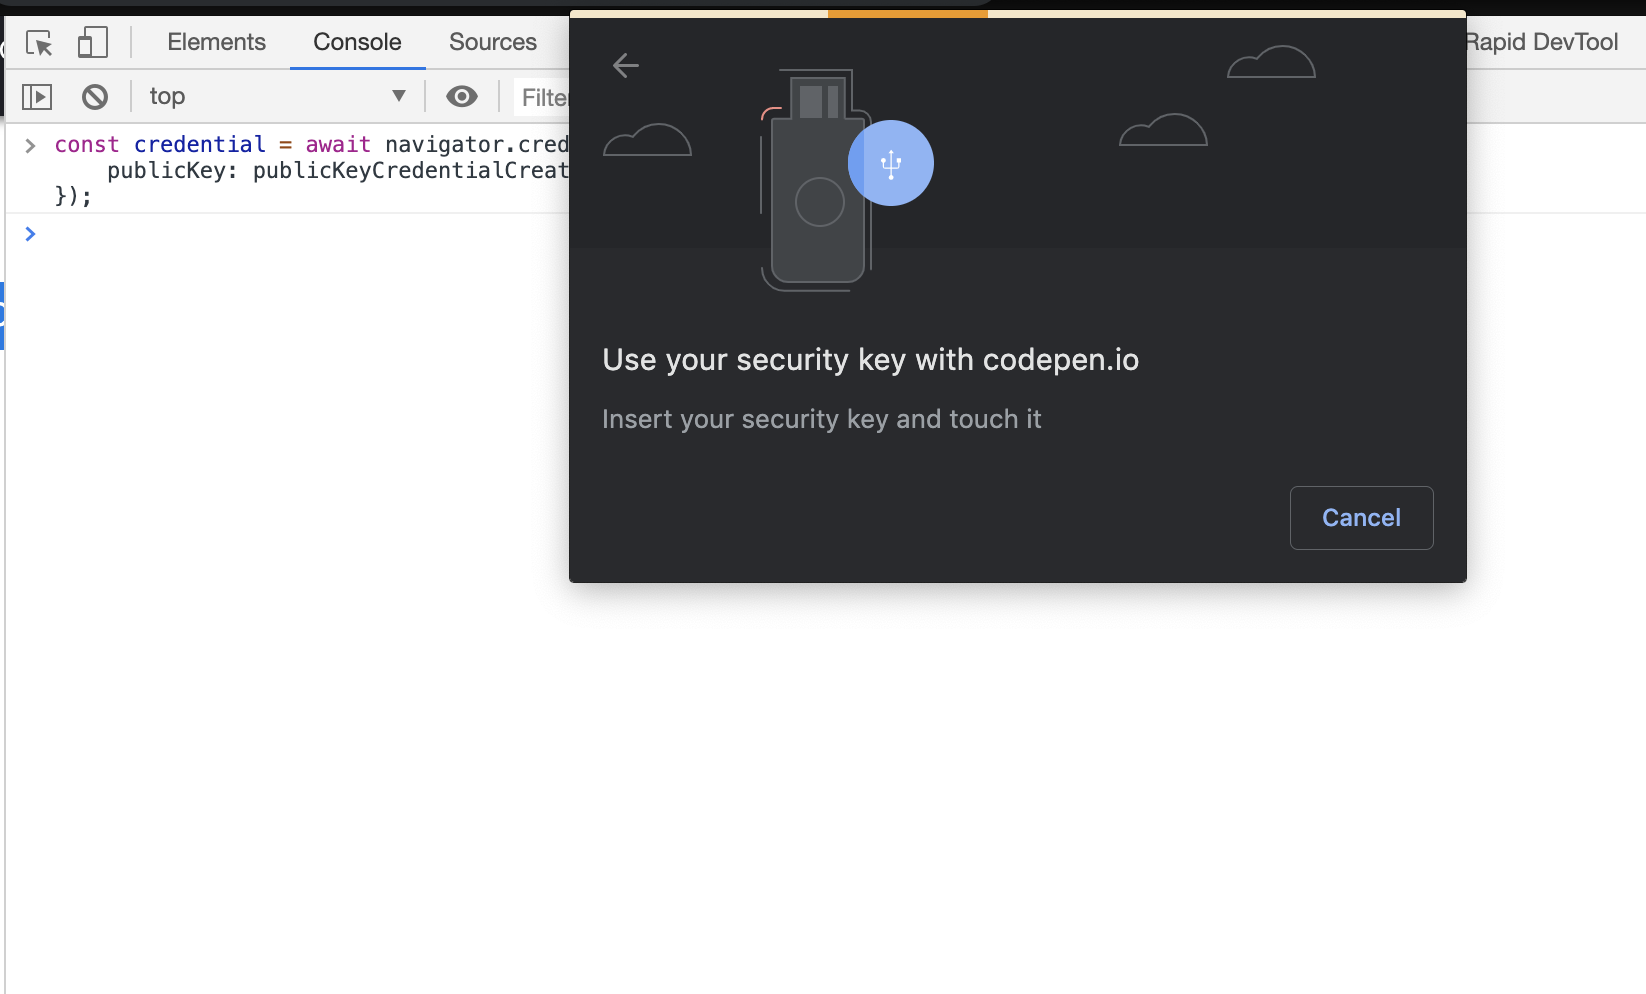
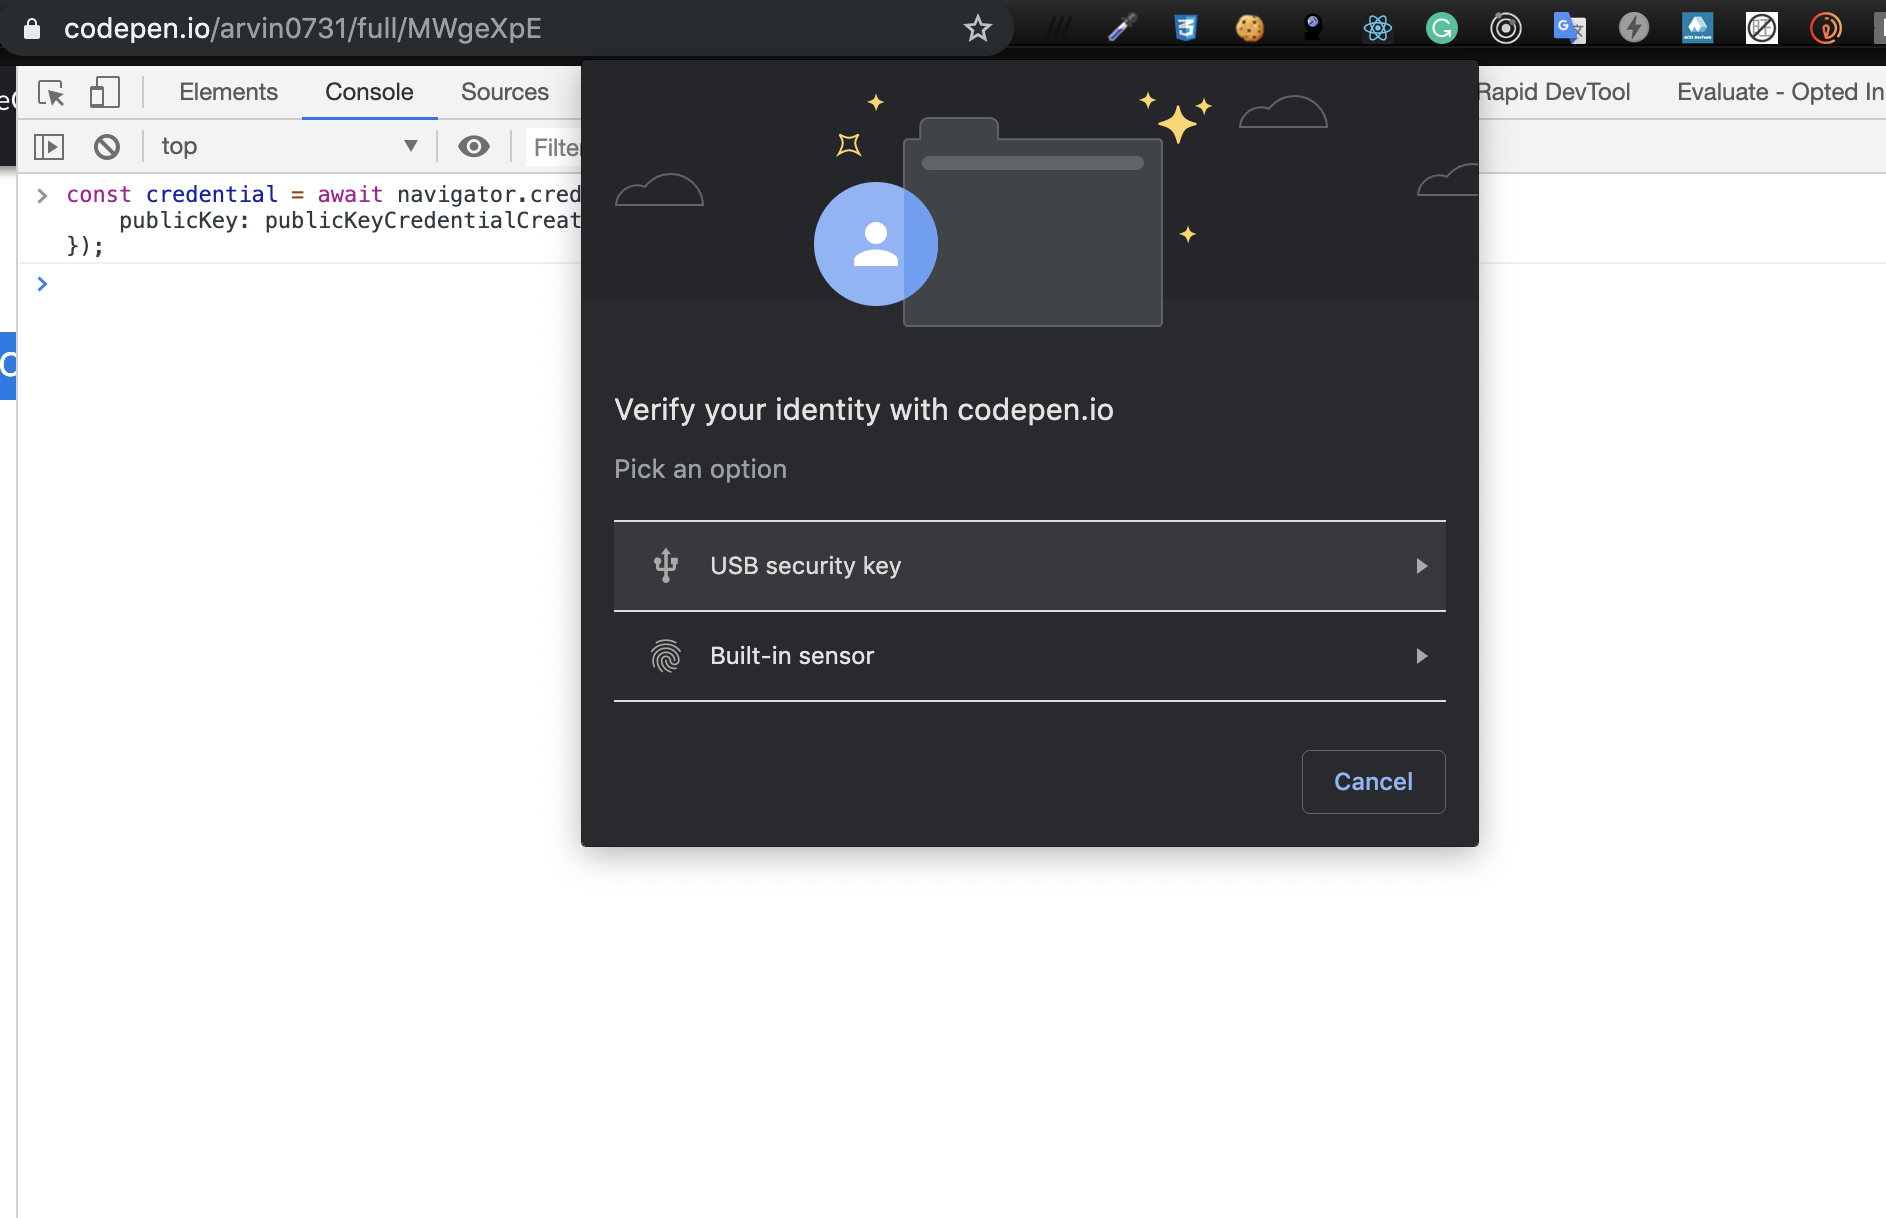
但如果今天你沒有指定,或是指定為 cross-platform,則會顯示如下兩種 prompt:
cross-platform:
會要求你插入實體 usb key。
不指定:
你有兩種選項可以選擇,使用 TouchID 或是實體 usb key。
Parsing 與 Validating 註冊資料
從剛剛的範例可以看到,呼叫 navigator.credentials.create 後會回傳一個 credential 物件:
1 | console.log(credential); |
其中:
id:代表產生的 credential,在對 user 進行 authentication 時,用此 id 來 identify user credential,是 base64-encoded string。
rawId:同上,只是是 binary form。
response.clientDataJSON:是瀏覽器產生的一組資料,包含 origin、challenge 等等,這個資料重要在於可以用來防止 phishing attemp。此外,內容是由 authenticator 加密過的。
response.attestationObject:包含了 credential public key、optional attestation certificate 與其他 metadata,用 CBOR encoded 過的 binary data。
拿到 PublicKeyCredential 後,就可以送到 Server 端去進行驗證與後續動作。
WebAuthn 規範中有描述了一系列驗證 registration data 的程序,而實作部分則與你用什麼語言有所不同,可以參考 Duo Labs 的 Go 與 Python 版本。
這邊以 JavaScript 為例說明:
首先,Server 端需要先解析 clientDataJSON:
1 | // decode the clientDataJSON into a utf-8 string |
這邊我們拿出 challenge、origin 與 type 來驗證,challenge 應該要與當初 Server 產生的一致、origin 要正確,且 type 要確定為 create,才能代表是在註冊使用者。如此來避免釣魚與 replay attacks。
接著,處理 attestationObject,由於是由 CBOR encode,所以需要額外找 lib 來 decode:
1 | // 需要找個 CBOR lib 來 decode |
解碼出來後的 attestationObject 含有幾項資訊:
authData:authData 這個 byte array 包含著所有 registration event 的 metadata,以及 public key。
fmt:這個是包含著 attestation 的 format,如果你在 create credentials 時有要求 Authenticators 提供 attestation data,那 server 可以從這個欄位知道該如何 parse 與 validate attestation data。
attStmt:這就是要求來的 attestation data,根據 fmt 的不同會有不同的結構,以這邊範例為例,我們拿到的是一個 signature 與 x5c certificate,servers 可以用這資料來驗證 publickey 是不是來自預期的 authenticator,或是根據 authenticator 的資訊而 reject authenticate (像是覺得不能信任該 certifacate,等等)
最後可以從 authData 中取得更多資料:credentialId、publicKeyBytes、publicKeyObject 等等:
1 | const {authData} = decodedAttestationObject; |
整個 Validation process 完成後,Server 就能將 publicKeyBytes 與 credentialId 存進資料庫,與使用者關聯起來。
到這邊為止,我們走完了 Registering 的流程。而剛剛都是直接在 console 貼入程式碼,如果想看稍微”真實“一點的範例,可以到 https://herrjemand.github.io/FIDO2WebAuthnSeries/WebAuthnIntro/makeCredExample.html 這個網址玩玩看,點選 button 註冊的流程。

接著,再努力一下,看看 Authenticating,也就是登入時要走的步驟吧!
Web Authentication API - Authenticating
Authenticated 的過程中,使用者會用其持有的 private key 簽上一個 signature 到 assertion 上頭,並傳給 server,server 則利用 public key 來驗證該 signature。
navigator.credentials.get()
Authentication 的過程在於使用者要證明他們擁有註冊時所提交的 key pair 中的 private key。證明方法為利用 navigator.credentials.get() 取得註冊時的 credential,並附上 signature。
1 | const credential = await navigator.credentials.get({ |
1 | const challenge = new Uint8Array(32); |
跟註冊時比較不同的是 allowCredentials,這欄位是 Servers 端想要瀏覽器提供的 credentials 資訊,用來認證使用者,其中 id 為註冊時獲取的 credentialId。此外也能指定要用哪種方式傳輸 credentials (usb、bluetooth 或 NFC)。你可以填入多個 credentialId,authenticator 會找出他認識的來使用。
navigator.credentials.get 取得的 assertion 也是一個 PublicKeyCredential object,跟註冊時的差別在於,這次我們拿到的多了 signature,少了 public key。
1 | console.log(assertion); |
基本結構都差不多,多出來的 signature 是由 private key 與此 credential 所產生,在 server 端可以用 public key 來驗證此 signature。
userHandle 則是 authenticator 提供的使用者 id,也是註冊時使用的那組。在 Server 端可以用來關聯使用者。
Parsing 與 Validating 登入資料
拿到 assertion 後,可以送往 server 進行驗證,server 會用註冊時的 public key 來驗證 signature。
一樣,Server 端實作有各種語言版本:Go 與 Python,等等。
這邊簡單舉例:
首先,從資料庫中取得 credential。接著利用 public key 和 client 傳來的 signature 與 authenticator data 和 SHA-256 hash 過的 cliendDataJSON 做驗證。
1 | const storedCredential = await getCredentialFromDatabase(userHandle, credentialId); |
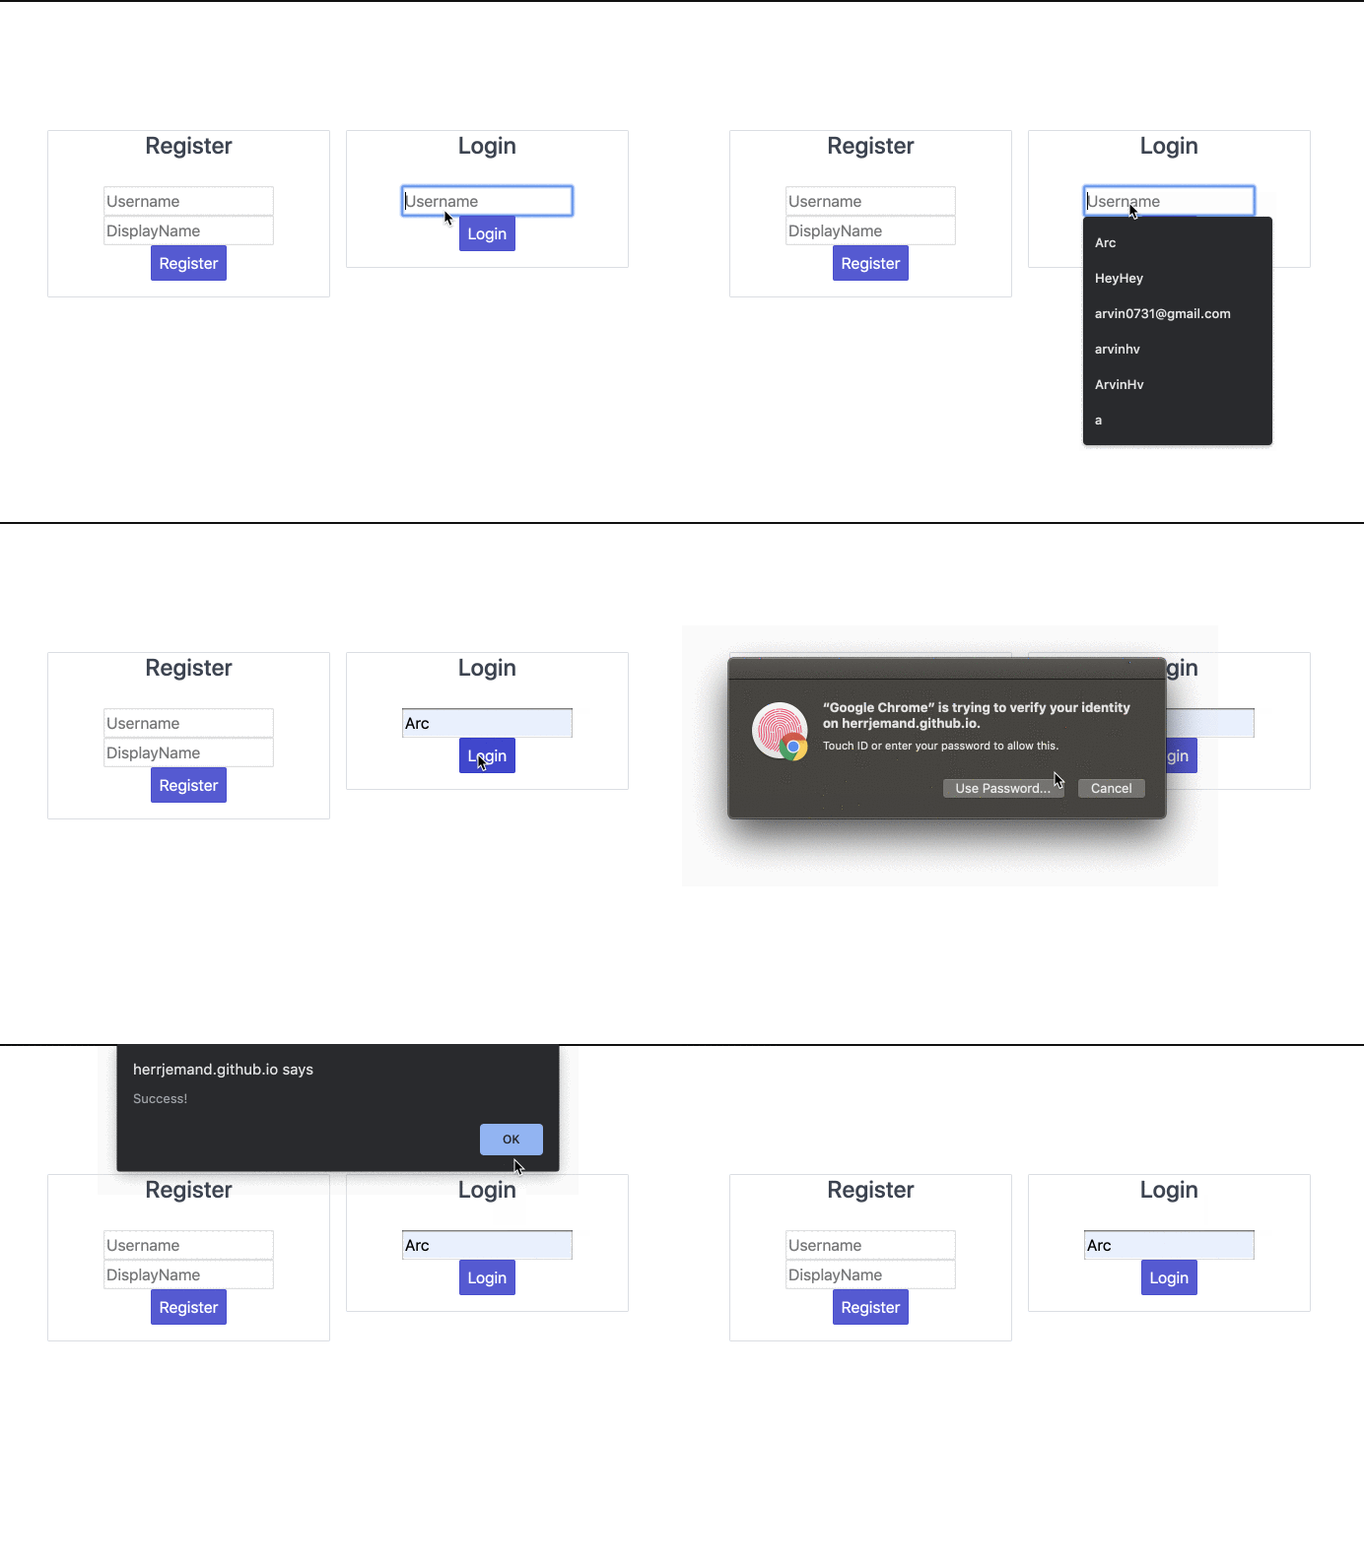
這樣我們就把一段無密碼登入的註冊與登入流程都走完了!一樣,可以到 https://herrjemand.github.io/FIDO2WebAuthnSeries/WebAuthnIntro/PasswordlessExample.html 來玩玩看實際一點的範例。
結論與更多資源
今天花了點時間把 Web Authentication 的概念與大致的實作方式瞭解了一番,雖然才剛成為標準,離全部瀏覽器都支援還需要一點時間,但最新版的瀏覽器幾乎都已支援(至少桌機版),想必不久的未來,passwordless 的登入會是一種趨勢。
這邊再多提供幾個網站資源供大家參考,裡面有更為豐富的範例程式,以及詳細的 API 與情境解說:
Duo blog - Duo 是 Cisco 旗下的公司,主要發展與 Authentication 與 security 相關的產品,也因此針對 web authentication 有不少的文章教學與介紹。
FIDO2WebAuthnSeries - 這是我在找資料過程中發現的範例 github,裡面有多種情境的 source code 與 demo,推薦大家去玩玩看,看看程式碼,想必會更加了解。作者也有在 Medium 上寫了一篇長文介紹,更詳細的說明各種情境的 Web authentication 應用會是如何的流程,而我們的程式碼又該如何修改。如果覺得這篇文章內的範例與說明不夠清楚,可以到他的 medium 看看。
資料來源
- webauthn.guide
- Introduction to WebAuthn API
- FIDO2WebAuthnSeries
- webauthn.io
- Web Authentication API - MDN
關於作者:
@arvinh 前端攻城獅,熱愛數據分析和資訊視覺化

留言討論